Credit card fees are costly. Enter Surcharging. Surcharging represents a growing trend in the payment industry, allowing you to pass your credit card fees on to your customers. Chargent has partnered with InterPayments, a leader in the surcharging space, to help you take control of your credit card fees and improve your Salesforce payment process. In Chargent, surcharging is a set-and-forget feature that automatically calculates and incorporates credit card surcharge fees into your Salesforce transactions, allowing your business to recover credit card fees and strengthen your cash flow.
Keep reading to learn more about implementing surcharging in Chargent.
Understanding Surcharging #
When businesses accept credit cards as payment, the credit card company charges a fee to process that payment. Surcharging involves passing some or all of a credit card fee to the cardholder. It’s important to note that surcharging is not legally synonymous with convenience fees, service fees, or cash discounts. Learn more from the surcharging experts at InterPayments by visiting Surcharging 101.
Getting to Know InterPayments
InterPayments is a leading independent surcharge service provider, empowering merchants to reduce processing fees while guaranteeing compliance with full indemnification. Surcharging is highly regulated, and it is essential to avoid any mistakes that potentially lead to hefty fines. That’s where InterPayments lends a helping hand. InterPayments automates the complexity of surcharging compliance while indemnifying you against possible errors.
Benefits of Surcharging
Enabling surcharging capabilities frees you to focus on strengthening your cash flow and growth. Chargent and InterPayments ensure your surcharges are automatically calculated and inserted into your existing payment process with minimal maintenance. Further, you will bolster your customers’ trust through transparency and a smooth, intuitive payment experience.
If you’d like to learn more about the benefits of Surcharging, check out Chargent Surcharging.
Gateways Supported
Surcharging is currently supported for the following gateways:
- Authorize.net
- BlueSnap
- Braintree
- Cybersource
- Network Merchants Incorporated (NMI)
If your gateway isn’t listed above, don’t worry! We will be adding additional gateway support at a later date. Please reach out to our Sales Team if your gateway isn’t listed above, as we are always listening to our customers’ needs.
Features Supported
Surcharging adds an additional step in the payment process, which calculates a surcharge fee. When surcharging is activated, it is enabled for the following features:
- Payment Console
- Payment Request
- Take Payment for Communities
Prerequisites #
Before enabling and configuring Surcharging, ensure you’ve completed the following prerequisites:
- Install or update Chargent to the latest version (v7.80 or higher). Visit Installing and Updating Chargent for more information.
- To see what version of Chargent you are using, see What version of Chargent am I on?
- Review the Gateway Guide for your preferred gateway:
- Configure Chargent using the Quick Start Guide.
- Ensure Payment Methods is enabled in your org.
- Payment Methods ensures that you have the data required to correctly calculate a surcharge for tokenized payments. Please note that this action is irreversible but recommended for all customers.
- A team member at Chargent must enable a feature parameter to unlock surcharging for your org.
- Please contact our support team to enable surcharging.
Setting Up Your InterPayments Portal #
Your InterPayments Portal account is your hub for all surcharges calculated through InterPayments. The following instructions will guide you through creating your account and locating your credentials.
Creating Your InterPayments Account
Before enabling Surcharging in your org, you’ll need an invitation to your InterPayments Portal account. The invitation is accessed via email and requires a 2-factor authentication method of your choice. InterPayments will work with you to determine your surcharge fees and ensure compliance is met. Contact InterPayments to get started.
You will require separate accounts for test and production environments. Log in using one of the links below:
- Test: https://portal-test.interpayments.com/
- Production: https://portal.interpayments.com/
Once logged in to your new InterPayments account, you can access documentation and support related to InterPayments’ services. See the InterPayments Support section of this guide for tips on filling out the contact form.
Saving Your InterPayments Credentials
Now that your account has been created, you must copy the credentials necessary to integrate Chargent and InterPayments. Chargent requires your InterPayments Access Token and Processor to enable Surcharging in Salesforce.
Follow these steps to find your credentials:
- Log in to the InterPayments Portal (Test or Live).
- Click the Tokens tab.
- Click Copy under the ‘Actions’ column and save the Access Token credential in a secure location.
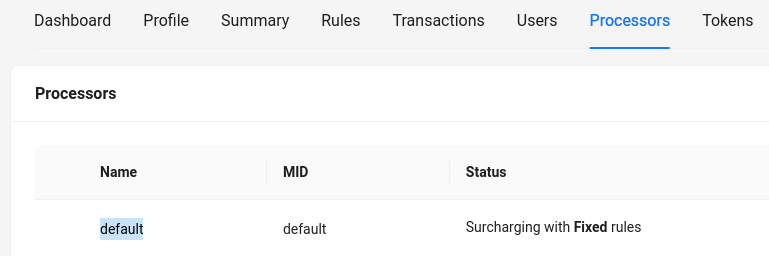
- Click the Processors tab.
- Copy the text in the ‘Processors’ column and save the Processor credential in a secure location.
With your InterPayments credentials in hand, you’re ready to set up surcharging in Chargent.
Setting Up Surcharging in Chargent #
Now that you’ve created your InterPayments account and saved your credentials, you can configure surcharging in your Salesforce org.
Activating InterPayments Remote Site Settings
Activate the remote site for InterPayments in Salesforce. Remote site activation will allow you to connect to the remote site URLs for InterPayments’ test and live environments. If these remote sites are not activated, you will receive an error when completing the Gateway Setup Wizard, stating “An error occurred, please contact your administrator”.
- Click the gear icon
 at the top right and choose Setup.
 - Enter “remote” in the Quick Find box and choose Remote Site Settings.
- Locate the following Remote Site names and make sure the “Active” box is selected:
- InterPayments_Live
- InterPayments_Test
- If the “Active” box is not selected, click Edit, select Active, and click Save.

Enabling Surcharging in Chargent
Surcharging is enabled or disabled via the “Credit Card Surcharging” step in the Gateway Setup Wizard. Please see the appropriate option below based on whether you are creating a new gateway record or updating an existing one. Keep in mind that it is possible to create more than one gateway record with Chargent, so you can have gateways with and without surcharging enabled.
Before continuing, it’s important to note that, as with most gateway accounts, InterPayments includes endpoints for testing and production. When completing the Gateway Setup Wizard, the endpoint will be determined when choosing the “Test Transactions” or “Live Transactions” tab. If you attempt to use test InterPayments credentials and choose “Live Transactions”, you will receive an error message. Similarly, if you attempt to use production InterPayments credentials and choose “Test Transactions”, you will also receive an error message.
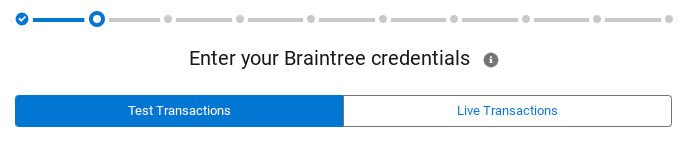
You can learn more about these tabs by visiting Using the Gateway Setup Wizard.
Option 1: Creating a New Gateway Record
Users can enable Surcharging for a new gateway record by following these steps:
- Go to the App Launcher
 and click the Chargent app.
 - Click the Chargent Settings tab.
- Click the Setup Wizard subtab.
- When prompted, “Do you have a Payment Gateway account?” click Yes.
- Select your gateway from the list and click Continue.
- Enter your gateway credentials and click Sign In.
- Complete the remaining steps in the setup wizard.
- If you have questions about any settings, see Gateway Setup Wizard.
- Once you’ve reached the final step in the setup wizard, titled “Credit Card Surcharging”, go to Configuring Surcharging in the Setup Wizard.
Option 2: Editing an Existing Gateway Record
You can also edit an existing gateway record by visiting the Gateways tab in Salesforce.
- Go to the App Launcher and click the Gateways tab.
- Click the down arrow next to your gateway record.
- Click Edit.
- Verify your gateway credentials and click Sign In.
- Complete the remaining steps in the setup wizard.
- If you have questions about any settings, see Gateway Setup Wizard.
- Once you’ve reached the final step in the setup wizard, titled “Credit Card Surcharging”, go to Configuring Surcharging in the Setup Wizard.
Configuring Surcharging in the Setup Wizard
- Once you’ve reached the final step in the setup wizard, titled “Credit Card Surcharging”, enter the following information:
- Surcharging: Toggle to ‘Active’.
- Access Token: Paste the Token credential obtained in the Saving Your InterPayments Credentials section of this guide.
- Processor: Paste the Processor credential obtained in the Saving Your InterPayments Credentials section of this guide.
- Clicking the Sign Up link below ‘Processor’ will open a form. When submitted, our team will be notified of your interest in setting up surcharging. We will be in touch as soon as possible.
- Default Messaging: This field determines the message displayed on the payform. As there are many considerations related to disclosure and compliance, we recommend contacting InterPayments for suggestions. Please see the following recommendations provided by InterPayments:
- Required Text:
- We may apply a fee to cover all or part of our costs of accepting your credit card.
- No fees are applied to non-credit card payment methods.
- If Limited Acceptance (Merchants with a direct relationship to AmEx):
- We may apply a fee to cover all or part of our costs of accepting your credit card. No fees are applied to non-credit card payment methods. We no longer accept Debit and Prepaid cards from Visa, Mastercard, and Discover.
- Required Text:
- Disclosure Script: Surcharge Disclosure message that internal users will read to consumers when taking phone payments. As with the Default Messaging field above, we recommend contacting InterPayments for suggestions.
- Always Display Surcharge Percentage: This option controls whether the surcharge fee percentage is always displayed to consumers. Enable this checkbox to ensure that the surcharge fee percentage is shown during payment processing.
- Read the disclaimer and check the box stating your acknowledgment.
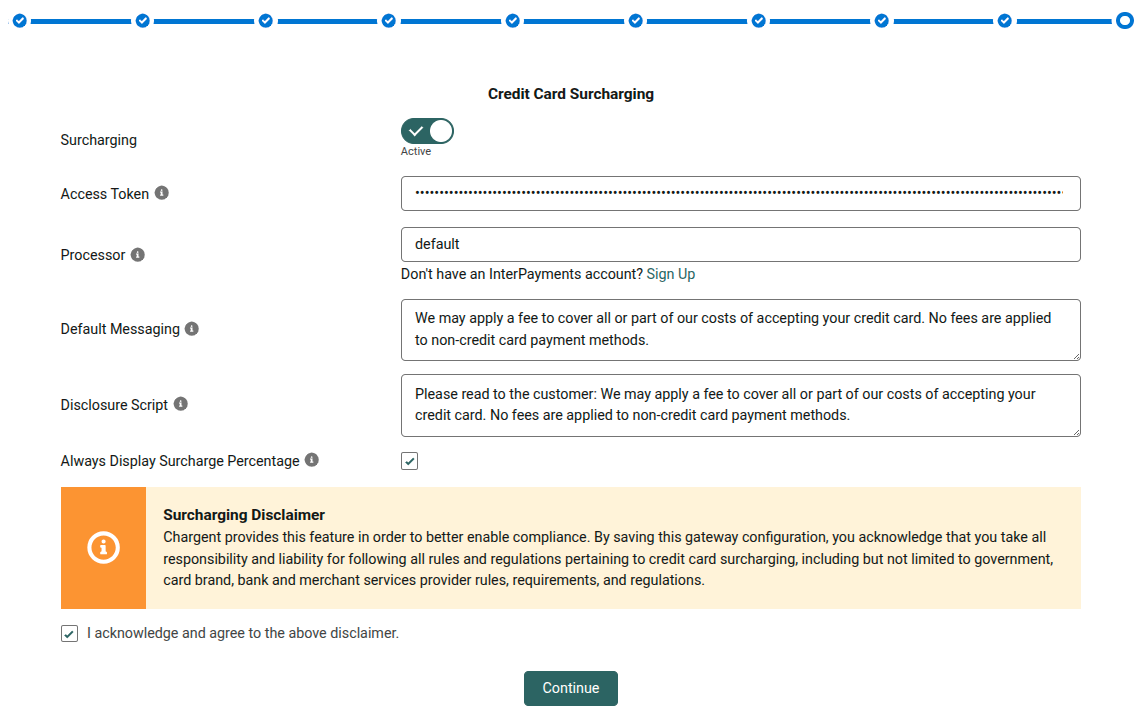
- Click Continue.
With surcharging enabled for your gateway, a few additional steps are required. Please complete the remaining sections to finalize your setup.
Updating Customer Receipts
Next, clone the “Customer Receipt” Email Template and update the Email Alert to use the new template. This step is essential in disclosing surcharges on customer receipts. Follow these instructions to update your customer receipts:
Step 1: Creating the ‘Customer Receipt’ Email Template
- Click the gear icon and select Setup.
- Under Process Automation, click Classic Email Templates.
- Select the ‘Chargent Templates’ folder.
- Click Customer Receipt.
- Click Clone.
- Add the following Email Template Information:
- Folder: Chargent Templates
- Available For Use: Checked
- Email Template Name: Customer Surcharge Receipt
- Template Unique Name: Customer_Surcharge_Receipt
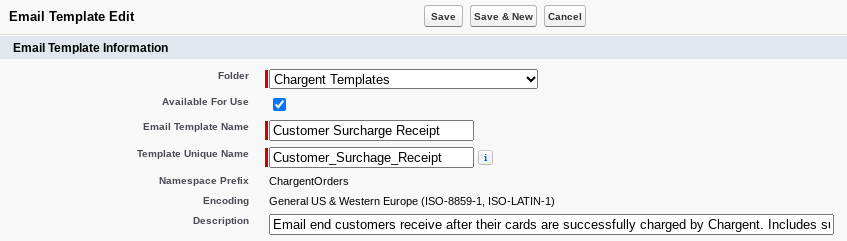
- Click Save.
- Click Edit.
- Copy the following text and paste it in the Email Body, replacing the preexisting text:
Thank you for your order!
Order Information
Merchant: {!Organization.Name}
Description: {!ChargentOrders__ChargentOrder__c.ChargentOrders__Order_Information__c}
Invoice Number: {!ChargentOrders__ChargentOrder__c.ChargentOrders__Invoice_Number__c}
Amount: {!ChargentOrders__Transaction__c.ChargentOrders__Amount__c}
Surcharge Fee Amount: {!ChargentOrders__Transaction__c.ChargentOrders__Fee_Amount__c}
Total Amount: {!ChargentOrders__Transaction__c.ChargentOrders__Total_Amount__c}
Card Type: {!CASE(ChargentOrders__Transaction__c.ChargentOrders__Payment_Method__c, “Check”, “Check”, “Credit Card”, CASE(ChargentOrders__Transaction__c.ChargentOrders__Credit_Card_Type__c, “Visa”, “Visa”, “Mastercard”, “Mastercard”, “Discover”, “Discover”, “American Express”, “American Express”, “AMEX”, “American Express”, “MC Eurocard”, “MC Eurocard”, “UK Maestro”, “UK Maestro”, “JCB Card”, “JCB Card”, “Solo”, “Solo”, “Electron”, “Electron”, “”), “”)}
Date/Time: {!ChargentOrders__Transaction__c.ChargentOrders__Gateway_Date__c} Transaction ID: {!ChargentOrders__Transaction__c.Id}
__________________________________________
Billing Information
Name: {! IF(ChargentOrders__Transaction__c.ChargentOrders__Credit_Card_Name__c != NULL, ChargentOrders__Transaction__c.ChargentOrders__Credit_Card_Name__c, ChargentOrders__Transaction__c.ChargentOrders__Billing_First__c + ‘ ‘ + ChargentOrders__Transaction__c.ChargentOrders__Billing_Last__c)}
Company: {!ChargentOrders__Transaction__c.ChargentOrders__Billing_Company__c}
Email: {!ChargentOrders__Transaction__c.ChargentOrders__Billing_Email__c}
Billing Address:{!ChargentOrders__Transaction__c.ChargentOrders__Billing_Address__c} {!ChargentOrders__Transaction__c.ChargentOrders__Billing_Address_Line_2__c}{!ChargentOrders__Transaction__c.ChargentOrders__Billing_City__c}, {!ChargentOrders__Transaction__c.ChargentOrders__Billing_State__c} {!ChargentOrders__Transaction__c.ChargentOrders__Billing_Postal_Code__c}
- Click Save.
Step 2: Update Email Alert for Receipts
- Click the gear icon and select Setup.
- Under Process Automation, click Email Alerts.
- Click Edit to the left of the ‘Customer Receipt’ Email Alert.
- Click the magnifying glass to the right of ‘Email Template’.
- In the top center dropdown, select Chargent Templates.
- Select the Customer Surcharge Receipt template.
- Click Save.
Your customers will now receive a receipt disclosing any surcharges applied to their orders. For more information about customizing Chargent’s email receipts, see Email Receipts and Notifications.
Tip: If your customers aren’t receiving receipts after following the process above, ensure your guest user emails aren’t blocked by following the steps in Why aren’t customers receiving email receipts?
Updating the Transaction Page Layout
Ensure you’ve added surcharging fields to the Transaction record page layout in Salesforce. Follow these steps to update your page layout:
- Click the gear icon and select Setup.
- Click the Object Manager tab.
- Click the Transaction object.
- In the sidebar, click Page Layouts.
- Click Transaction Layout.
- Drag and drop the ‘Section’ field onto your page layout with the following Section Properties:
- Section Name: Surcharge Information
- Detail Page: Checked
- Edit Page: Checked
- Layout: 2-Column
- Tab-key Order: Left-Right
- Click OK.
- Drag and drop the following fields into the ‘Surcharge Information’ section:
- Surcharge Id
- Chargent UUID
- Surcharge Fee Amount
- Total Amount

- Click Save. Complete these steps for any other transaction page layouts.
Note: If you plan on surcharging Canadian customers, we also recommend adding the Surcharge Fee Percentage field to your Transaction page layout.
Surcharging information will now be available on the record page for your transactions. Visit a transaction record to verify your configuration. For more information about page layouts, see Salesforce’s Page Layouts documentation.
Adding Waive Fee Checkbox Fields (Optional)
Surcharges can be waived for specific transactions via the Payment Console or for specific Accounts and/or Chargent Orders when the Waive Fee checkbox is checked on the related Account or Chargent Order record. This section includes instructions for adding the Waive Fee checkbox fields to your Account or Chargent Orders page layout. Learn more about waiving surcharges in the Waiving a Surcharge Fee section of this page.
Waive Surcharges Using the Account Object
To waive surcharges using the Account object, create a checkbox field and add it to your Account page layout, ensuring the field’s API Name is Waive_Fee__c.
Create the Waive Fee field by following these instructions:
- Click the gear icon and select Setup.
- Click the Object Manager tab.
- Click the Account object.
- In the left sidebar, click Fields & Relationships.
- Click New.
- Select the ‘Checkbox’ radio button and click Next.
- Enter the following information:
- Field Label: Waive Fee
- Default Value: Set the default value based on your use case (typically ‘Unchecked’).
- Field Name: Waive_Fee
- Click Next.
- Select the profiles you’d like to provide view and edit access for and click Next.
- As a note, any user who will be waiving surcharging fees will require permission to view and edit the Waive Fee checkbox.
- Select the page layouts to which you’d like to add the field and click Save.
The Waive Fee checkbox field has been created and added to your Account page layout. For considerations related to creating custom fields in Salesforce, see Create Custom Fields.
Waive Surcharges Using the Chargent Order Object
You can also add the included Waive Fee field to the Chargent Orders page layout to waive surcharges via the Chargent Order object.
- Click the gear icon and select Setup.
- Click the Object Manager tab.
- Click the Chargent Order object.
- In the left sidebar, click Page Layouts.
- Click Order Layout.
- Drag the Waive Fee field onto your page layout.
- Click Save.

Tip: Ensure your users can view and edit the Waive Fee checkbox field based on whether they require the ability to waive surcharges.
For considerations related to Salesforce page layouts, see Page Layouts.
Surcharging Reports
Use Chargent’s Out-of-the-box Surcharging Reports
Added in Chargent v7.95 and later, a report titled “Surcharging – By Month” has been added, allowing you to track your monthly surcharge fees as they relate to your Chargent Order and Transaction records. In addition, the ‘Surcharge Fee Amount’ and ‘Total Amount’ fields have been added to the following existing reports:
- All Transactions Last 90
- All Transactions by Month
- Transactions by Gateway
- Transactions by Month (2 Years)
For more information about accessing Chargent’s out-of-the-box reports, see Installed Chargent Reports.
Create Custom Surcharging Reports
You can also create your own custom Surcharging reports to reconcile Salesforce transaction records with InterPayments transaction records. If you’re new to Salesforce reports, we recommend visiting Build a Report in Lighting Experience. We’ve added a suggested report below, but we recommend modifying it to meet your specific use case.
- In Salesforce, click the AppLauncher and search for Reports.
- Click New Report.
- Select the “Chargent Orders with Transactions” report type and click Start Report.
- See the following recommended fields:
- Chargent Order
- Billing Account
- Chargent Order: Order ID
- Transaction
- Transaction: Transaction ID
- Transaction: Created Date
- Type
- Response Status
- Credit Card Type
- Card Last 4
- Surcharge Id
- Chargent UUID
- Amount
- Surcharge Fee Amount
- Total Amount
- Chargent Order
- See the following recommended filters:
- Gateway equals <the name of your gateway used for surcharging>
- Click Save to save your work and continue working on your report, or Save & Run to view the results immediately.
- Choose a Report Name, for example, “All Transactions with Surcharging”.
- Click Save.
Your Surcharging Report has been created and is ready to provide analytics to compare with your InterPayments account. Please see the Viewing Your Surcharge Transactions in InterPayments and Field Mapping sections below to learn more about how you can reconcile your surcharges. To learn more about other reports included with Chargent, see Chargent Reporting.
Using Surcharging #
With Surcharging enabled, Chargent sends a callout via Salesforce to InterPayments to calculate a surcharge whenever a customer makes an eligible credit card payment. Chargent records the surcharge in Salesforce for your records. Surcharging is currently available for Payment Console, Payment Request, and Take Payment. See the instructions below to get your end users up to speed with surcharging.
Surcharging With Payment Console
Before your users can use the Payment Console with Surcharging, ensure that Chargent Anywhere has been added to the object from which you wish to create payments and that the Payment Console is set up.
Your internal users will complete the following steps:
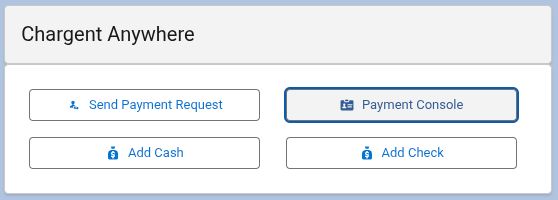
- Go to a record where Chargent Anywhere has been added.
- Click Payment Console in the Chargent Anywhere Lightning component.
- If you have multiple gateways, select a gateway with surcharging activated. If you only have one gateway, this step will be skipped.
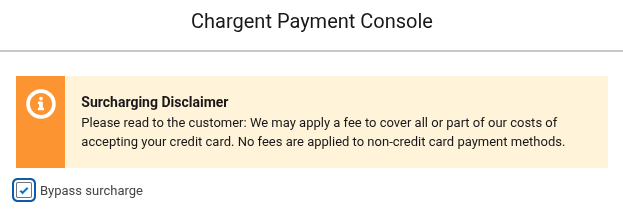
- Note the default surcharging messaging at the top of the payform. This text is derived from the Disclosure Script field when completing the Gateway Setup Wizard.
- If you don’t wish to add a surcharge, check the Bypass surcharge checkbox.
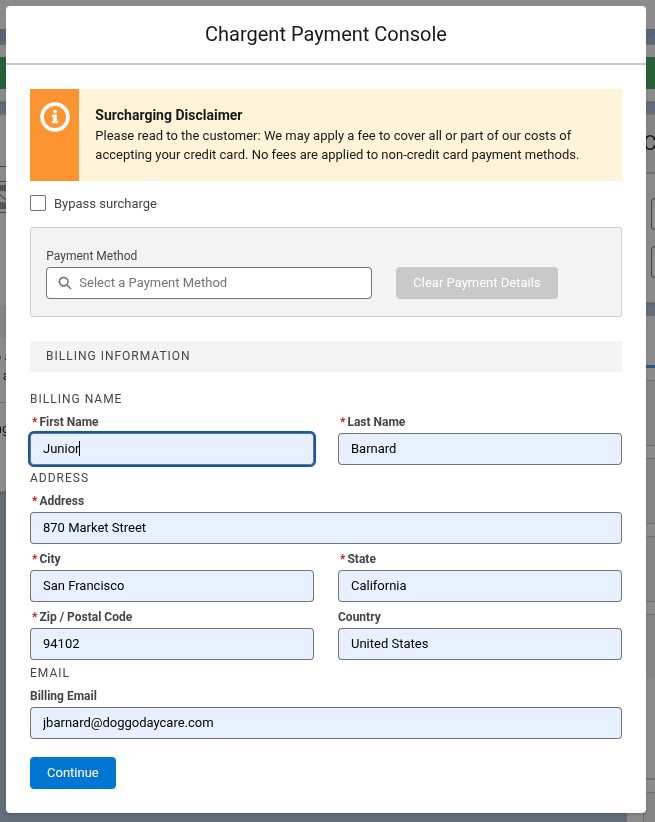
- Enter your customer’s billing information.
- Click Continue.
- Ensure the “Card” tab is selected.
- Enter the customer’s payment information and complete any one-time or recurring billing fields.
- When creating a recurring payment, you must complete additional information, as noted in Using The Payment Console.
- Click Charge, which will calculate the Card Surcharge Fee.
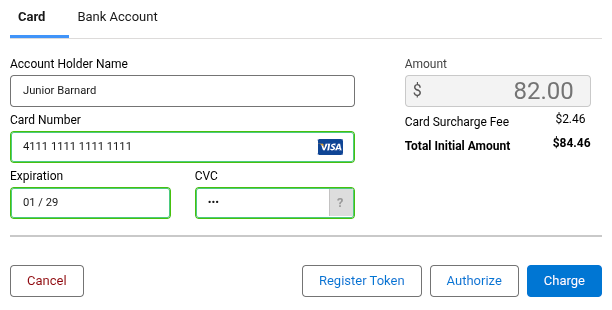
- The Card Surcharge Fee will be displayed. Ensure you report the surcharge fee to the customer.
- Click Charge to complete the payment.
When completed, you will see a green success message, and your customer will receive a receipt noting the surcharge amount. A transaction record will be created in Salesforce, and a surcharge transaction will be visible on your InterPayments Portal.
For a more detailed description of the Payment Console’s fields and capabilities, see Using The Payment Console.
Surcharging With Payment Request
Before your users can create payment requests with Surcharging, ensure that Chargent Anywhere has been added to the object from which you wish to send payment requests and that the Payment Request is set up.
Sending a Payment Request
Your internal users will complete the following steps:
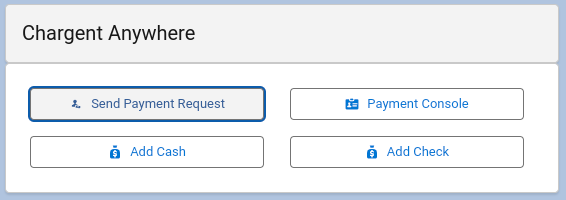
- Go to a record where Chargent Anywhere has been added.
- Click Send Payment Request in the Chargent Anywhere Lightning component.
- If you have multiple gateways, select a gateway with Surcharging activated. If you only have one gateway, this step will be skipped.
- Fill out the “Send Payment Request” form, selecting your Payment Request template, recipient email address or Contact, and the requested amount.
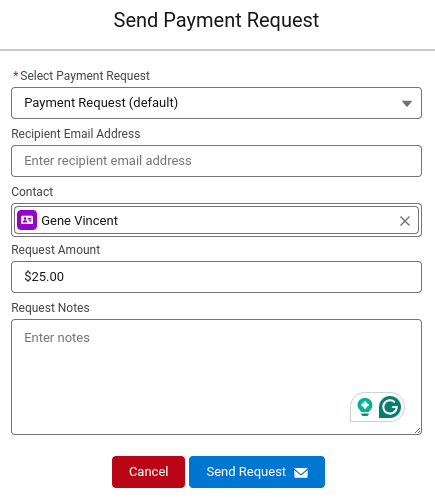
- Click Send Request.
When completed, you will see a green success message, and your customer will receive an email including a secure payform.
For more detailed descriptions of Payment Request’s fields and capabilities, see Sending a Payment Request.
Completing a Payment Request
Your customers will complete the following steps:
- Click the Payment Link in the “Chargent Payment Request Notification” email.
- Note the default surcharging messaging at the top of the payform. This text is derived from the Default Messaging field when completing the Gateway Setup Wizard.
- Fill out the billing information on the payform and click Pay, which will calculate the Card Surcharge Fee.
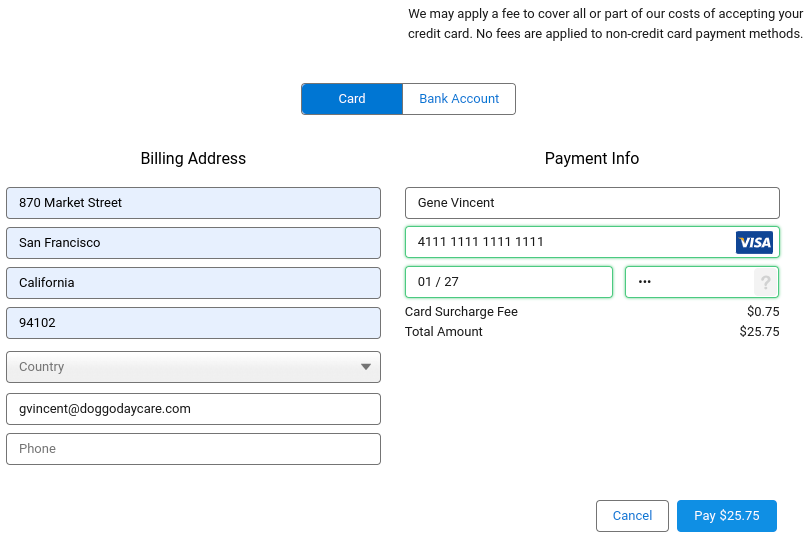
- Review the Card Surcharge Fee and updated Total Amount and click Pay again to complete the transaction.
- If the Waive Fee checkbox is checked on the related Chargent Order or Account record, a fee will not be applied, and the Card Surcharge Fee will be $0.00.
- The surcharge fee will automatically be calculated based on InterPayments’ assessment of surcharging rules and regulations. For example, some states or area codes cannot be surcharged.
When successful, Chargent displays a green success message, and they will receive a receipt noting the surcharge amount. A transaction record will be created in Salesforce, and a surcharge transaction will be visible on your InterPayments Portal.
Surcharging With Take Payment in Experience Cloud
Before you can start collecting surcharges using the Take Payment component in Experience Cloud, ensure that the component has been added to and configured on your Salesforce Community Site.
- Log in to your community and visit the page containing the Take Payment component.
- Choose an existing Payment Method or click + New Payment Method. If no existing payment methods are available, this option will be skipped.
- Learn more about Payment Methods by visiting Setting Up Payment Methods.
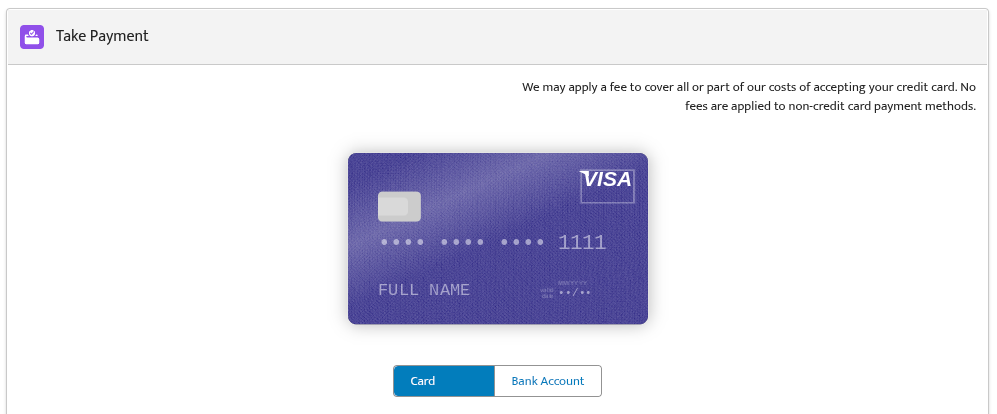
- Note the default surcharging messaging at the top of the payform. This text is derived from the Default Messaging field when completing the Gateway Setup Wizard.
- Complete the required payment information and click Pay, which will calculate the Card Surcharge Fee.
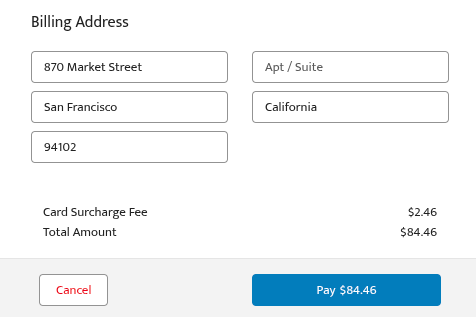
- Review the Card Surcharge Fee and updated Total Amount and click Pay again to complete the transaction.
- If the Waive Fee checkbox is checked on the related Chargent Order or Account record, a fee will not be applied, and the Card Surcharge Fee will be $0.00.
- The surcharge fee will automatically be calculated based on InterPayments’ assessment of surcharging rules and regulations. For example, some states or area codes cannot be surcharged.
When completed, a green success message will appear, and the billing email address will receive a receipt noting the surcharge amount. A transaction record will be created in Salesforce, and a surcharge transaction will be visible on your InterPayments Portal.
For more details about Take Payment’s fields and capabilities, see Using the Take Payment Component.
Viewing Your Surcharge Transactions in InterPayments
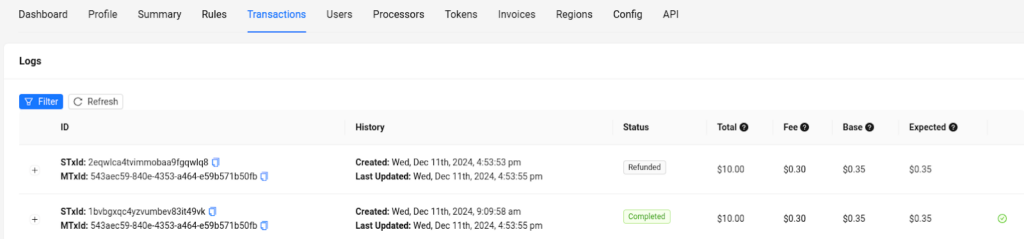
When a payment is completed, the surcharge is recorded in your InterPayments portal. You can find the details by logging into your Interpayments Portal (Test or Live) and visiting the “Transactions” tab.

The Status field in InterPayments allows you to monitor your surcharges. Surcharge transactions are logged in your InterPayments account with a status, allowing you to monitor and keep track of your surcharges.
| Status | Description |
| Assigned | The surcharge amount has been calculated but has not yet been collected. |
| Completed | Transaction has been authorized and captured, and a surcharge has been applied. |
| Refunded | This transaction represents a refund for another transaction. |
| Cancelled | The transaction has been cancelled. |
| Declined | The payment method was declined, and the surcharge amount was not collected. |
| Exception | The surcharge could not be calculated due to a misconfigured request. Contact InterPayments for more information. |
The STxId and MTxId fields in InterPayments can be used to reconcile your payments in Salesforce. See Field Mapping to learn how these fields map to your Transaction records in Salesforce.
| Identifier | Description |
| STxId | A unique identifier used for InterPayments transactions. Compare this field with the Surcharge Id field in Salesforce to reconcile your refunds. |
| MTxId | Identifier used for InterPayments orders. Relates multiple InterPayments transactions to the same order, such as a completed surcharge and a related refund. Compare this field with the Chargent UUID field in Salesforce to reconcile all transactions except refunds. |
Waiving a Surcharge Fee
You can waive surcharge fees in Salesforce in three different ways:
- Using the Bypass surcharge checkbox in the Chargent Payment Console.
- Using the included Waive Fee field on the Chargent Order object.
- Using the custom Waive Fee field on the Account object.
Using the above methods, you can waive a surcharge on a per-transaction basis, for all transactions related to a specific customer, or for all transactions related to a specific subscription or order. We’ve included instructions for each method below.
Waiving a Surcharge Fee Using the Payment Console
When your sales team or call center agents use the Payment Console to take payments, they can decide to waive a surcharge fee on a per-transaction basis by using the Bypass surcharge checkbox. The checkbox is present directly under the surcharging disclaimer when accessing the Payment Console. For more information, see Surcharging With Payment Request.
Waiving a Surcharge Fee Using the Account Object
After creating the Waive Fee checkbox field on the Account object, your users can waive a surcharge fee when they have access to view and modify the field. Using the Waive Fee field on the Account object ensures that all surcharges are waived for that particular account, useful for your preferred customers or when negotiating a contract.
To ensure a fee is waived for all transactions related to an account, your users should complete these steps:
- Go to the Account record that requires surcharge fees to be waived.
- Click the pencil icon
 to the right of the Waive Fee checkbox and ensure it is checked.

- Click Save.
If the Waive Fee checkbox is checked on the Account record, a surcharging fee will no longer be applied to transactions related to the account.
Waiving a Surcharge Fee Using the Chargent Order Object
We’ve also included a Waive Fee checkbox on the Chargent Order object. When enabled, surcharge fees will be waived for all transactions related to a specific Chargent Order record, ensuring that all additional payments related to the Chargent Order, such as subscription or recurring payments, do not include a surcharge.
To ensure a fee is waived for all transactions related to a Chargent Order record, your users should complete these steps:
- Go to the Chargent Order record that requires waived surcharge fees.
- Click the pencil icon to the right of the Waive Fee checkbox and ensure it is checked.
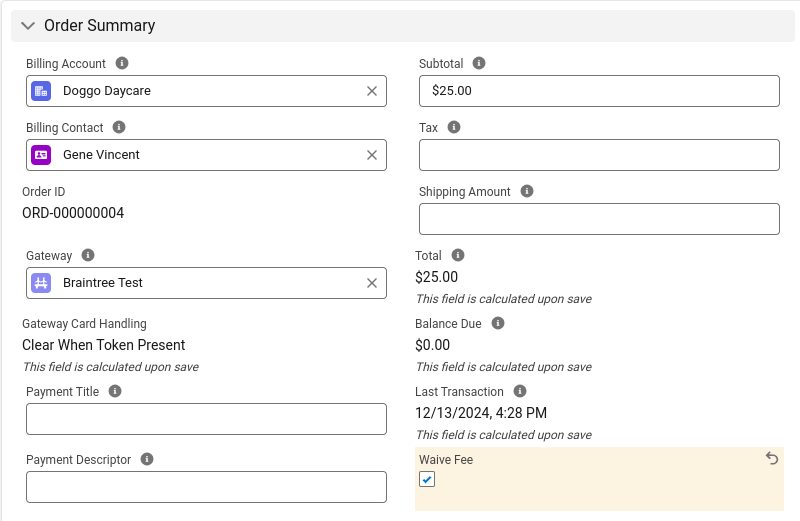
- Click Save.
With the Waive Fee checkbox checked, all related transactions for that Chargent Order will no longer include a surcharging fee.
Identifying Transactions with Waived Fees
You can identify transactions that have had their surcharging fees waived by visiting your InterPayments Portal:
- Log in to the InterPayments Portal (Test or Live).
- Click the Transactions tab.
- Click the + to the left of your transaction.
- Click Details.
If the surcharge was waived, the “waive-surcharge” tag appears in the Tags section. If the tag is not present but the surcharge amount is $0.00, it is likely that InterPayments automatically waived the surcharge due to compliance and regulatory requirements. For example, suppose InterPayments determines that the billing address is in a state where surcharging is prohibited. InterPayments calculates the surcharge amount of $0.00.
Refunding and Voiding a Surcharge
Transactions with surcharge fees can be refunded, partially refunded, and voided in Salesforce. To learn more about refunds and voids in Chargent, see Refunding and Voiding Transactions. See each action below for considerations specific to Surcharging.
Fully Refunding a Transaction
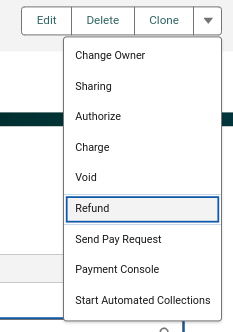
Go to the transaction record for the payment you wish to refund and click the Refund button in the top right of the record. You may need to click the down arrow to find the refund option.
When a refund is processed, InterPayments saves two separate records with the same MTxID: one representing the completed surcharge and one representing the refund. See the unique STxId to reconcile your refund transactions with the Surcharge Id in Salesforce. For more information, see Field Mapping.
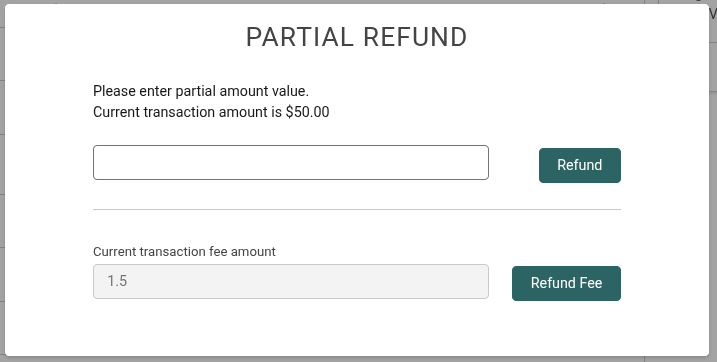
Partially Refunding a Transaction
Partial refunds work similarly to full refunds in Chargent.
- Click the Transactions tab and locate the transaction record for the payment you wish to refund.
- Click the Partial Refund button in the top right of the record. You may need to click the down arrow to find the partial refund option.
- Select one of two options:
- Enter the amount you’d like to refund and click Refund. InterPayments will automatically calculate and add the surcharge refund based on the amount you choose to refund.
- Refund only the surcharge fee by selecting Refund Fee.
Voiding a Transaction
You can void a transaction as long as it has not settled yet. To void a transaction:
- Click the Transactions tab and locate the transaction record for the payment you wish to void.
- Click the Void button in the top right of the record. You may need to click the down arrow to find the void option.
- When a transaction is voided in Salesforce, the corresponding InterPayments surcharge transaction status changes to ‘Cancelled’.
Field Mapping #
The following fields are included with Chargent’s Surcharging feature, which can be used to reconcile your Salesforce transaction records with InterPayments transaction records. For most transactions, we recommend using the Chargent UUID to reconcile your transactions. Refunds should use the Surcharge Id for reconciliation since the Chargent UUID will not provide a unique value for a refunded transaction. For more information about InterPayments’ fields, see the Viewing Your Surcharge Transactions in InterPayments section of this guide.
The arrows represent where each field originates (the tail) and where it is received (the head).
| Salesforce Field Name | InterPayments Portal Field Name | |
| Surcharge Id | <- | STxId |
| Chargent UUID | -> | MTxId |
| Surcharge Fee Amount | <- | Fee |
Considerations & Troubleshooting #
Surcharging is designed to work seamlessly and intuitively within your existing payment process. Please see the considerations below to help you get the most out of surcharging in Chargent.
Calculating Surcharges
- InterPayments calculates a surcharge fee based on a number of rules and regulations. The fee cannot be changed from within Salesforce. For more information, contact InterPayments Support.
- If billing information is modified after the surcharge has been calculated, the InterPayments transaction will be canceled, and a new one will be calculated based on the new information.
- When a user calculates a surcharge fee but navigates away from the form without making a payment, a record of the surcharge calculation will remain in your InterPayments portal with a status of “Unassigned”. This will not affect your surcharge costs. However, no transaction record will exist in Salesforce to reconcile against.
- If an error occurs when calculating a surcharge fee, an email notification will be sent to your Chargent Admin. You can also create a tab for the Email Notification object to obtain more details about any errors that occur. Learn more about Email Notifications.
Connecting to InterPayments
- If you receive the error “The API Token entered was unable to successfully connect to InterPayments. Please check your value and try again.” when completing the Gateway Setup Wizard, ensure your credentials are correct and you are using test or live credentials appropriately. For more information, see Surcharging Error: The API Token entered was unable to successfully connect to InterPayments. Please check your value and try again.
- If you receive the error “An Error Occurred, please contact your administrator.” when completing the Gateway Setup Wizard, ensure the Remote Site Settings have been activated. See the instructions at Surcharging Error: An error occurred, please contact your administrator.
Payment Request Field Set
- Refrain from removing any fields from the ‘Payment Request Form’ Field Set. Removing fields from the ‘Payment Request Form’ Field Set on the Payment Request object makes them unavailable. If the fields are removed, they cannot be added again. Learn more about Salesforce Field Sets to better understand this Salesforce feature.
Optimized for Payment Methods
- Surcharging is optimized to work with the Payment Methods data model. Without Payment Methods enabled, Chargent lacks the required data to send InterPayments for subsequent surcharge calculations. Ensure that you enable Payment Methods to take full advantage of Surcharging in Chargent.
Error Handling
- When a callout to the Interpayments API fails due to invalid credentials, Chargent will send an email notification to the Chargent administrator, stating “Credentials for Interpayments are no longer valid for endpoint ‘ + endpoint + ‘. The System administrator was notified.”. In this case, the payment operation will not be blocked, allowing your users to continue processing payments. Applies to Chargent v7.95 and above.
- Since a correctly formatted Postal Code is required for InterPayments to successfully surcharge, the validation related to the postal code has been updated for surcharged payments, specifically ensuring that the correct format is entered for US and Canadian transactions. Applies to Chargent v7.95 and above.
Getting Support #
If you run into any issues related to Surcharging, both InterPayments and AppFrontier support are here to help!
InterPayments Support
For any questions related to your InterPayments portal, indemnification, or surcharging compliance, please contact InterPayments Support.
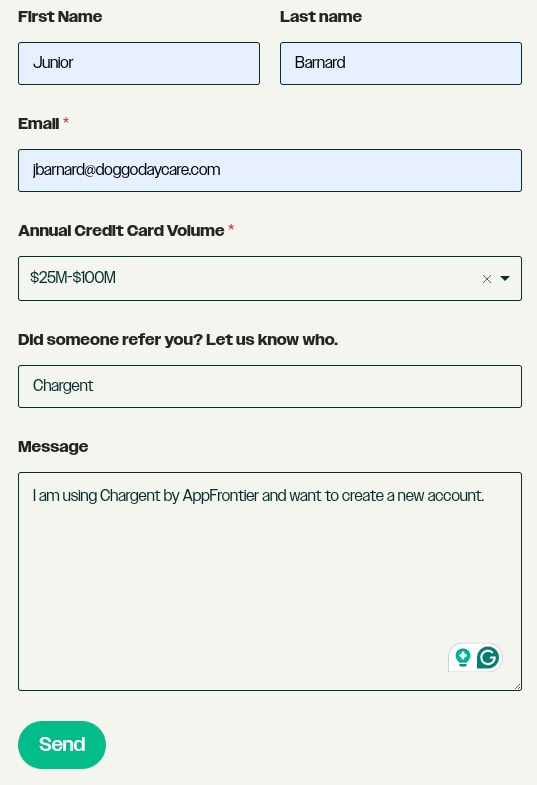
For best results, fill out the form as follows:
- Open the dropdown menu under “I would like to…” and select Connect with an Expert.
- Complete the form, answering the questions as follows:
- Email: Enter your email address.
- Annual Credit Card Volume: Select the answer that best represents your business’s volume.
- Did someone refer you? Let us know who: Enter “Chargent”.
- Message: Enter your question or request a new account. Please note that you are using Chargent when reaching out.
- Click Send.
Chargent Support
For questions about Chargent and surcharging in Salesforce, please contact our support team.
You can learn more about Chargent’s support process and documentation by visiting Contacting Support.
Thank you again for choosing Chargent and InterPayments for your surcharging needs. We look forward to helping you recover your credit card fees and strengthen your cash flow!
See Also
Understanding Credit Card Payments
Chargent Terminology
Chargent Quick Start Guide
Understanding Transaction Settlement

