The Chargent Settings tab contains everything you need to set up and customize Chargent. After installing Chargent and assigning your Chargent licenses and permissions, familiarize yourself with the tab.
Note: In addition to assigning Chargent’s permissions, users who require access to the Chargent Settings tab also require the ‘View Setup and Configuration’ and ‘Customize Application’ Salesforce permissions.
To access the Chargent Settings tab, follow these steps:
- Go to the App Launcher
 and click the Chargent app.
 - Click the Chargent Settings tab.
Chargent Settings Authentication #
You must complete OAuth authentication the first time you access the Chargent Settings tab. If you skip OAuth authentication, some features will not function properly. Click Complete OAuth and verify your Salesforce credentials to continue.

For more information, see What is AppFrontier Chargent Settings Authentication?
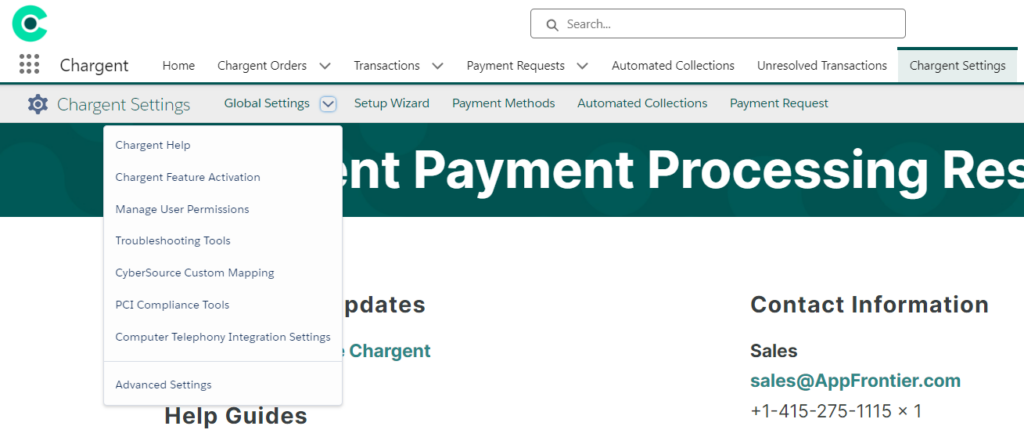
Global Settings #
Chargent Help
Click this subtab to access quick links to install or update Chargent. We also provide links to support documentation, video tutorials, and Chargent support contact information.
Chargent Feature Activation
Use this subtab to request access to Chargent’s premium features, such as Payment Console, which requires a license key provided to you by Chargent. To learn more, visit our Feature Activation page.
Manage User Permissions
Click this subtab to quickly assign Chargent permissions to users who need to view, modify, and process payments. Visit Permission Assignment for instructions on assigning Chargent’s permission sets.
Troubleshooting Tools
Chargent Support may direct you to click this subtab for access to several automated testing tools that can help you diagnose Salesforce validation rule conflicts or other issues. You can test the insertion of transaction records or master records, as well as IP addresses.
Cybersource Custom Mapping
Click this subtab to use Chargent’s CyberSource Custom Mapping feature, which allows you to send values from almost any field on the Chargent Order object to the CyberSource gateway using CyberSource’s Merchant Defined Data fields.
The feature is optional and is not required to process CyberSource payments. It is designed to send up to 20 fields in a request. Any field on the Chargent Order can be selected – including standard Chargent fields or any custom field you’ve created.
PCI Compliance Tools
Using this subtab, you can check your Chargent app to determine if you are using the most PCI-compliant version. To best minimize the scope of your PCI Compliance, we recommend updating Chargent to the latest version.
If you are on a version of Chargent prior to 5.20, you can upgrade your Chargent package using these PCI Compliance tools.
Computer Telephony Integration Settings
This subtab appears after you have activated Chargent’s Call Center functionality. Chargent works with Vonage and Five9 Salesforce CTI Integrations to automatically pause your call recordings when sensitive payment information is entered. For more information, visit Chargent for Call Centers (CTI).
Advanced Settings
Customize the daily batch size for your recurring payments, update your email address, or set your default currency from this subtab. Settings on this subtab relate to the Payment Request and Account Updater premium features of Chargent.
Feature Settings #
Setup Wizard
Click this subtab to integrate directly with over 30 payment gateways! We have made it easy for you to integrate with your gateway using the Chargent Setup Wizard. The Setup Wizard guides you through the setup and validation of a Gateway record, ensuring integration between Salesforce and your gateway provider. For more information about the Setup Wizard, visit Gateway Setup and User Guides.
Payment Methods
Most of your customers likely have more than one payment method. Chargent’s Payment Methods feature offers customers a convenient and secure way to store all their card and bank account details for single and recurring payments. For more information about Payment Methods, visit Setting Up Payment Methods.
Important: Once Payment Methods is enabled, it cannot be disabled. We recommend you test this feature in a sandbox to review how it works in your business process.
Automated Collections
Automatically communicate with customers when they’ve missed a payment using Automated Collections, an add-on feature for Chargent. Once enabled, this feature sends a payment request link to your customers, allowing them to update their payment information, ensuring their account is in good standing.
Automated Collections also allows you to automatically retry failed payments based on the schedule and logic that you choose. It takes minutes to configure and activate. Once activated, you no longer need to spend time sending emails and making phone calls to collect late payments.
Payment Request
Click this subtab when you are ready to create templates that manage your Payment Request forms. Payment Requests allow you to create secure links that can be sent to customers and allow them to make their own payments using a customized payform. For more information about Payment Request Setup, visit Setting Up Payment Requests.
See Also
Installing Chargent
Understanding Payments
Gateway Setup and User Guides
Chargent Help

