Chargent directly integrates with the PayPal Complete Payments (PPCP) gateway, allowing you to charge credit cards and accept PayPal Wallet payments in Salesforce. This guide provides instructions for testing and using the PayPal Wallet in Chargent.
Overview #
The PayPal gateway integration uniquely allows you to accept PayPal Digital Wallet payments alongside credit cards. With the Digital Wallet, your customers can make payments using any PayPal-supported payment method, including:
- PayPal Balance
- Credit Card
- Bank Account/Checking
- PayPal Credit (Buy Now, Pay Later)
When selecting a payment method via a self-service option, such as an emailed Payment Request or an Experience Cloud payment using Take Payment, your customers can select the digital wallet option and log in to their PayPal account to make a payment.
Prerequisites #
To start taking payments using the PayPal Wallet, ensure you’ve completed the following steps based on your use case:
- Set up your PayPal gateway integration via the PayPal Gateway Guide, ensuring you enable the PayPal Wallet payment method in the gateway record’s Advanced Settings.
- Set up Payment Request if you plan to email secure payment links to your customers.
- Set up Take Payment if you plan to take payments via an Experience Cloud site.
Testing the PayPal Wallet #
Your PayPal Business Account allows you to create sandbox test PayPal accounts that can be used to test PayPal Wallet functionality in Chargent.
- Log in to your PayPal Business Account.
- Click the Developer Dashboard Icon
 in the top right.
 - Click the Testing Tools tab.
- Click the Sandbox Accounts subtab.
- Either click Create account and follow the steps to create a new sandbox account or select an existing account.
- Copy the Email and Password fields to use when testing the PayPal Wallet in Chargent.
From your sandbox test PayPal account, you can manage the credit cards, bank accounts, and PayPal balance to meet your specific test criteria. We recommend testing both personal and business accounts. For more information, see PayPal’s documentation, Sandbox Accounts.
Using the PayPal Wallet #
After setting up Payment Request and/or Take Payment and enabling the PayPal Wallet on your PayPal Gateway record, your customers will be able to make payments via their PayPal account.
When accessing the secure paylink via an emailed Payment Request or visiting an Experience Cloud payments page, follow these steps:
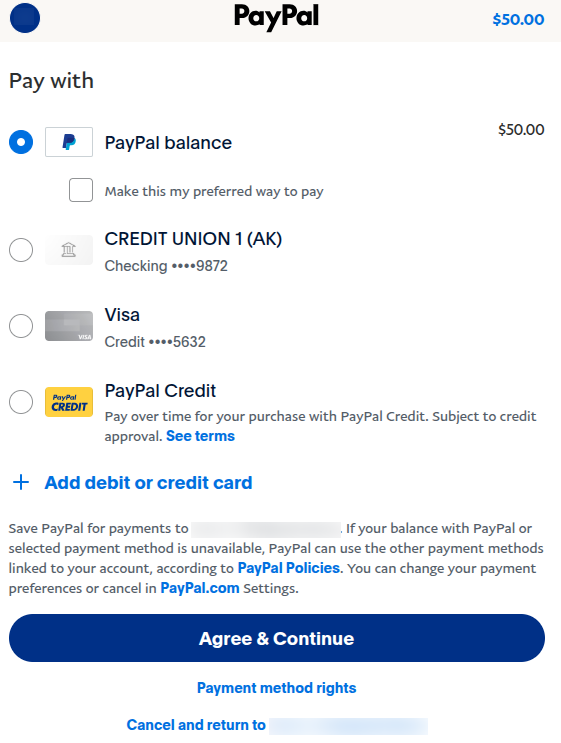
- Select Digital Wallet as a payment method.
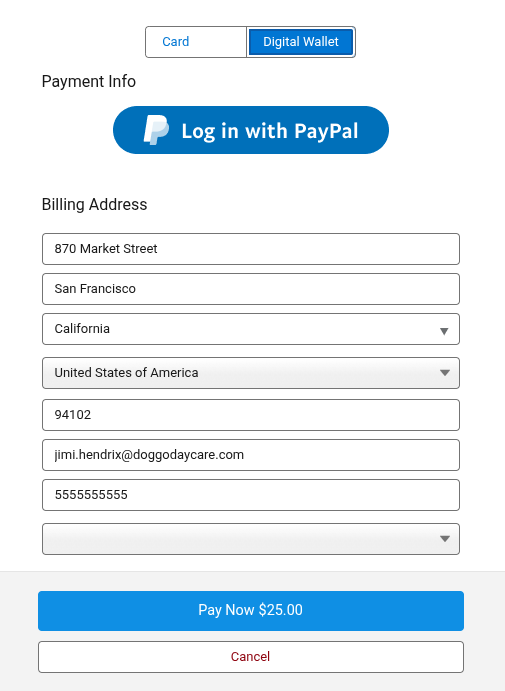
- Enter your address information.
- Click Log in with PayPal to open the PayPal login screen.
- If prompted, click Confirm.

- Enter your PayPal credentials (if testing, use the credentials obtained in the Testing the PayPal Wallet section above).
- Click Log In.

- Select the radio button next to the payment option you’d like to choose.
- Click Agree & Continue (this option selects and sets the payment method, but the payment is not yet completed).
- Click Continue to finalize the payment.

Considerations #
Transaction Status
When the user initially clicks Log in with PayPal, a Transaction record will be created with the following field values:
- Response Status: AdditionalStep
- Response Message: [Blank]
A Response Status of ‘AdditionalStep’ indicates that payment has not yet been collected. Once the transaction is successfully completed, the Transaction record will be updated to reflect the status:
- Response Status: Approved
- Response Message: COMPLETED
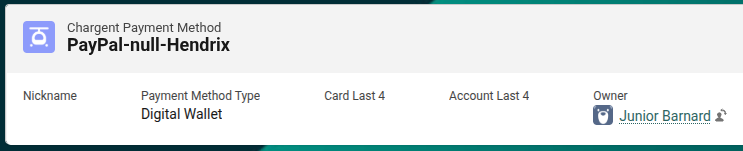
Payment Method Record Naming Convention
The naming convention for Payment Methods created via the PayPal Wallet differs from that of direct credit card and bank account Payment Methods (see Payment Methods Naming Conventions). For Chargent Payment Methods records with a Payment Method Type of Digital Wallet, the Chargent Payment Method Name field is created by concatenating “PayPal-null-[the cardholder’s last name]”, as shown in the example below.