Many merchants leverage Salesforce’s Experience Cloud (formerly known as Salesforce Communities) to provide self-service payment options for their customers. If you are looking to get started with payments in Experience Cloud, but have little experience (pun intended) working with the platform, this page is for you.
The following instructions will guide you through the process of creating an Experience Cloud site, specifically to test Chargent’s Experience Cloud payment options. This guide covers topics including creating your site, creating site pages, site membership, and setting up an Experience Cloud user.
Most merchants should customize and design their Experience Cloud site to meet their specifications. Take the next step by diving into Salesforce’s Experience Cloud Guide.
Enable Experience Cloud #
First things first. If Experience Cloud isn’t enabled in your org, follow these steps:
- In Salesforce, click the gear icon
 and select Setup.
 - In the Quick Find, search for “Digital Experiences”.
- In the left sidebar, click Settings.
- Check the box labeled: “Enable Digital Experiences”.
- Click Save.
Learn more by visiting Salesforce’s documentation, Enable Digital Experiences.
Create Your Site #
With Experience Cloud enabled, you are free to create your first site:
- In Salesforce, click the gear icon and select Setup.
- In the Quick Find, search for and select All Sites.
- Click New.
- Select a Template. You can click on any template to learn more about its features and design.
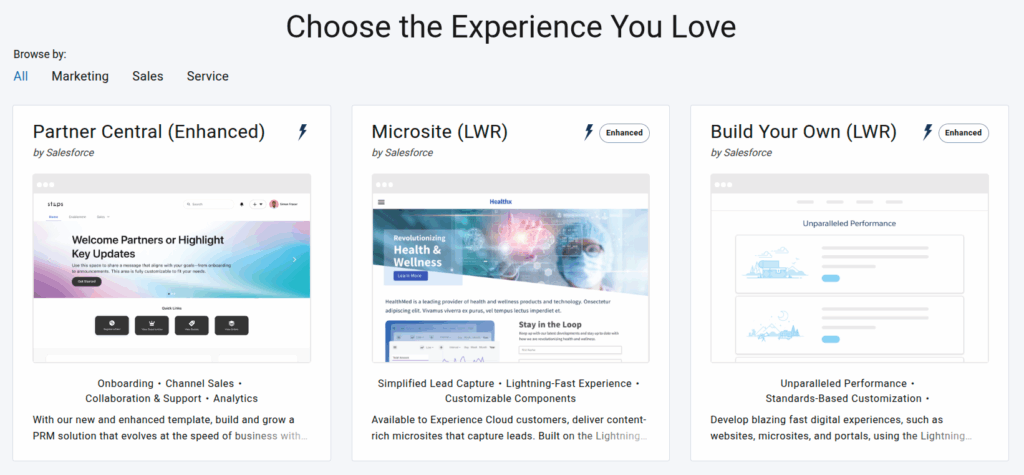
- Once you have chosen a template, click Get Started.
- Provide a Store Name and, optionally, customize the URL.
- Click Create. It will only take a few minutes to generate your site.
That’s it! Your Experience Cloud site is now live and ready to customize. We recommend that you take some time to explore the platform by visiting Understand the Basics of Experience Cloud before moving on to the next step.
With that completed, let’s ensure that our users can access our site by updating the site’s Membership.
Site Membership and Access #
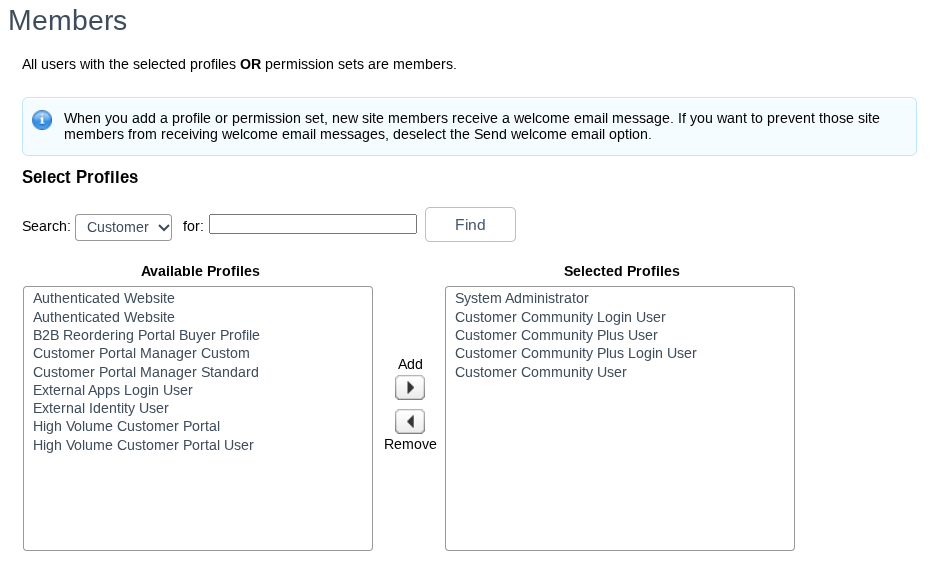
Profiles or Permission Sets define membership to your Experience Cloud site. Follow these instructions to provide access to a specific group of users. Merchants most often use Experience Cloud user profiles, but this is a decision that will be based on your specific use case.
- In Salesforce, click the gear icon and select Setup.
- In the Quick Find, search for and select All Sites.
- To the left of your site’s name, select Workspaces.
- Click the Administration tile.
- In the left sidebar, click Members.
- Select any Profiles or Permission Sets that will define membership to your site and click the right arrow under “Add”.
- Click Save.
For more information, see Add Members to Your Experience Cloud Site.
Make sure to review any additional access best practices related to Experience Cloud by viewing the following webpages:
- Who Can See What in Experience Cloud Sites
- Securely Share Your Experience Cloud Sites with Guest Users
Objects and Fields for Experience Cloud Payments #
Chargent allows you to take payments from any object in Salesforce – standard or custom. Optionally, you can create a custom object that will be used for payment processing in Experience Cloud. When taking payments from a specific object’s page in Experience Cloud, two fields are required: a currency field representing the amount to be paid and a lookup field to the Chargent Order object.
The instructions below will provide a basic overview of creating a custom object and the required fields. If you want to dive deeper, see Salesforce’s documentation, Create a Custom Object and Create a Custom Field.
Create a Custom Object (Optional)
You can use a site page, a pre-existing standard object’s detail page, or a custom object’s detail page for your payments. If you wish to create a new custom object, see the following instructions:
- In Salesforce, click the gear icon and select Setup.
- Click the Object Manager tab.
- Click Create and select Custom Object.
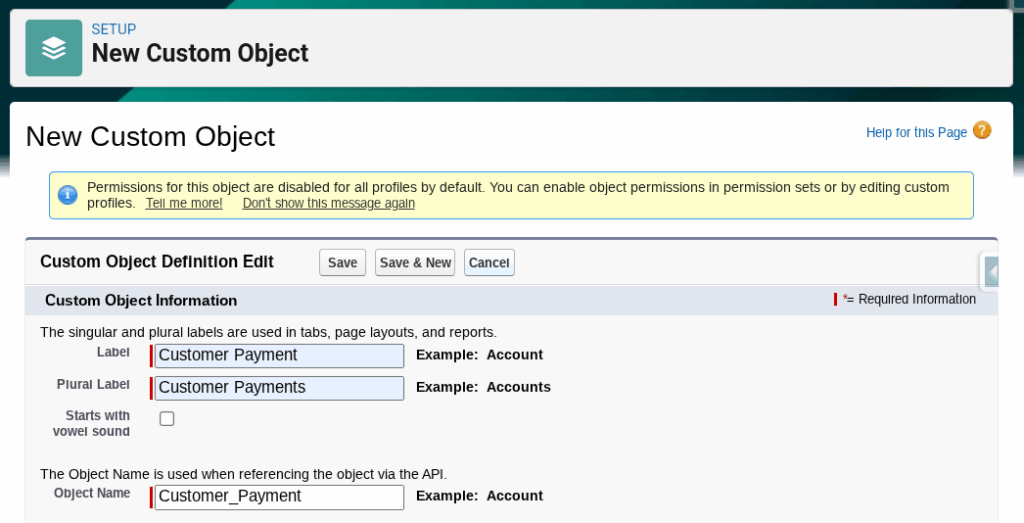
- Populate the following fields:
- Label: Choose a name for your object, for example, “Customer Payment”.
- Plural Label: Select the appropriate plural form of the Label above.
- Object Name: This will automatically populate based on the Label.
- Deployment Status: Deployed
- Select any additional optional features you’d like to enable for your object.
- Click Save.
Create a Custom Currency Field
A currency field is required when taking payments from an object detail page in Experience Cloud. If a currency field representing the amount to be paid does not exist on your object, you can create one by following these steps:
- In Salesforce, click the gear icon and select Setup.
- Click the Object Manager tab.
- In the Quick Find, search for and select your desired object, for example, “Customer Payment”.
- In the left sidebar, click Fields & Relationships.
- Click New.
- Select the Currency radio button.
- Click Next.
- Populate the following fields:
- Field Label: Provide a name for the field, for example, “Amount”.
- Length: Choose a desired length based on your largest expected payment (must be 16 or less).
- Decimal Place: 2 (representing cent values)
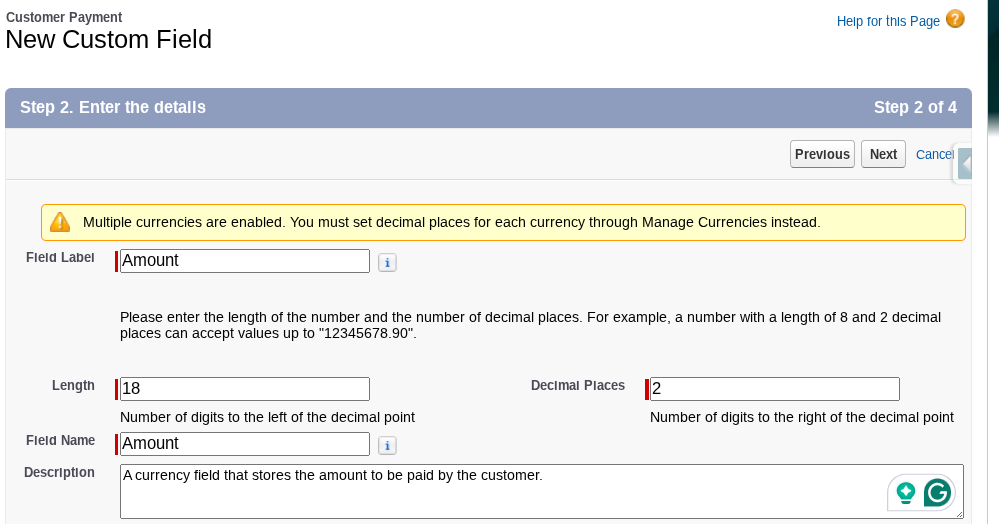
- Click Next.
- Select the Profiles you would like to provide access to for the field.
- At a minimum, ensure you provide access to your System Administrator and Experience Cloud User’s profiles, for example, “System Administrator” and “Customer Community User”.
- Click Next.
- Select the Add Field checkbox for your custom object’s Page Layout.
- Click Save (or click Save & New to skip to step 6 in the next section).
Create a Custom Chargent Order Lookup Field
A Chargent Order lookup field is also required when taking payments from an object page in Experience Cloud. If a lookup field to the Chargent Order object does not exist on your object, you can create one by following these steps:
- In Salesforce, click the gear icon and select Setup.
- Click the Object Manager tab.
- In the Quick Find, search for and select your custom object, for example, “Customer Payment”.
- In the left sidebar, click Fields & Relationships.
- Click New.
- Select the Lookup Relationship radio button.
- Click Next.
- In the Related To dropdown, choose “Chargent Order”.
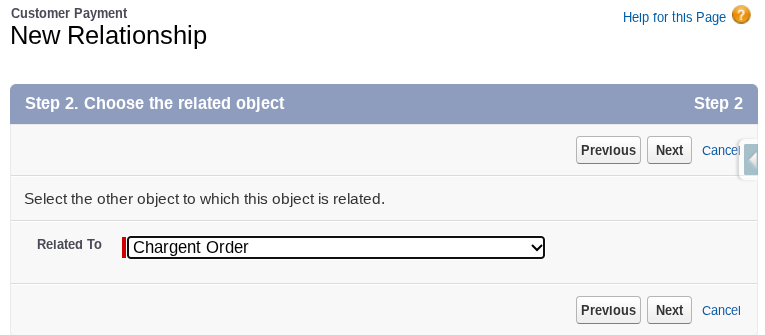
- The Field Label and Field Name will automatically populate.
- Click Next.
- Select the Profiles you would like to provide access to for the field.
- At a minimum, ensure you provide access to your System Administrator and Experience Cloud User’s profiles, for example, “System Administrator” and “Customer Community User”.
- Click Next.
- Select the Add Field checkbox for your custom object’s Page Layout.
- Click Next.
- The Related List Label will automatically populate.
- Click Save.
Create a Payments Page in Experience Cloud (Optional) #
Chargent’s Take Payment component can be placed on any Experience Cloud Page when added to a Screen Flow; however, when the component is added directly to your site, it can only be added to an object’s Detail Page. When your Experience Cloud Site is created, many standard objects will already have an associated Detail Page. You may need to create a Detail Page if one does not exist for your desired object.
Create an Object Detail Page
Follow these steps if you need to create pages for your object:
- In Salesforce, click the gear icon and select Setup.
- In the Quick Find, search for and select All Sites.
- To the left of your site, select Builder.
- In the top left, click “Home” to open the dropdown.
- At the bottom of the dropdown list, click +New Page.
- Click Object Pages.
- Search for and select your desired object, for example, “Customer Payment”.
- Click Create.
- Salesforce will inform you which pages will be created. Click Create again.
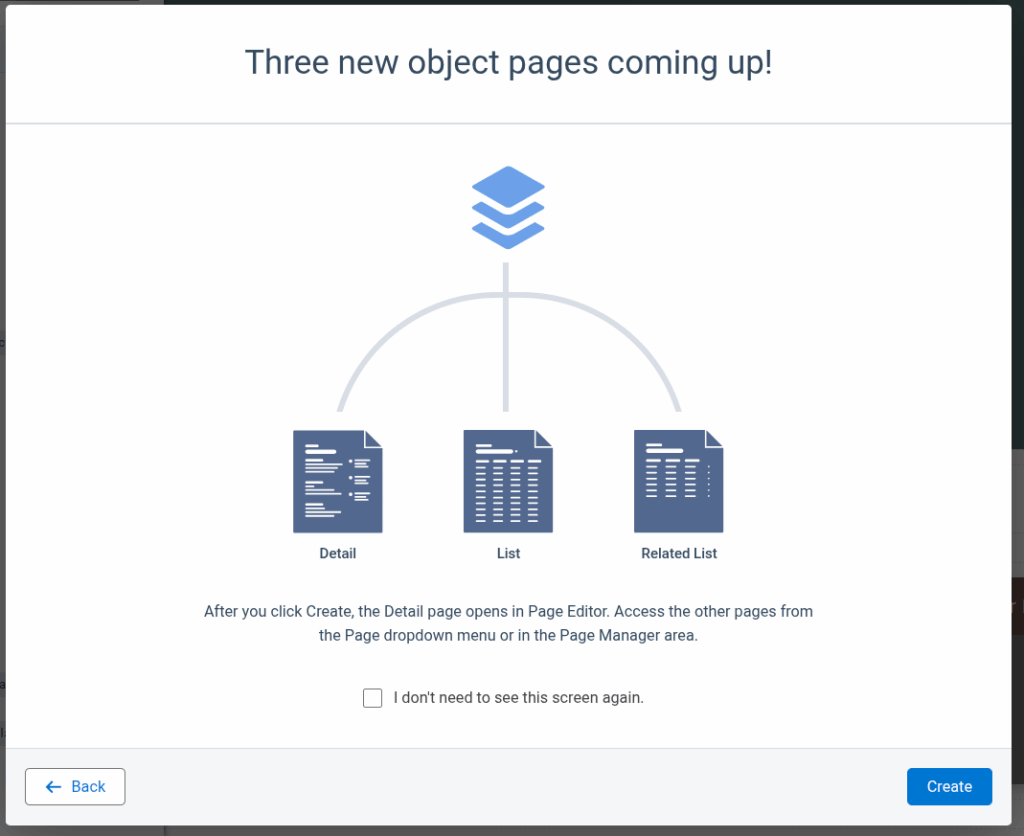
Three pages will be created for your Experience Cloud site:
- Detail Page: displays a specific record, its fields, and actions.
- List Page: displays a list of records owned by the Experience Cloud user.
- Related List Page: Displays a list of related records accessible by the user.
See the next section for information about creating navigation to your object pages.
Create Navigation to Your Payments Page #
Depending on how you plan to take payments in Experience Cloud, you will need to create a means for your Experience Cloud users to navigate to it. This is the perfect time to carefully consider how your users will access and navigate your site based on your specific use case. For testing purposes, we’ve provided instructions for adding a Tile Menu to your Home page to access your payments page quickly.
- In Salesforce, click the gear icon
 and select Setup.
 - In the Quick Find, search for and select All Sites.
- To the left of your site, select Builder.
- In the left sidebar, click Components.
- Search for the Tile Menu component.
- Drag the Tile Menu component to your Home page.
- Click the Tile Menu component to open the configuration options.
- Select a Default Menu from the dropdown.
- You can select the Default Navigation option or create a new navigation menu.
- Click Edit Default Navigation (This button’s name will reflect the name of your navigation menu).
- If your object isn’t already present, click +Add Menu Item.
- Populate the following fields:
- Name: Choose an appropriate name, for example, “Customer Payments”.
- Type: Salesforce Object.
- Object Type: Choose your object, for example, “Customer Payment”.
- Default List View: Choose your preference.
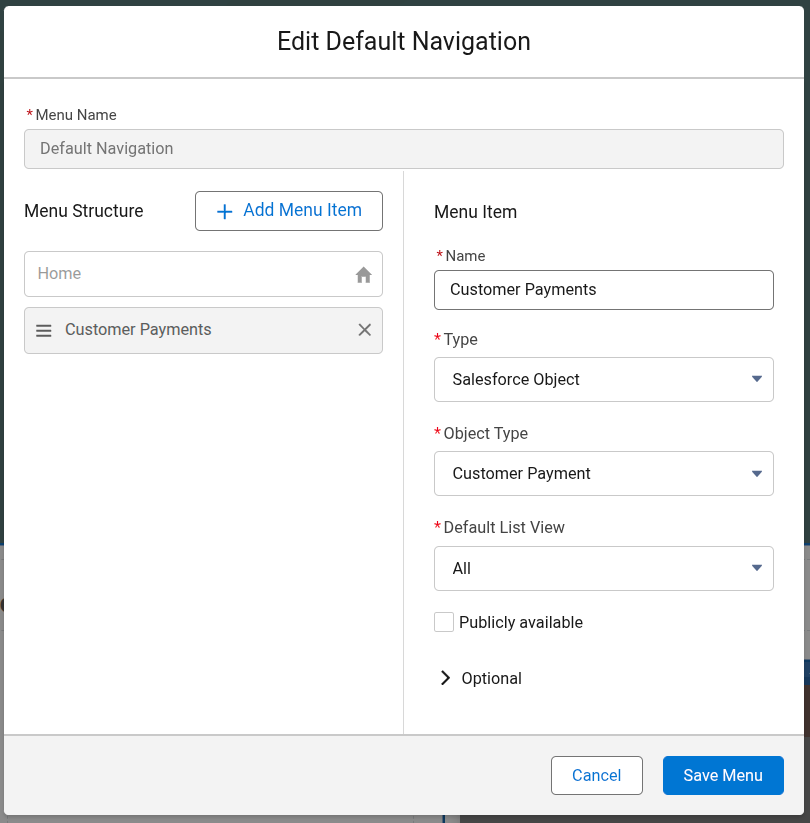
- Click Save Menu.
- In the top right, click Publish to make your changes available.
Keep in mind, there are multiple options for navigation in Experience Cloud. The simplistic example above will allow you to test your payment solution with minimal effort, allowing a user to navigate to a list of records they own.
For additional instructions, see Salesforce’s documentation: Tile Menu or Navigation Menu.
Create an Experience Cloud User #
Experience Cloud Users function a bit differently than standard users in Salesforce and are based on a Contact record. When testing payments in Experience Cloud, we recommend creating and logging in as an Experience Cloud User to simulate a realistic payment scenario.
Depending on your licenses, to create or log in as your Experience Cloud User, you’ll need the “Manage External Users” or “Manage Customer Users” permission. Additionally, ensure object and record-level access to the Account object is set to “Edit”. See Login As Experience User Button Not Visible for Internal Users for more information.
The following instructions specifically refer to creating a Customer User. For more information about the required licenses, permissions, or instructions on enabling a Partner User, refer to Create Experience Cloud Site Users.
Enable a Customer User
- In Salesforce, click the AppLauncher
 .
. - Search for and select Contacts.
- Either select an existing Contact or click New to create a new Contact.
- As a note, your Contact must be related to an Account to become an Experience Cloud User.
- Click the down arrow in the top right corner.
- Select Enable Customer User.
- Complete the required fields and click Save.
Assign the Chargent Community User Permission Set Group
- Go to the App Launcher and click the Chargent app.
- Click the Chargent Settings tab and choose the Manage User Permissions option under the Global Settings subtab.
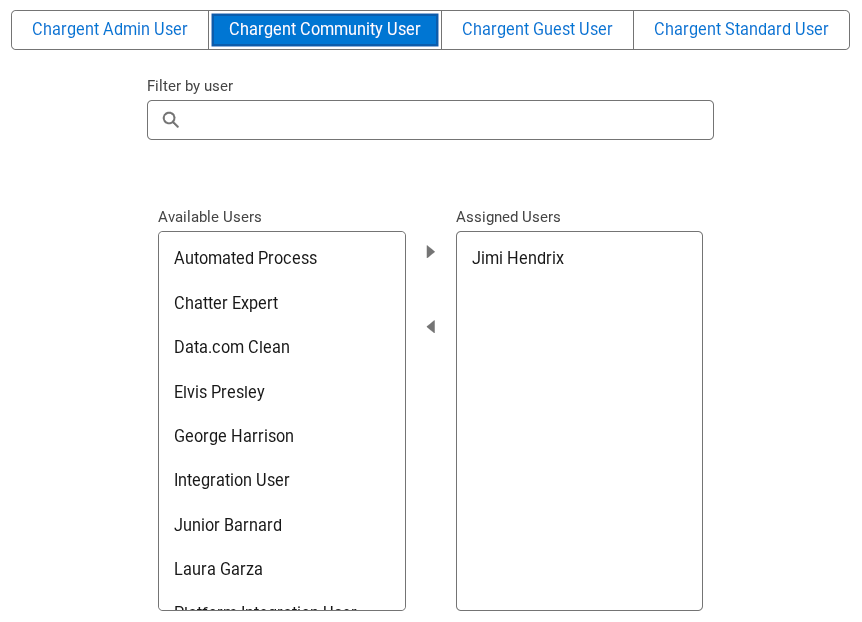
- Select the Chargent Community User tab.
- Select your Experience Cloud User and click the right-facing arrow to assign the permission.
- Repeat step 4 for any additional Experience Cloud Users.
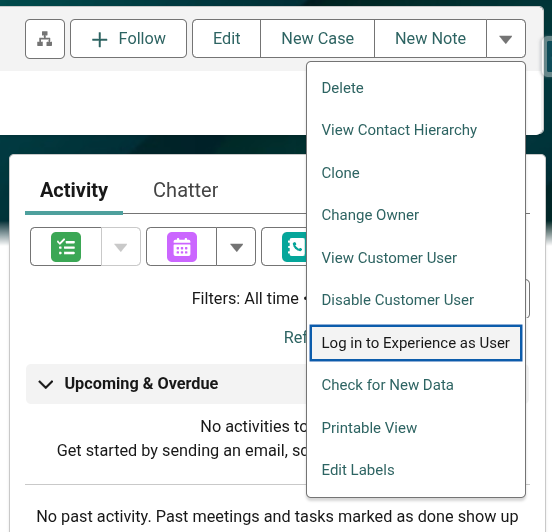
Log In as a Your Customer User
- In Salesforce, click the AppLauncher .
- Search for and select Contacts.
- Visit the Contact record for your Experience Cloud User (enabled in the previous section).
- Click the down arrow in the top right corner.
- Select Log in to Experience as User.
Enable Payments in Experience Cloud #
Now that your Experience Cloud Site is set up, you’re ready to add your preferred Chargent payment solution. We’ve developed several options tailored to various use cases.
Use the Take Payment Component on a Detail Page
Chargent’s Take Payment Lightning Web Component (LWC) enables any Experience Cloud site to accept payments. Maintenance-free and designed for simplicity over flexibility, the LWC can be placed directly on an Experience Cloud’s Object Detail Page.
For more information, see Take Payment in Experience Cloud.
Use the Take Payment Component in a Flow
Chargent’s Flow-enabled Take Payment Component introduces flexibility and automation to your Experience Cloud payments. Those with Salesforce Flow experience can create a Screen Flow that includes Chargent’s Take Payment Component, which can be placed on any Experience Cloud page (not just an object’s Detail Page).
For more information related to setting up Flow-Enabled Take Payment for your authenticated Experience Cloud users, see Take Payment in Experience Cloud Using Flow.
Allow Guest Users to Access the Take Payment Component
After creating your Take Payment Flow via Take Payment in Experience Cloud Using Flow, you can extend its functionality to allow your unauthenticated guest users to make payments on any Experience Cloud page.
For more information on setting up Flow-Enabled Take Payment for your unauthenticated Experience Cloud users, see Take Payment in Experience Cloud for Guest Users.
Use Chargent Custom Checkout for a Flexible Look and Feel
Chargent Custom Checkout, a pro-code solution for developers, allows you to create secure, pixel-perfect payment pages that match the look and feel of your company’s branding. This solution offers additional customization options beyond the Take Payment component and is recommended for experienced developers only. This feature is available for our Growth and Enterprise Pricing Plans.
Compare Chargent Custom Checkout with our out-of-the-box Take Payment component.
Take a Developer-Centric Approach with Chargent’s Payments API
If you’re an experienced developer, you can use Chargent’s API to create fully customized solutions for your Experience Cloud site. For example, you can utilize our Flow API to build a solution that meets your specific use case. This feature is available for our Growth and Enterprise Pricing Plans.
For more information, see our Developer Documentation.
See Also
Chargent for Experience Cloud
Chargent Terminology
Salesforce Experience Cloud

