Chargent’s Flow-enabled Take Payment Component builds upon the Take Payment Lightning Web Component, enabling you to create a customized payment experience for your Experience Cloud users. You can create a flow and use Chargent’s Take Payment Component on any page in Experience Cloud (formerly known as a Salesforce Community).
Before You Begin #
This page assumes a basic knowledge of Salesforce Flow. For more information, see Automating Chargent with Flow. Additionally, ensure you have completed the following steps:
- Install and configure the latest version of Chargent in Salesforce
- Create and configure your Salesforce Experience Cloud Site
Determine Your Use Case
This page provides step-by-step instructions for implementing Chargent’s Take Payment component in a Screen Flow for your authenticated Experience Cloud users. This method focuses on customization and flexibility, allowing you to accept payments from any Experience Cloud page (not just Detail Pages).
- Take Payments in Experience Cloud: If you want a simple and easily maintained payment solution for your authenticated Experience Cloud users, limited to Experience Cloud Detail Pages. This simplistic solution involves placing a Lightning Web Component (LWC) on your desired Detail Page and requires no Flow experience.
- Take Payments in Experience Cloud for Guest Users: If you want to allow unauthenticated Guest Users to make payments via your Experience Cloud site. This process involves adding Take Payment to a Screen Flow and assumes you have completed the steps on this page beforehand.
Assign Licenses and Permissions
Before implementing the Take Payment component, you must first assign the appropriate licenses and permissions. Consideration should be given to internal users, such as your Salesforce Administrator(s) and users who will access Chargent records, as well as external Experience Cloud users who will utilize the Take Payment Flow to make payments.
- Assign Salesforce Licenses
- All Experience Cloud users will require Experience Cloud User Licenses.
- Assign Chargent Licenses
- In a production or developer org, all Chargent users, whether internal or external, must be assigned Chargent licenses. This includes your Experience Cloud users.
- Merchants with numerous community users are encouraged to sign up for Chargent’s usage-based pricing model, in which case Chargent licenses are not required (contact sales for more information).
- Licenses are not required in scratch or sandbox Salesforce orgs.
- Assign Salesforce Permissions
- Assign the “View Setup and Configuration” and “Customize Application” system permissions to your Chargent Administrator(s).
- Ensure your community users have the “Run Flows” permission assigned.
- Assign Chargent Permissions
- Assign the “Chargent Community User” Permission Set Group to all community users who will access the Take Payments component.
- Assign the “Chargent Standard User” Permission Set Group to all internal users who will access Chargent records.
- Assign the “Chargent Admin User” Permission Set Group to your Chargent Administrator(s).
Create the Take Payment Screen Flow #
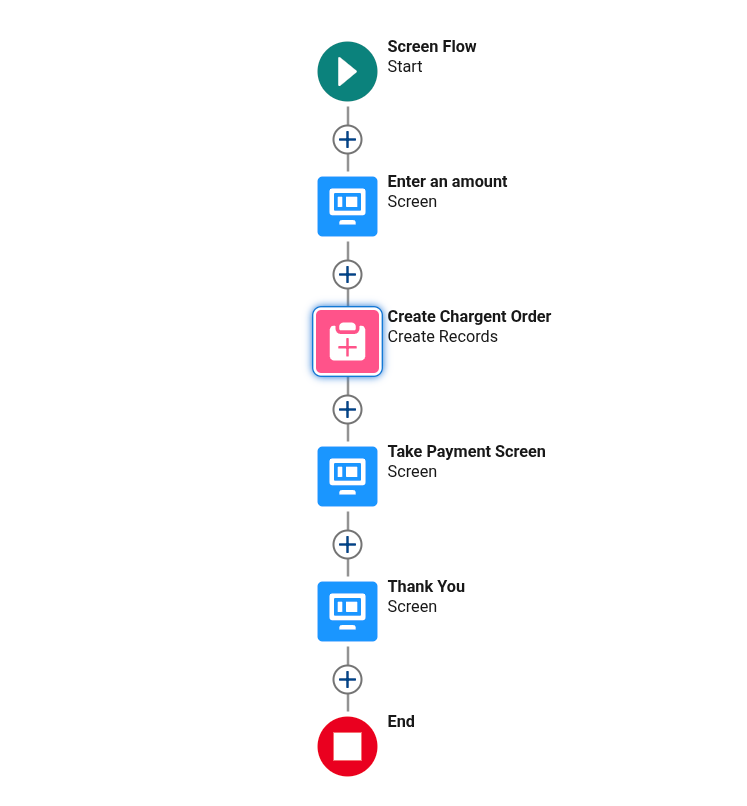
When Take Payment is added to a Screen Flow, you unlock the full capabilities of Experience Cloud payments and Salesforce Flow. As such, the customization options are endless. To limit the scope of our documentation, we will present a simplistic example of taking a donation where the payee chooses their donation amount. See the Flow outline below.
Create a New Flow
Get started by creating a Screen Flow to host your payment experience.
- Click the gear icon
 and select Setup.
 - In the Quick Find, search for and select Flows.
- Click New Flow.
- Select Start From Scratch and click Next.
- Select Screen Flow and click Create.
Create Your Variables and Custom Elements
Before continuing, ensure that you have considered and created any necessary Flow variables or elements that will precede the transaction.
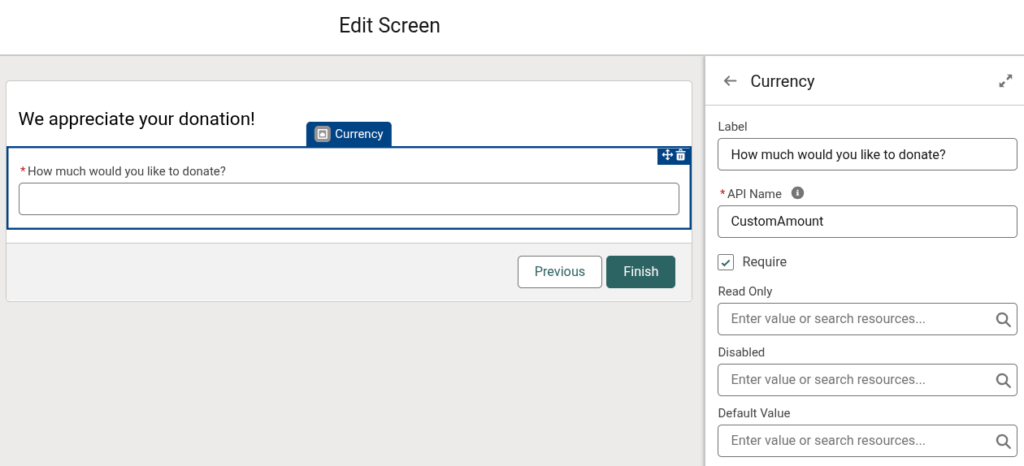
Most importantly, you must provide a currency value representing the amount to be charged. There are several ways to accomplish this. In the example below, we have created a Screen element that stores an amount chosen by the payee in {!CustomAmount}, a helpful solution for donation collection.
The following example represents one of many ways to acquire the amount to be charged:
- Click the plus sign under Start and select Screen.
- On the right side of the Screen editor, set the values as follows:
- Label: Enter an amount
- API Name: Enter_an_amount
- In the left sidebar, find and drag the Currency component onto your screen.
- Click the Currency component to open the configuration options on the right side of the Screen editor.
- Enter the following information:
- Label: How much would you like to donate?
- API Name: CustomAmount
- Require: Checked
- Click Done.
Create a Chargent Order Record
Next, create a Chargent Order record to facilitate your payment. The Chargent Order record acts as the parent of the Transaction. By creating a Chargent Order record, you enable the flow to be placed on any Experience Cloud page, not just Detail pages. (Alternatively, you can retrieve an existing Chargent Order record using a Get Records element or refer to a Chargent Order Lookup Field on another object.)
- Click the plus sign and select Create Records.
- This element can be added anywhere in your flow, but should be located after obtaining the amount to be charged and before the Screen element for Take Payment. See the previous section for an example.
- Populate the fields in the Create Records element as follows:
- Label: Create Chargent Order
- API Name Create_Chargent_Order
- How to set record field values: Manually
- Object: Chargent Order
- At minimum, set the following Field Values for the Chargent Order:
- Field: Subtotal <- Populate with the API Name of the currency variable, noted in the previous step (in our example, this is {!CustomAmount}).
- Field: Gateway <- Populate with your Gateway record’s ID (found by visiting the gateway record and copying the 18-character value from your web browser’s URL).
![]()
Note: Depending on your use case, you may wish to populate the Charge Amount field instead of the Subtotal field. When populating the Charge Amount field, you must also set Manual Charge to True. For more information, see How does the Charge Amount field work?
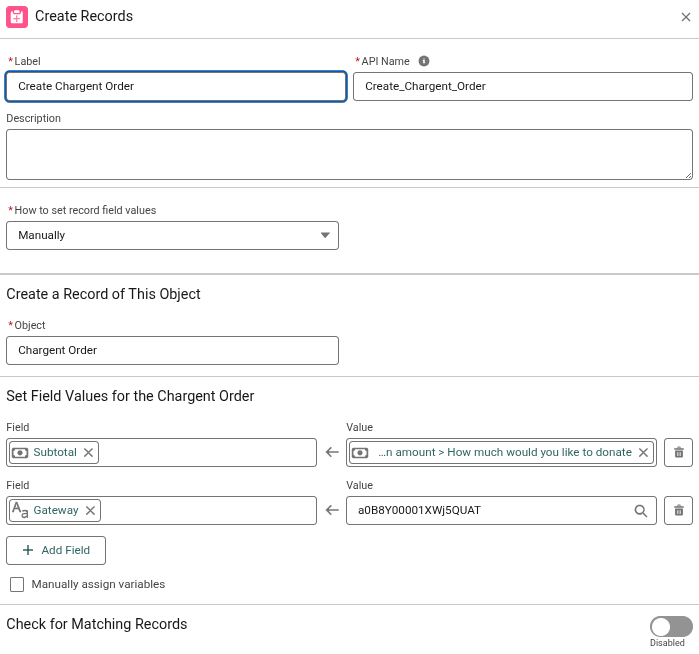
- Click Done.
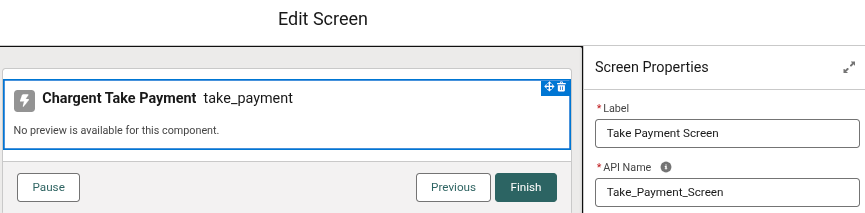
Create a Screen Element for Take Payment
Now, add a Screen Element. This is where you will add the Take Payment component, which presents a pay form to the payee.
- Click the plus sign and select Screen.
- This element must be placed after an amount to be charged is saved and the Chargent Order record has been established. See the previous two steps for more information.
- On the right side of the Screen editor, set the values as follows:
- Label: Take Payment Screen
- API Name: Take_Payment_Screen
- In the left sidebar, scroll down to Custom.
- Drag the Chargent Take Payment component onto your screen.
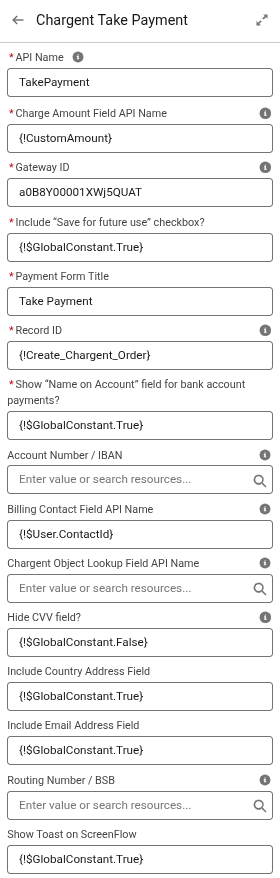
Configure the Take Payment Component
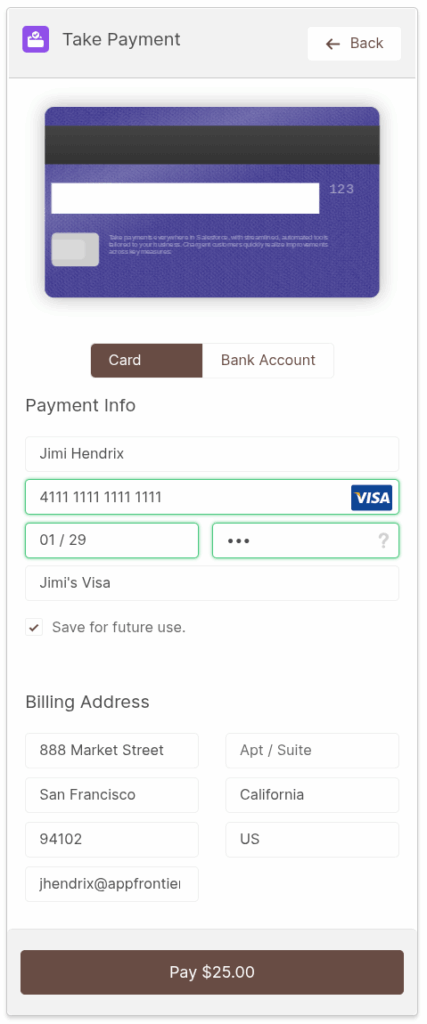
Click the Chargent Take Payment component to open the configuration options on the right side of the Screen editor. Please see the configuration field descriptions below. Your customization will ultimately determine the values. Below the table, we have included a screenshot of an example configuration related to our donation use case.
| Label | Description |
| API Name* | Choose a unique API Name for the Chargent Take Payment component. For example, take_payment. |
| Charge Amount Field API Name* | Represents the amount to be charged. If the Flow is placed on a Detail Page for an object and the Record ID configuration field is set to {!recordId}, you can add the API Name of a currency field from the object. For greater flexibility, use a Flow variable to specify the amount to be charged. This can be obtained via a Screen element, a Get Records element, a Create Records element, and so on. For example, {!CustomAmount}. |
| Gateway ID* | Enter your Gateway record ID. Found by visiting the gateway record and copying the 18-character value from your web browser’s URL. |
| Include “Save for future use” checkbox?* | Populate with {!$GlobalConstant.True} to allow authenticated users to associate payment method details with their user, enabling Chargent to display them to the payee on future purchases. Otherwise, enter {!$GlobalConstant.False}. For more information, see Understanding the “Save for future use” Checkbox. |
| Payment Form Title* | Enter the header text that will be visible to the payee above your Take Payment payform. |
| Record ID* | Represents the record being referenced by the component. If the Flow is placed on an object’s Detail Page, you can refer to the Detail Page’s record using {!recordId}. For greater flexibility, including adding the Flow to Experience Cloud pages that are not Object Detail Pages, we recommend referencing a Create Records or Get Records element. For example, {!Create_Chargent_Order}. |
| Show “Name on Account” field for bank account payments? | Populate with {!$GlobalConstant.True} to display the Name on Account field on the payform and capture the payee’s name for bank account payments. Otherwise, enter {!$GlobalConstant.False}. |
| Account Number / IBAN | Enter the label for the Bank Account Number. If left blank, the value will be “Account Number”. |
| Billing Contact Field API Name | Enter the API name for the contact lookup field of the payee. If provided, the billing address fields will be auto-populated by default, allowing the payee to change them if necessary. If left blank, the payee will be prompted to enter the data manually. To refer to the current Experience Cloud user, the value should be {!$User.ContactId}. |
| Chargent Object Lookup Field API Name | Enter the API name of the Chargent Order lookup field. If the Flow is placed on the Chargent Order Detail Page or includes a Create Records or Get Records element that refers to the Chargent Order, the API name should be left blank. If the Flow is placed on any other object’s Detail Page or refers to any other Salesforce object (via Get Records or Create Records), a Chargent Order Lookup Field must exist on that object. Create a custom lookup field that references the Chargent Order object and add the field’s API name here. For example, Chargent_Order__c. |
| Hide CVV field? | Populate with {!$GlobalConstant.True} to hide the CVV field on the payform, in which case the CVV will not be captured for credit card payments. Otherwise, enter {!$GlobalConstant.False}. |
| Include Country Address Field | Populate with {!$GlobalConstant.True} to display the Country field on the payform and capture the payee’s billing country. Otherwise, enter {!$GlobalConstant.False}. |
| Include Email Address Field | Populate with {!$GlobalConstant.True} to display the Email field on the payform and capture the payee’s email address. Otherwise, enter {!$GlobalConstant.False}. |
| Routing Number / BSB | Enter the label for the Bank Routing Number. If left blank, the value will be “Routing Number”. |
| screenFlowToastEnabled | Show a Toast on ScreenFlow. This should always be populated with {!$GlobalConstant.True}. Do not change this value. |
* indicates a required field
When your configuration is completed, click Done.
Configuration Example
See the configuration example below. As mentioned above, our example Flow collects a custom donation amount, stored in {!CustomAmount}. The Flow also references a Get Records element called {!Create_Chargent_Order}, where a Chargent Order record was created. Since the record being referenced (the Record ID configuration field) is a Chargent Order record, the Chargent Object Lookup Field API Name is left blank. Your use case may differ.
Add Additional Follow-Up Elements
When a payee completes their payment using the Take Payment component, they will receive confirmation of success or failure directly on the Take Payment screen. However, you may wish to include additional processes or a “Thank You” screen after a payment is completed. Consider your use case and add any necessary follow-up elements as needed.

Save and Activate Your Flow
With your Take Payments Flow completed, ensure that you save and activate it.
- In the top right of the screen, click Save.
- Provide a Flow Label, Flow API Name, and Description for your Flow.
- Click Save.
- To make your Flow available for use, click Activate in the top right of the screen.
Add the Take Payment Screen Flow to an Experience Cloud Page #
Finally, add the Take Payment Flow to the Experience Cloud Page of your choice. To get started, visit the Experience Builder and add the component to your page.
- Click the gear icon
 and select Setup.
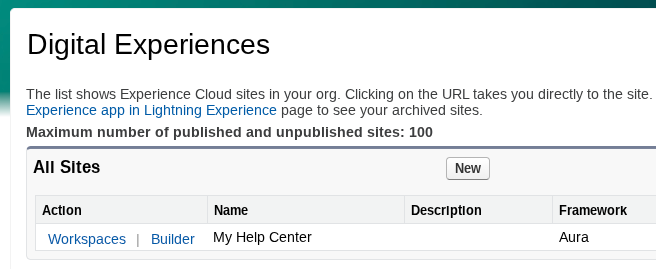
 - Using Quick Find, search for and select All Sites.
- Find your Experience Cloud site in the list and click Builder.
- Click the dropdown in the top left (initially set to “Home”).
- In the list, find and select the page to which you want to add the Take Payment Flow.
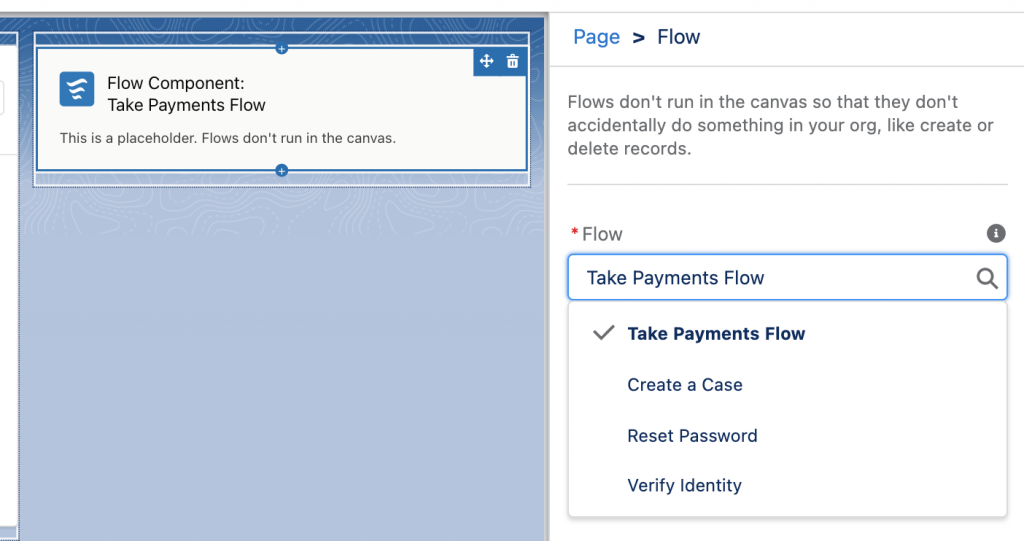
- Click the Components Icon and scroll down to the Process Automation section.
- Drag the Flow component onto your Experience Cloud page.
- In the configuration menu on the right-hand side of the screen, click the Flow drop-down.
- In the list, find and select your Take Payment Flow.
- Click Preview to review your work.
- Click Publish to make this change available to Experience Cloud users.

Next Steps #
- Test Your Component: Now that your Take Payment Flow is up and running, we recommend testing it by logging in as an Experience Cloud user and creating test transactions. For more information about testing in general, see Testing Chargent.
- Using Take Payment: Refer to Using the Take Payment Component to explore the various options available when using the Take Payment component.
- For Developers: Learn about how the Payment Completion Event allows you to identify when a payment attempt has been completed using the Take Payment component.
Troubleshooting #
- Error: Something Went Wrong: If you receive the error, “Something went wrong,” see Take Payment Error: Something went wrong.
- Error: Attempt to dereference a null object: If you receive the error, “Attempt to dereference a null object,” see Take Payment Error: Attempt to Dereference a Null Object.
- Missing Payment Fields: If your Take Payment component is missing fields, see Why is the Take Payments component missing payment fields?
Note: SCA scenarios cannot be executed using Take Payment in Flow. Screen Flows are not compatible with iframes and opening external URL pages.
See Also #
Setting Up Payment Methods
Take Payment in Experience Cloud
Take Payment in Experience Cloud for Guest Users

