Payment Request allows you to quickly and easily generate and email payment links (in the form of a URL) to your customers from Chargent Anywhere. You can configure Chargent Anywhere on any object and use it to send a payment link in a Salesforce email template. It is the most secure way for your customers to enter their payment information. Additionally, our Automated Collections and Account Updater features leverage payment requests to provide customers with a secure way to update payment information.
For more information about Payment Request use cases, see Payment Request.
Prerequisites #
Before setting up Payment Requests, you must install and configure Chargent. For more information, visit our Installation and Setup Guide.
Setting Up Payment Request #
To send Payment Requests, you must set up a Salesforce Site and configure a Payment Request Template.
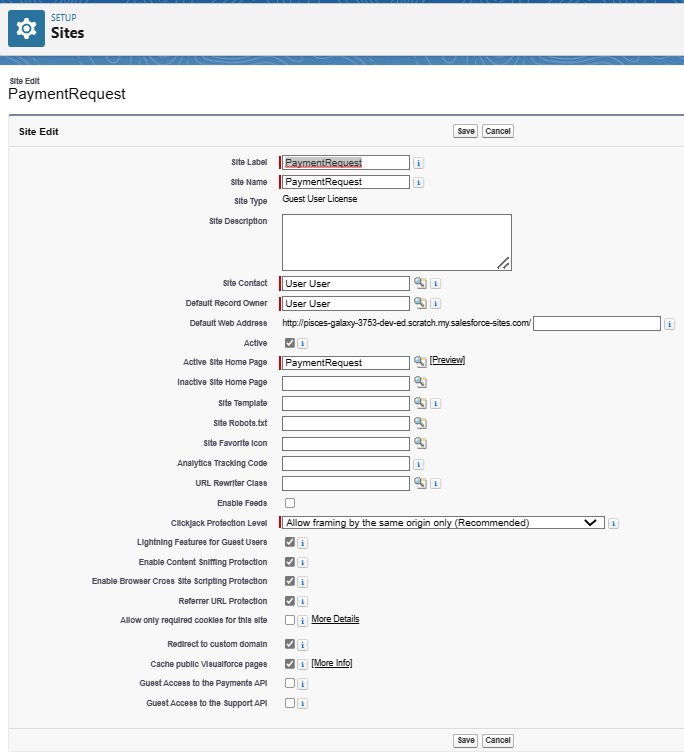
Set Up Your Site
- Click the gear icon
 and choose Setup.
 - In the Quick Find box, enter Sites and select Sites under Sites and Domains within the User Interface section.
- Click New to create a new site.
- Enter a Site Label to use as a name for your site, such as “Payment Request.”
- Enter a Site Name to refer to this site in the API, such as “PaymentRequest.”
- Select Active to activate this site after you save.
- Select PaymentRequest (with no space between the words) from Active Site Home Page.
- Use the default setting for Clickjack Protection Level or check with your IT department.
- Click Save.
Click here for more information about configuring Salesforce sites.
Note: If you are upgrading from an older version, replace the Active Site Home Page value with “PaymentRequest” to use your original pages. This is done by clicking Setup and editing your site. This can be enabled in the Layout section of the Setup under Developer Pages.
Configure Payment Request Templates
Once your site is set up, use the Payment Request Setup wizard to set up your payment request templates. Payment request templates control what is displayed to customers when they receive a payment request.
Payment Requests allow you to display an option for customers to store their payment method details for future use. This option is only available if you have enabled the Payment Method feature.
Note: Your Chargent installation may not have Payment Methods enabled. Once enabled, it cannot be disabled. See Setting Up Payment Methods for more details about enabling this feature.
- Select Chargent from the
 App Launcher.
 - Click the Chargent Settings tab.
- Click the Payment Request Setup subtab. If your site is set up correctly, Chargent displays an option to create a new payment request template. You can have more than one payment request template.
- Click New to create a new template.

- Salesforce displays all sites you previously created. Choose the site dedicated to your Payment Requests.
- Select the link to your Payment Request site, which was created in the previous section.
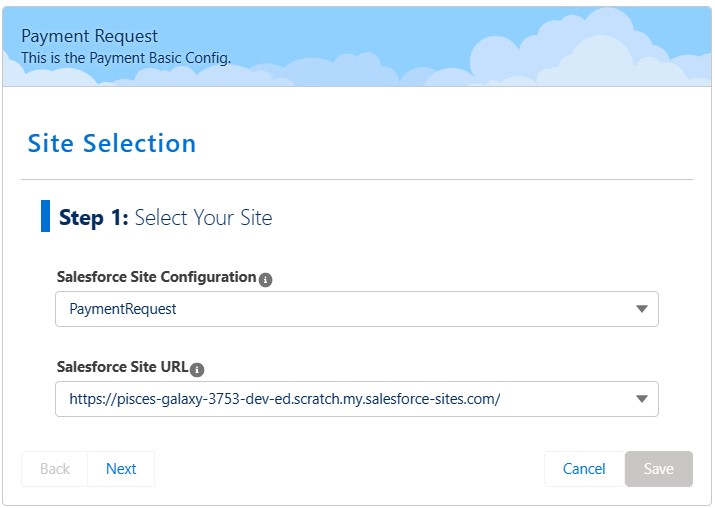
- Click Next.
- Choose from the following options for your payment method template.
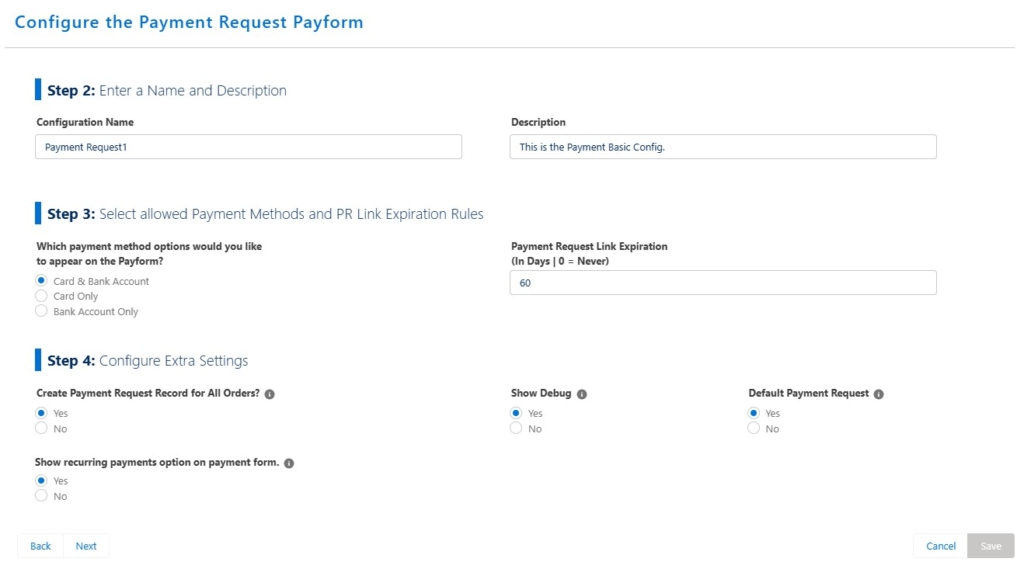
Configuration Name | Choose a name that helps you identify this payment method template. |
Description | Provide a useful description that distinguishes this payment method template from others. |
Which payment method options... | Select the method(s) of payment you’d like to accept on this template. |
Payment Request Link Expiration | Enter the number of days before a payment request link expires. Enter zero if the link should never expire. |
Create Payment Request Record for All Orders? | Choose No unless your business requires that a new Payment Request record is automatically created each time a Chargent Order record is created by an authenticated user. A Payment Request record will not be created if an unauthenticated (guest) user creates the Chargent Order record. |
Show Debug | Choose No unless you are troubleshooting and need to review gateway requests and responses. |
Default Payment Request | Choose Yes to auto-populate fields with this payment request template. |
Show recurring payments option on payment form. | Choose Yes to display an option for customers to save their payment details for other purchases from your business. This option will not be available to customers if you select No. This option requires activation of the Payment Methods feature. For more information, visit Setting Up Payment Methods. |
- Click Next.
- Choose your preferred text and messages for your payment method template and click Next.

Edit your Welcome Text | Enter a friendly message that asks the customer to enter their payment information. |
Success Page Text | Enter the message you want displayed to your customers when their payment is processed successfully. |
Failure Page Text | Enter a message to display to your customers when payment was not processed successfully. We recommend suggesting a solution. |
Cancel Page Text | Enter a message you want to be displayed to customers when they request a payment be canceled. |
Payment Request Footer | Enter the information you want displayed at the bottom of your payment method template. Most businesses include their business name, address, website information, and phone number here. |
Developer Pages | To use Visualforce pages instead of a payment request template, see Developer Pages for Payment Request. |
- Click Next.
- Add your company branding in the following settings.
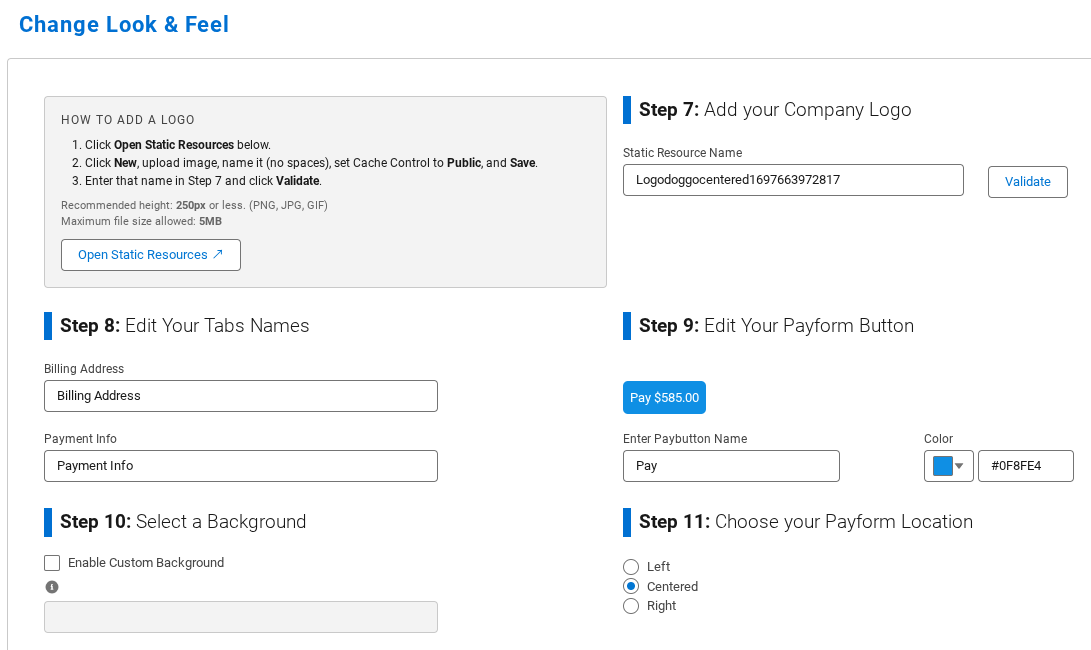
Upload your Company Logo | When creating or updating a Payment Request template’s Company Logo in Salesforce (Step 7), a static resource must be added beforehand. You can follow the in-app instructions to manually upload a static resource to your Salesforce org.
|
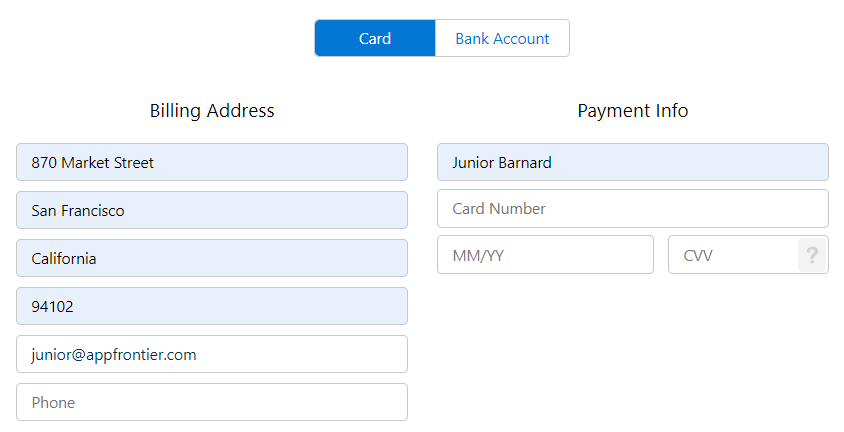
Edit Your Tab Names | Your page has two sections: one for the billing address and the other for the card or bank account details. Edit the titles of each section to better fit your company’s branding. |
Enter Paybutton Name | By default, the title of the button is “Pay”. Enter another term based on your business requirements, such as “Donate”, or “Process Payment”. |
Color | Select a color for the button if you want it to match your branding. |
Enable Custom Background | To change your background image:
|
Choose your Payform Location | Select the option to align your form left, center, or right. |
- Click Next.
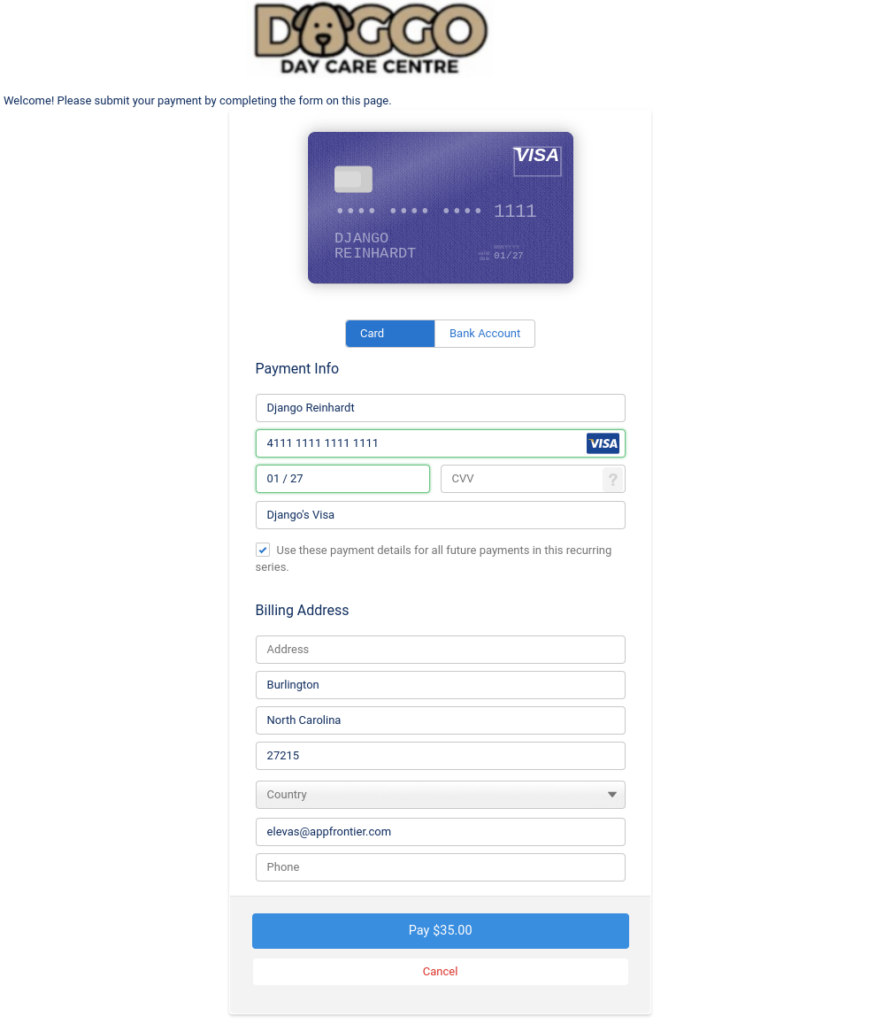
- Click Preview to review your settings and make any adjustments. Your payment request could resemble the sample below when your users receive it.
- Click Save.
Once you have created your first template, you can easily add additional templates with different branding by following the same steps.
Customize Payment Request Fields (Optional)
The fields displayed on the payform of your Payment Request page can be further customized by using Salesforce’s Field Sets and Custom Label tools. Note that these customizations will impact all Payment Request templates.
Show and Hide Fields with Fields Sets
If you don’t require complete Address Verification on your Payment Requests or wish to capture additional information, you can add or remove various fields on the payform using Field Sets.
Keep in mind that some Payment Gateways require specific fields. You may also configure whether a field is required by clicking on the wrench icon next to each field.
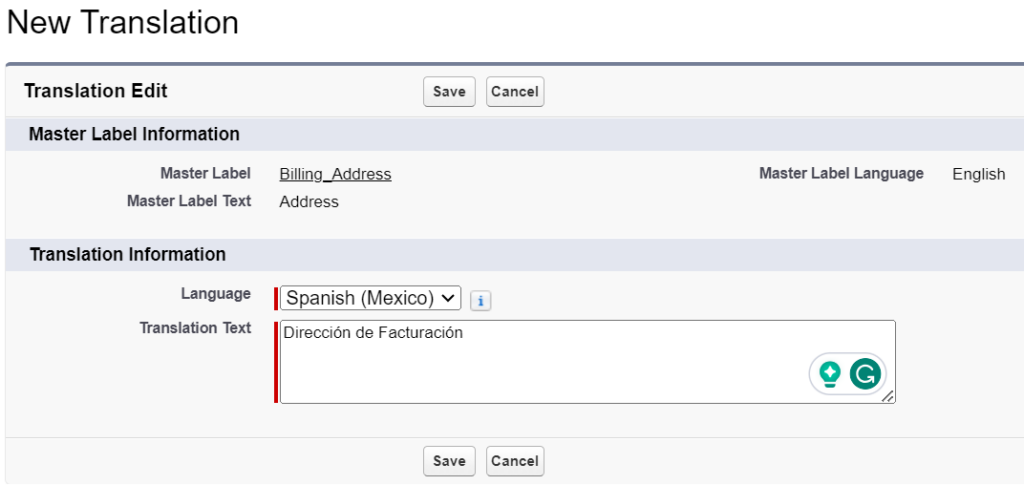
Change Field Names with Custom Field Labels
You can also customize the Field Labels of the fields displayed in the Billing Address section of your Payment Request templates using Salesforce’s Translation Workbench.
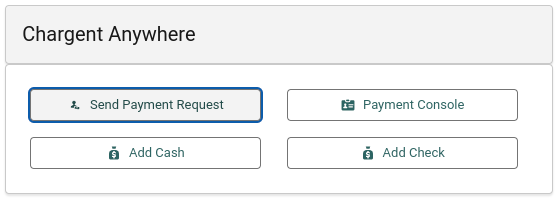
Sending a Payment Request #
Payment requests can be sent from any object in Salesforce using the Chargent Anywhere component. You can also implement Payment Request independent of the Chargent Anywhere component, such as in a screen flow (see Send Payment Request LWC). The instructions below will focus on using Chargent Anywhere to quickly and easily send a payment request to your customers, allowing them to pay via a secure emailed payment link.
- Set up Chargent Anywhere on an object in your org.
- Visit a record where Chargent Anywhere has been added.
- Click Send Payment Request in the Chargent Anywhere Lightning component.
- If you have more than one gateway configured, choose the gateway you’d like to use for the transaction.
- If you’ve only configured one gateway, the gateway will automatically be chosen, and the step will be skipped.
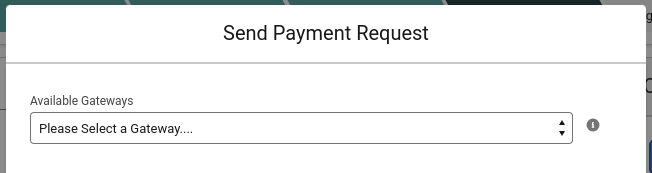
- Click Next.
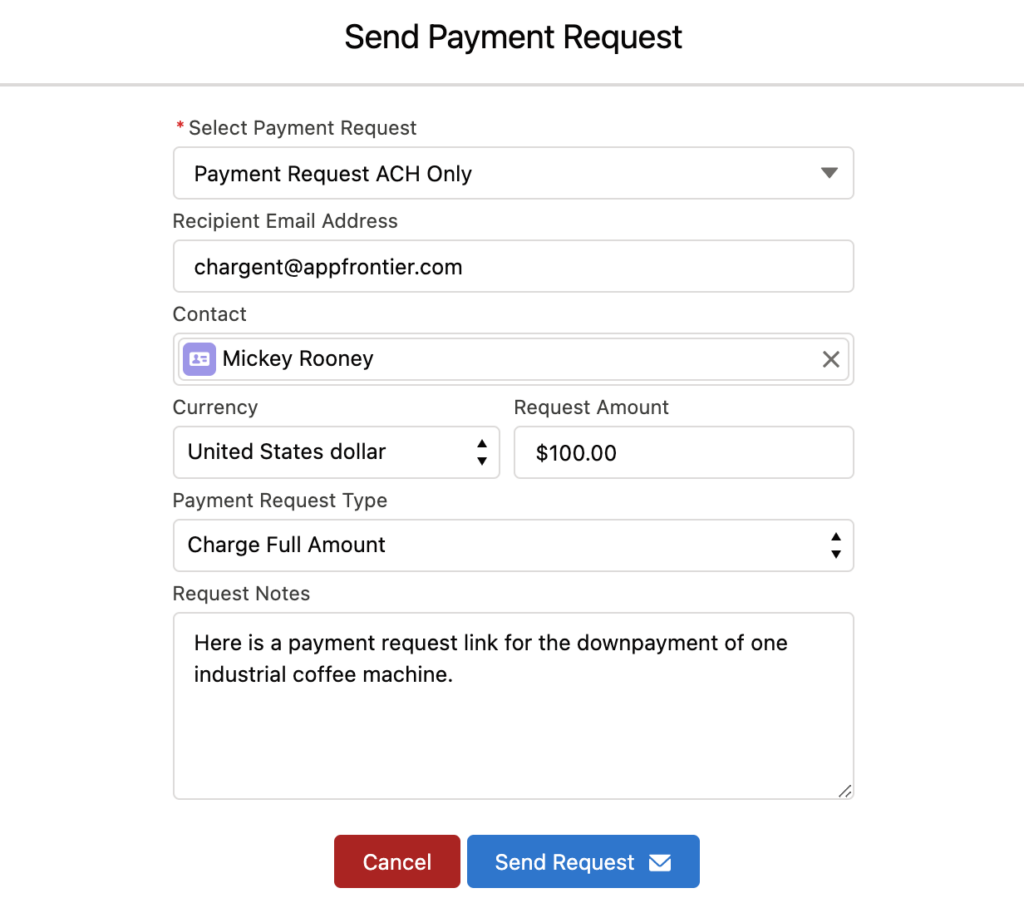
- If you have multiple payment request templates, select the template you want to use from the Select Payment Request Template picklist.
- Enter the email address of the contact who should receive the request in the Recipient Email Address field OR choose the contact from the Contact lookup. Only one of these fields needs to be populated.
- Confirm the Charge Amount.
- Choose a Payment Request Type from these options:
- ‘Charge Full Amount’ asks recipients to enter their payment details and completes the transaction.
- ‘Authorize Full Amount’ gathers and stores the recipient’s payment details for future use.
- Enter optional info in Request Notes, such as any notes you want the recipient of this payment request to see in the email they receive.
- Click Send Request.
When completed, you will see a green success message, and your customer will receive an email including a secure payform.
Completing a Payment Request #
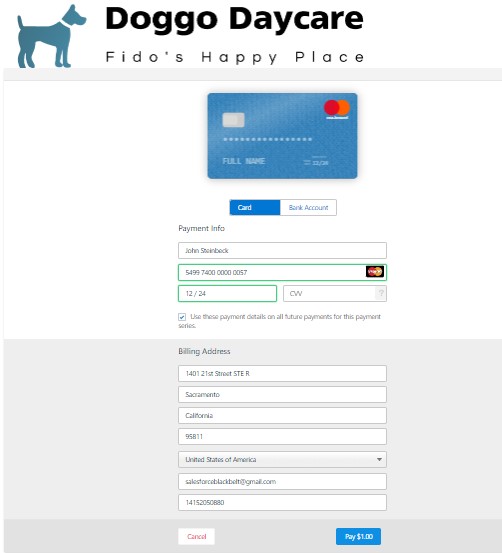
Once a Payment Request has been created using the steps above, an email with a secure payment link will be sent to the customer. When the customer clicks the payment link, they are directed to a payform, allowing them to enter their payment details and complete their payment.

Note: Payment Request is compatible with credit card surcharging. If you’ve enabled surcharging for your gateway record, the steps below will differ slightly. Please see Completing a Payment Request with Surcharging.
- Click the Payment Link in the “Chargent Payment Request Notification’ email.
- Fill out the billing information on the payform.
- Check the Use these payment details on all future payments for this payment series checkbox if you wish to store the payment details for later use, relating a Payment Method record to the recurring Chargent Order record.
- This action is only available for recurring transactions when Payment Methods is active in your org. To learn more, see Saving Payment Details for Later Use.
- Click Pay
When successful, Chargent displays a green success message, and the payer will receive a receipt noting the payment amount. Additionally, a transaction record will be created in Salesforce.
Tip: If your customers aren’t receiving receipts after completing a Payment Request, ensure your guest user emails aren’t blocked by following the steps in Why aren’t customers receiving email receipts?
Payment Request Related Objects #
The payment request process involves the following objects in your Salesforce instance:
- Chargent Order: The Chargent Order record acts as a payment profile. It indicates the payment method being used and the schedule of payments planned if configured for recurring payments. Transactions related to this record will also be associated and displayed.
- Chargent Payment Request: the Payment Request object consists of all Payment Requests for all transactions. Chargent associates each payment request with a Chargent Order record.
- Transaction: Once the Payment Request is completed and payment has been made, Chargent creates a transaction record showing the payment and associating the transaction with the Chargent Order.
- Chargent Payment Method: If the Use these payment details on all future payments for this payment series checkbox is checked, Chargent securely stores a record on this object.
Saving Payment Details For Later Use #
Using the Payment Method feature, customers can opt to save their payment details for later use via the Use these payment details on all future payments for this payment series checkbox on the payform.
The Use these payment details on all future payments for this payment series checkbox will only appear if the following three conditions are met:
- Payment Methods has been activated and configured in your org.
- The checkbox for Show recurring payments option on payment form is selected on your Payment Request Template.
- The related Chargent Order’s Payment Status equals ‘Recurring’.
Once the above criteria are met, your customers will see the checkbox on the payform. When selected, Chargent relates a Payment Method record to the recurring Chargent Order record.
For more information, see Payment Methods for Payment Request.
Note: Payment Requests are accessed and paid by an unauthenticated Site Guest User. While a Site Guest User can create a Payment Method record, Payment Methods cannot be exposed to the Site Guest User on the payform. This means your unauthenticated users cannot see or select previously saved payment methods. The internal user who generated the Payment Request will own the Payment Method record.
Chargent Payment Request Status Values #
Payment Requests have several different Status updates. This status indicates whether or not a payment request has been paid. For example, once the payment request is paid, the status field changes from Created to Paid. Click here for more information on these status values.
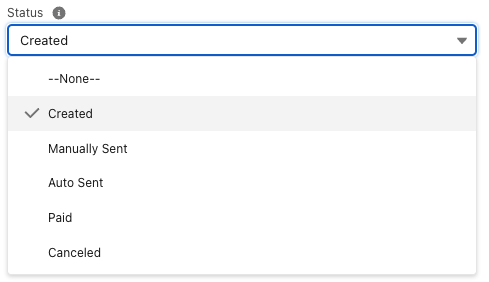
Please see the Status field value descriptions below:
- Created: This is the initial stage when a Payment Request is created (either by clicking the Send Pay Request button or automatically created).
- Manually Sent and Auto Sent: These options allow you to create automation around Payment Requests. Additionally, the Account Updater feature will automatically create and send a Payment Request when a card is about to expire, setting the status to “Auto Sent.”
- Paid: When the payment is made and the Transaction is successful, the status will be marked as “Paid”.
- Canceled: This field value must be selected manually. If the order was paid through a different means outside of Payment Request (for example, the payment is made through the Payment Console), you can update the status manually to indicate the Payment Request was canceled.

