Chargent allows you to set up recurring payments that automatically charge your customer’s payment method on schedule, such as daily, weekly, or monthly. Setting up recurring billing allows your organization to generate a more predictable revenue stream using a more convenient payment process for your customers.
The best way to set up recurring payments is to use Chargent’s Payment Console. Payment Console is available on any page you have configured Chargent Anywhere and allows you to process one-time and recurring payments from any object without ever storing sensitive payment information in Salesforce.

Before You Begin #
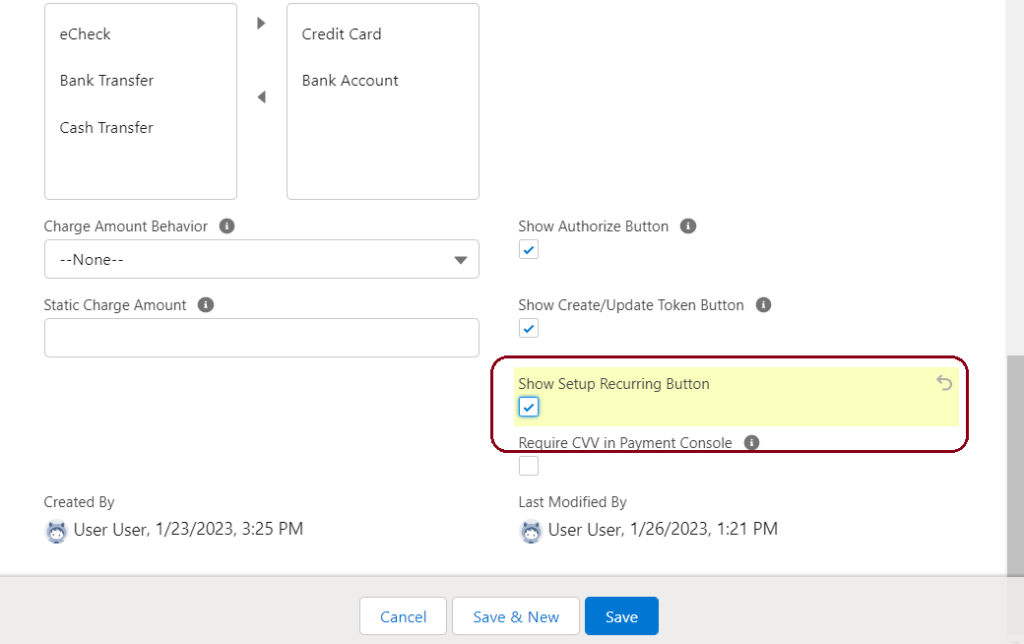
Make sure your gateway is configured to allow recurring payments. Check the gateway setup guide to ensure you have selected the Show Setup Recurring Button for your gateway.
If you’ve already set up your gateway and want to check this setting, follow this quick shortcut:
- Click the App Launcher icon
 at the top-left of your screen and choose Chargent.
 - Click the Gateways tab. You may have to add this tab to your tab set first.
- Select your gateway and ensure the Show Setup Recurring Button checkbox is selected. You may need to add the field to your page layout.
- Click Save.
Recurring Billing is scheduled based on the Recurring Billing Batch. This batch process is automatically created the first time you run Chargent’s Setup Wizard. For more information, see the Recurring Billing Batch section below.
Note: Surcharging is available for Recurring Billing. Please see Setting Up Surcharging for more information.
Creating Recurring Payments #
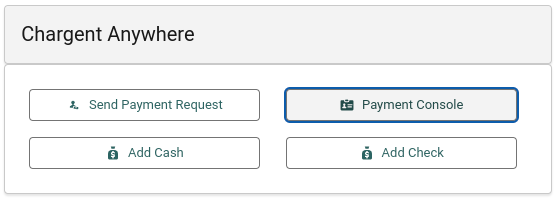
The following example demonstrates setting up recurring payments using the Payment Console button on Chargent Anywhere. Ensure you’ve set up Chargent Anywhere before continuing.
- Visit a record where you have Chargent Anywhere configured.
- Click Payment Console.
- Populate the required billing information on the form and click Continue.
- Optionally, click Update to change billing information and Continue to return to payment details.
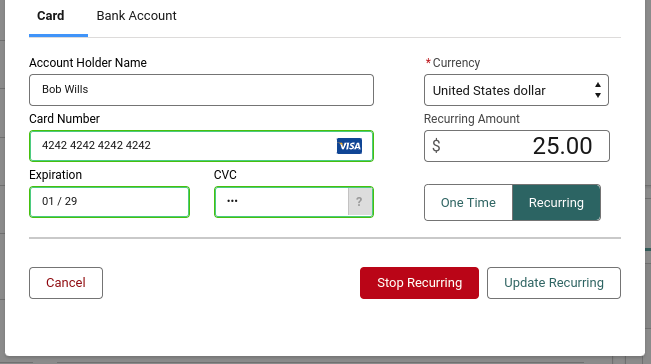
- Click Recurring and populate the following fields depending on the payment method (card or bank account):
| Card | Account Holder Name, Card Number, Expiration, and CVC (if configured to accept CVC) |
| Bank Account | Name on Account, Routing Number, Account Number, Bank Name, and Account Type |
| Initial Amount | Enter a one-time payment amount to be charged at the onset of the series, such as a down payment. You’ll be given the option to authorize this amount before charging the transaction if your gateway has configured it. Select Authorize Only to approve this amount without processing it.Note: this field does not show up if a recurring payment has already been applied to a record without an initial amount. To reset this, delete all recurring values, including the token, and it will redisplay. |
| Recurring Amount | Enter the amount to be charged repeatedly based on the recurring settings. If you change this amount, all future payments will be charged the new amount without changing previous payments.Note: when splitting payments between two parties (as in two parents who split child care payments), do not divide the recurring amount in half. Instead, create a separate recurring payment schedule for each party with a Bimonthly frequency. |

- Click Next to view recurring payment settings.
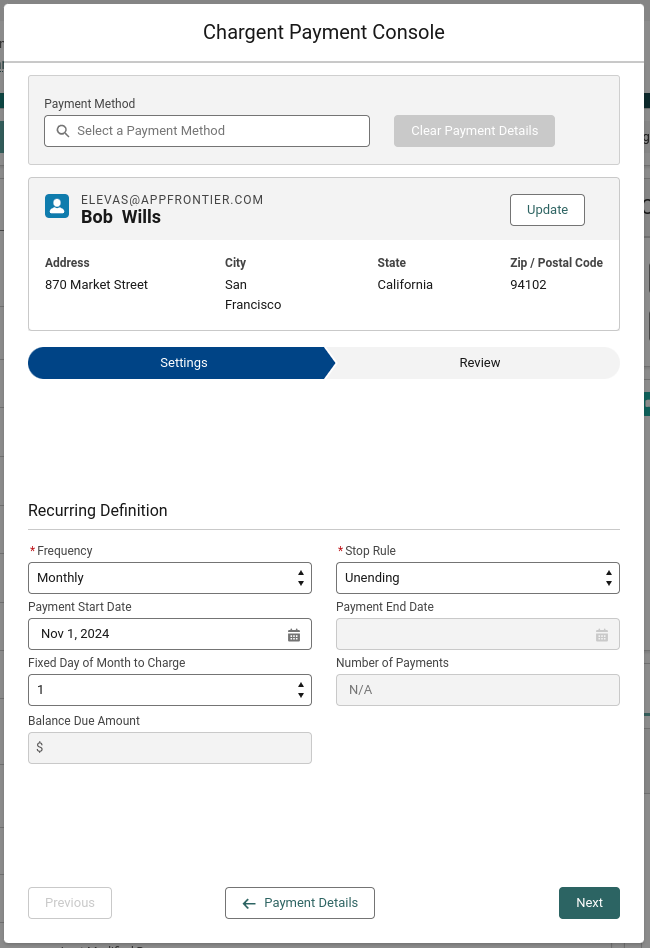
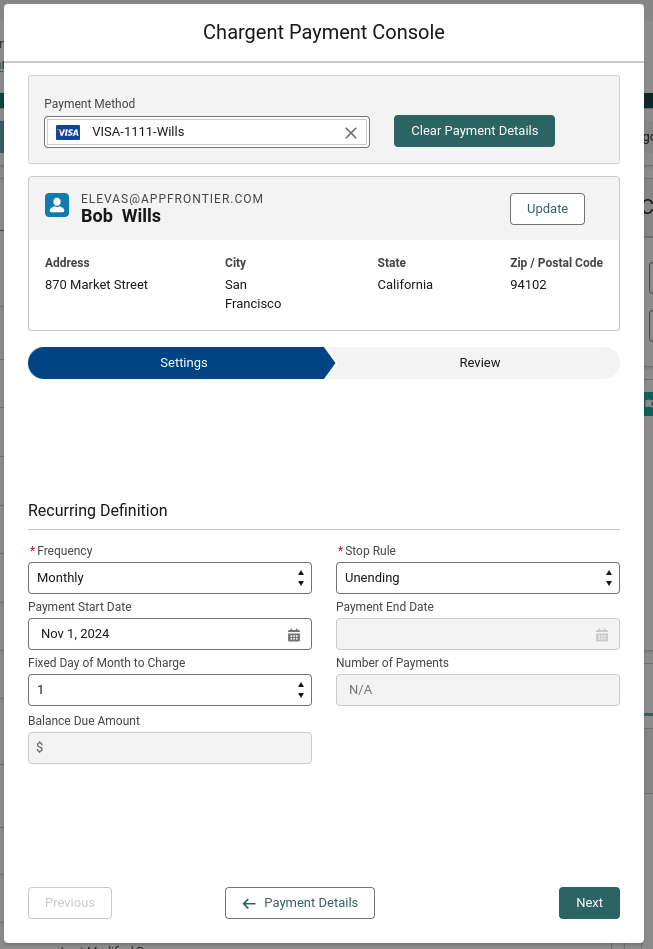
- Enter the following settings for your series of recurring payments:
| Frequency | Choose if you want this payment to recur Daily, Weekly, or Monthly. When you select any frequency besides Once, you also need to select an option in Payment Stop.Note: when splitting payments between two parties (as in two parents who split child care payments), create a separate recurring payment Chargent Order record for each party with a Bimonthly frequency. |
| Payment Start Date | Enter the date you want recurring payments to begin. Without this date, no charges will be attempted. Leave this blank until you are ready for payments to begin. |
| Fixed Day of Month To Charge This same field is labeled Charge Date on the Order object. | Enter the day of the month you want monthly or bimonthly charges to occur. Click here for more information on this setting. |
| Balance Due Amount | Chargent calculates this field based on the Total minus the total of all past transactions, including both charges and refunds. |
| Stop Rule This same field is labeled Payment Stop on the Order object. | Choose one of these options:
|
| Payment End Date | If Payment Stop is set to Date, enter the final date for this recurring payment. This is ignored and set to Unending if you choose Count as the Payment Stop option. |
| Number of Payments This same field is labeled Payment Count on the Order object. | Enter the total number of payments you want to recur. |
Chargent automatically sets default values for the following fields after you set up your recurring payment schedule:
| Payment Status | Set to Recurring. Click here to view other status definitions. |
| Payment Count | The total number of payments to be collected before a recurring payment stops. |
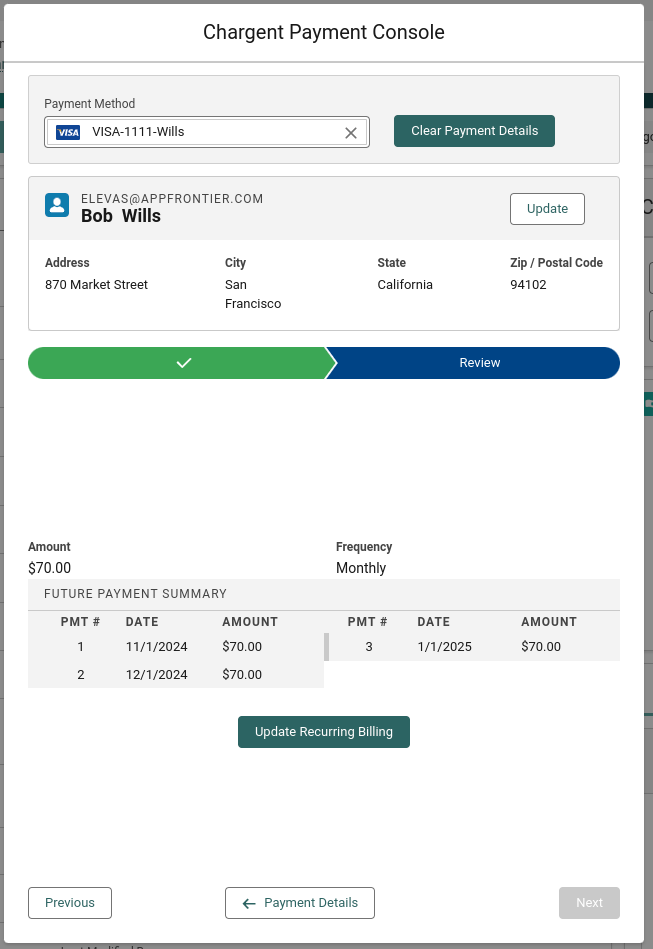
- Click Next to review the payment schedule and amounts.
- Click Charge to schedule the recurring payment and process the initial amount.
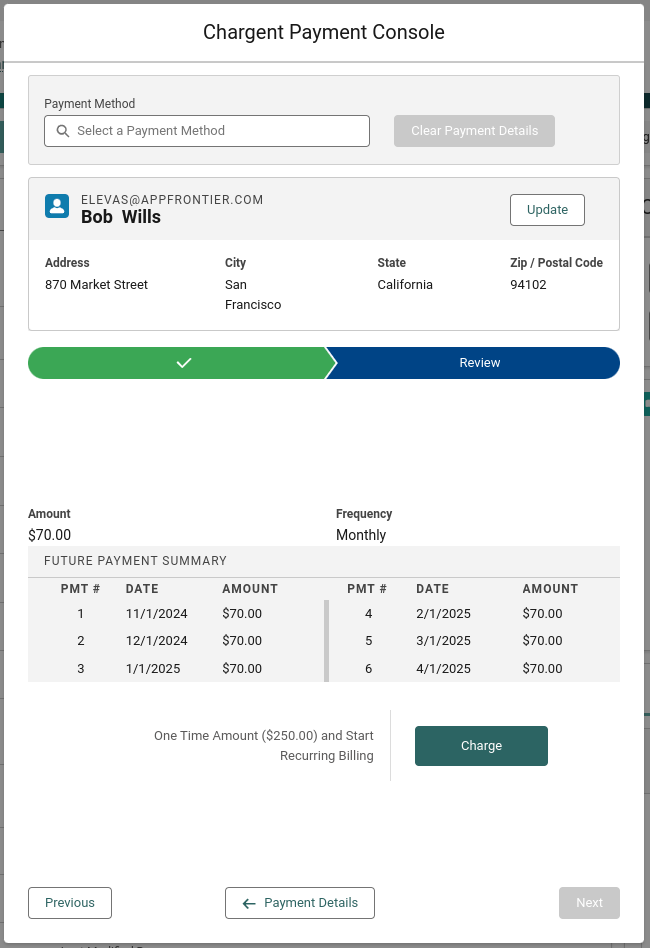
Congratulations! You have successfully set up a recurring billing schedule.
Updating Recurring Payments #
Once you have set up recurring payments, you can use the Payment Console to change the amounts and payment schedule or stop future recurring payments. Previous transactions will not be affected.
- Visit a record where the initial recurring payment was initiated.
- Click Payment Console.
- Click Recurring and change the recurring amount if desired.
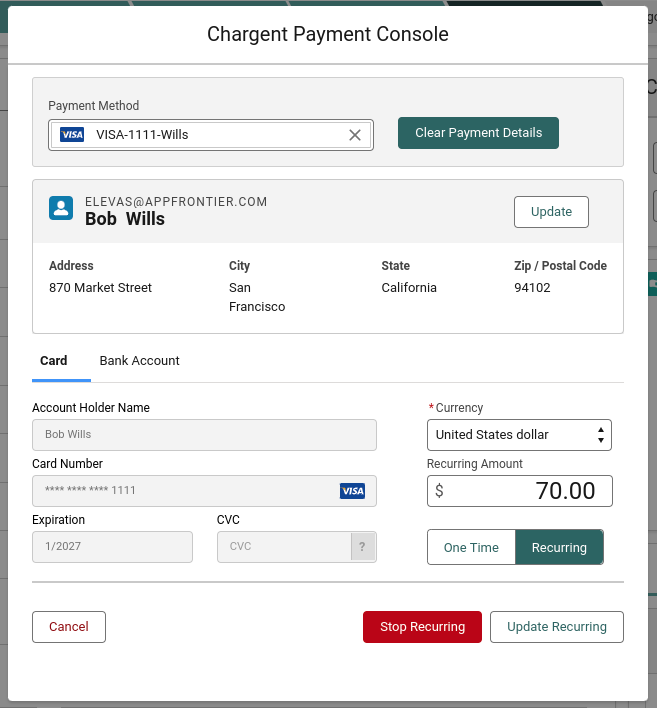
- Click Update Recurring.
- Alternatively, click Stop Recurring if you want to cancel all future recurring charges.
- Update the payment schedule if desired.
- Click Next to review your changes.
- Click Update Recurring Billing.
The recurring billing schedule and/or amounts have successfully been updated.
Stopping Recurring Payments #
To stop a recurring payment in Chargent Anywhere:
- Click Payment Console. Billing information displays if it is incomplete.
- Click Recurring.
- Click Stop Recurring. A green confirmation image displays when your recurring payment has stopped.
The recurring payment will be stopped. If needed, you can always set up a new recurring payment or process one-time charges from this record.
Updating Recurring Billing Payment Information #
Suppose a customer has an ongoing recurring payment and reaches out to change their payment method. Chargent’s recurring billing feature allows you to update your customer’s credit card or bank account easily using the Payment Console button in the Chargent Anywhere component.
- Visit a record with Chargent Anywhere where a recurring payment was previously initiated.
- Click Payment Console.
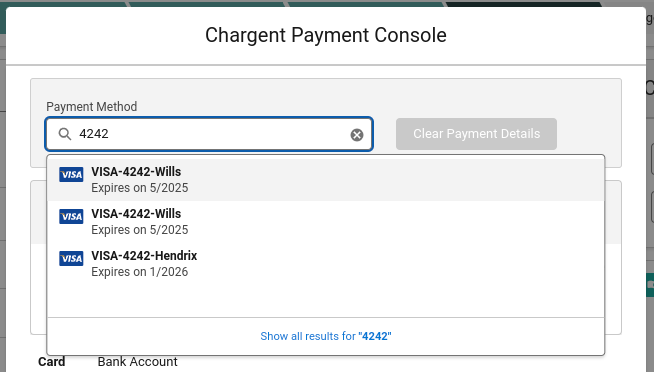
- If Payment Methods is enabled in your org, click the X in the Payment Method selection box. Otherwise, skip to step 3.
- Enter the new credit card or bank account information in the fields below.
- Alternatively, if Payment Methods is enabled, choose an existing payment method by selecting the text box under Payment Method.
- Click Update Recurring.
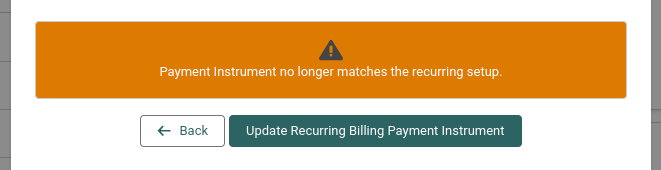
- Click Update Recurring Billing Payment Instrument.
- You will see a warning message stating that “Payment Instrument no longer matches the recurring setup”.
If successful, you will see a green box noting that the recurring payment update was successful. You’ve just updated the payment information related to the recurring payment. If tokenization is enabled, the token will also be updated. All future payments will be made using the new payment method.
Processing Recurring Payments Directly from Chargent Orders #
All the above procedures use the Payment Console because it is the quickest and easiest way to manage recurring payments. You can also complete these tasks directly from the Chargent Orders object. The Chargent Orders record stores all of your recurring payment details.
To learn how to process your recurring payments or modify your recurring billing information directly from a Chargent order record, see Chargent Order Recurring Billing.
Recurring Billing Batch #
The Recurring Billing Batch allows you to process recurring payments via a scheduled batch. This batch determines the cadence and time of day that your recurring payments are processed. The batch looks for records to process daily that fit a specific criteria:
- Does the Payment Status equal Recurring?
- What is the Payment Start Date?
- What is the Frequency?
- When was the last ‘Recurring’ transaction processed?
Creating the Recurring Billing Batch
The Recurring Billing Batch is automatically created the first time you run the Setup Wizard in the Chargent app. When you set up your first Payment Gateway using the Gateway Setup Wizard, you are prompted to set up Recurring Billing. This is recommended and will automatically schedule the Recurring Billing batch for you.
- Go to the App Launcher
 and click the Chargent app.
 - Click the Chargent Settings tab.
- Click the Setup Wizard subtab.
- Follow the instructions in the Setup Wizard, and when asked if you will be using recurring, scheduled, or installment payments, click Yes.
- When asked if you want to run the batch daily at 3 am local time, select your preference. If you click No you will be given the option to choose the time and cadence that your batch will run.

- Click Start Recurring Batch to create the Recurring Billing Batch.
You’re all set! Your recurring billing batch is ready to start processing scheduled payments.
Manually Creating the Recurring Billing Batch
There are a few reasons you may want to schedule the Recurring Billing Batch manually.
- Recurring billing was previously manually scheduled, but the end date has expired.
- The individual who originally set up Recurring Billing is no longer an Active Salesforce User.
First, if you already have a batch scheduled, you must delete the old batch before scheduling a new one.
- Click on the gear icon
 and select Setup.
 - Under Environments > Jobs select Scheduled Jobs.
- Click Del next to the ‘Chargent Recurring Batch’ job and select OK.
After deleting the old batch, you can schedule the new one.
- Click on the gear icon and select Setup.
- Under Custom Code select Apex Classes.
- Click Schedule Apex.
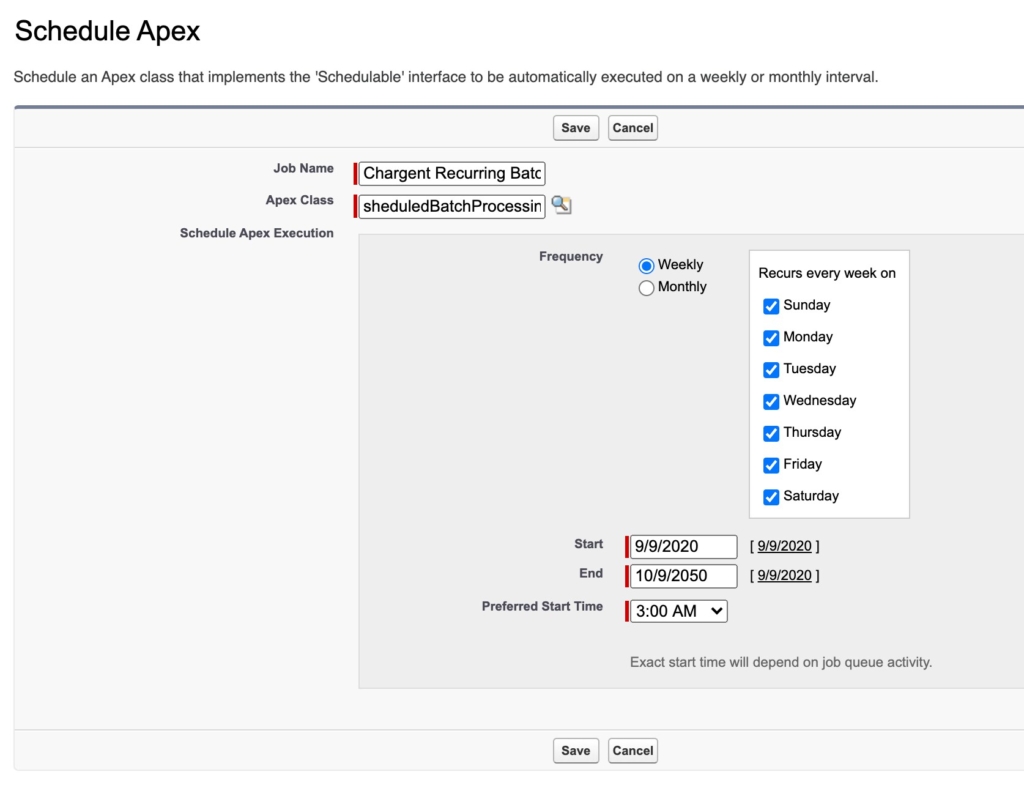
- Enter the following field values:
- Job Name: Chargent Recurring Batch (Use this name to prevent additional batches from being created)
- Apex Class: Click on the magnifying glass and select “sheduledBatchProcessing”
- Schedule Apex Execution:
- Frequency = Weekly
- Check every day of the week so that the batch runs daily.
- Start Date = today’s date
- End Date (Important): The end date should be far into the future so the schedule doesn’t end. Once the batch ends, the recurring batch will no longer process recurring transactions. 2050 is generally a good year to use.
- Start Time: Although you can choose any time, we recommend 3:00 AM to give your team the whole day to review transactions and make any required adjustments or voids during business hours.
Note: The Apex Class name is “sheduledBatchProcessing”, using the word “scheduled” without the “c”.
Setting the Batch Chunk Size
The Recurring Billing Batch processes recurring payments depending on the settings chosen when creating your initial Gateway, but you can customize the number of records sent per batch chunk by setting the Payment Batch Chunk Size Limit.
To set the number of records sent in a batch chunk:
- Go to the App Launcher and click the Chargent app.
- Click the Chargent Settings tab.
- Click the Advanced Settings subtab.
- Set the Payment Batch Chunk Size Limit to your desired limit.
We recommend setting the Payment Batch Chunk Size Limit to 30. This will evaluate 30 records in each batch chunk. For example, if you have 160 records that are marked as Recurring, there might be 5 chunks of 30 records and 1 chunk with 10 records. The size of each batch chunk is automatically calculated to optimize the process.
Setting the Payment Batch Chunk Size Limit to 0 will set it to the default of 30.
Run the Recurring Billing Batch On Demand
When testing the recurring batch job, it is often useful to run the Chargent scheduled apex for the recurring batch on demand instead of scheduling it and waiting until that time is reached.
Important: You should always wait until the batch has completed execution before executing it again. If batches overlap, duplicate transactions can occur.
- Click on the gear icon and select Developer Console.
- In the Developer Console, go to Debug and select Open Execute Anonymous Window.
- Clear any text from the ‘Enter Apex Code’ window.
- Copy and Paste the following code snippet and click Execute.
| ChargentOrders.TChargentBatchProcessing b = new ChargentOrders.TChargentBatchProcessing(); Database.executeBatch(b,10); |
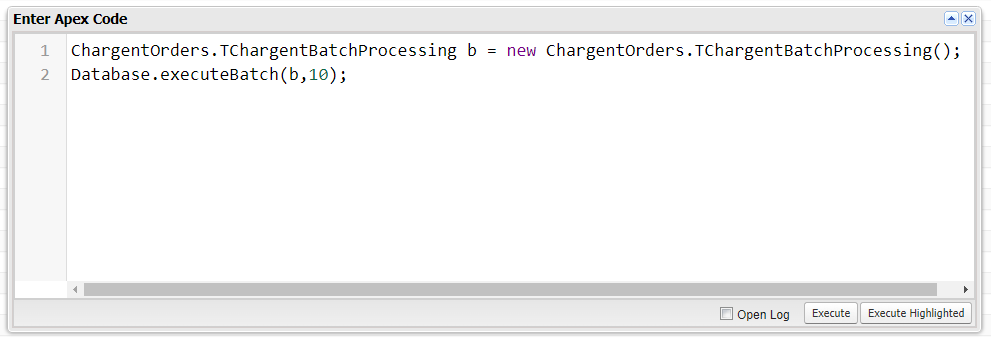
Note: If your Payment Chunk Batch Size has been changed you will want to add the chunk size to the code. For example, if your Chunk Size is 2 the code should end in (b,2). You can check the Chunk Size under Chargent Settings > Advanced Settings.
After following the steps above, one Apex Job will be executed. Return to the Salesforce org and monitor the Job status, discussed in the next section.
Monitor the Recurring Billing Batch
You can easily create a view that will help you monitor your Recurring Billing Batch. This is especially useful when troubleshooting any recurring billing errors.
- Click on the gear icon and select Setup.
- Search the Quick Find and select Apex Jobs.
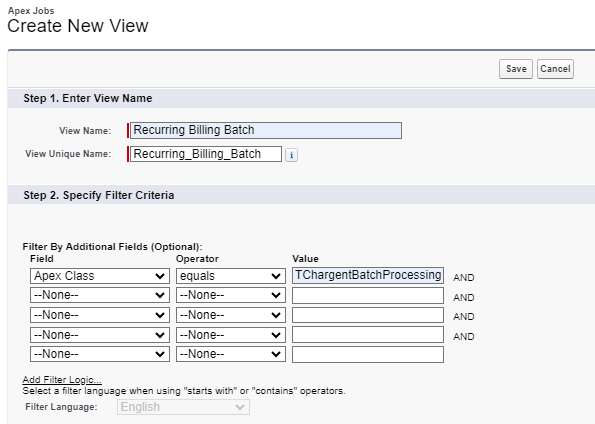
- Click Create New View
- Name the View. We suggest ‘Recurring Billing Batch’.
- Under ‘Filter By Additional Fields”
- Field = Apex Class
- Operator = equals
- Value = TChargentBatchProcessing
- Select the fields you’d like to include. We recommend including ‘Failures’, ‘Batches Run, and ‘Batches Processed’ to track errors or unexpected results.
- Choose how you’d like to give access to your view.
- Click Save.
Recurring Billing Batch Tips & Tricks
- We recommend scheduling your batches to run daily to ensure your records are always current. This is especially important with your recurring payments, ensuring your customers’ payments are processed when expected.
- You can schedule the batch using an API / integration user, so if your Salesforce Admin changes and a user is deactivated, the batch does not get deactivated. Log in with that user, and go through the Chargent Setup Wizard on the Chargent Setting tab.
- If you are scheduling the batch manually, set the end date 10+ years in the future.
- Run the batch at a time when no other batches will be running to prevent conflicts.
Troubleshooting & Best Practices #
The following information contains tips and tricks to troubleshoot your recurring billing process:
Custom Automation and Validation Rules
Please be cautious when using validation rules, required fields, or custom automation on Chargent Orders or Transactions. These customizations can prevent the Chargent Order or Transaction from saving properly, leading to errors or missing transaction records.
We recommend testing any custom solutions thoroughly in a sandbox environment before deploying them in your production org. It is also beneficial to monitor your recurring billing batch to identify any errors that occur.
For more information, see Troubleshooting Automation and Validation Rules.
Recurring Billing Declines
If you’re not using Automated Collections and a card is declined as part of the recurring billing batch, the Payment Status will be changed from “Recurring” to “Error” on the order.
Once you’ve received a payment, you will need to manually update the Chargent Order record to resume the recurring payments. After you’ve updated the billing information to generate a successful payment:
- Visit the Chargent order record.
- Change the Payment Status back to “Recurring.”
If you have processed a charge manually outside of the recurring billing schedule by clicking the Charge button, be sure to set the Payment Start Date ahead to the next time the record should be billed to avoid a recurring charge the next time the batch runs.
If you are using Automated Collections, the Payment Status will update to “Automated Collection” upon a declined transaction. If the payment is collected via the Automated Collections process, the Payment Status will revert to “Recurring”.
Learn More About Recurring Billing
- If you have trouble with these steps, review our comprehensive knowledge base for troubleshooting tips and solutions to common problems.
- Learn more about how to Solve Subscription Business Challenges with Recurring Billing in Salesforce.
- Are you a nonprofit organization? Here are five reasons you need recurring billing in Chargent.
See Also
Chargent Payment Console
What are the Different Chargent Batches?
Simple Guide to Batch Apex in Salesforce

