Chargent Anywhere is one of our flagship features, allowing you to process payments from any object in Salesforce. We recommend all customers use Chargent Anywhere when testing your payment process and taking live payments from within Salesforce. The Chargent Anywhere component contains four buttons, as depicted below.
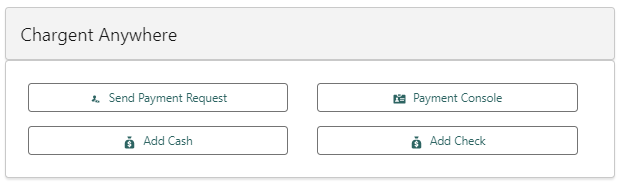
- Send Payment Request – Send an email with a URL to a secure payment page, allowing your customers to pay when it’s most convenient for them.
- Payment Console – Enter credit card information securely and either process one-time payments or set up recurring billing.
- Add Cash – Create a transaction record for a cash entry (does not get sent to your payment gateway).
- Add Check – Create a transaction record for a paper check entry (does not get sent to your payment gateway).
Tip: When using Payment Console and tokenization, you will never store sensitive credit card or bank account number information in Salesforce, reducing the overall scope of your PCI Compliance.
Setup & Configuration #
Watch the following video to learn how to set up and configure Chargent Anywhere, Payment Requests, and the Payment Console.
Add Chargent Anywhere to Your Lightning Page
You can add the Chargent Anywhere component to any object from which you want to process payments. We highly recommend adding the component to the Chargent Orders object as well.
Note: When added to the Chargent Orders object, the component includes a Payment Summary and information about the Last Transaction for recurring payments, shown below.

To set up Chargent Anywhere, follow these steps:
- Navigate to a record of the object you wish to add Chargent Anywhere.
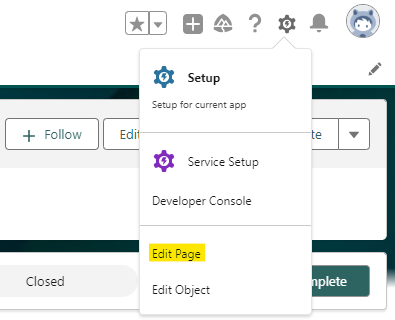
- Click the Gear Icon and click Edit Page.
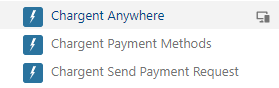
- On the left, under Components, scroll down and find the Chargent Anywhere Component under Managed Components.
- Drag the component to the desired position on the page. We recommend placing it at the top for easy access.
For details about the Chargent Anywhere component configuration fields, see Customizing Chargent Anywhere.
- Click Save and Activate the Page as the Org Default for Web Browser & Phone.
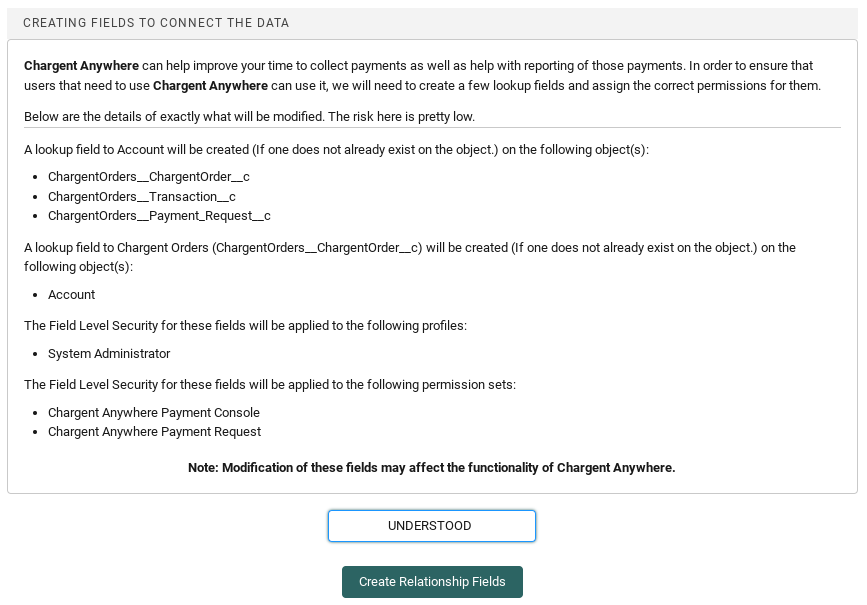
The last phase of setup is to complete the configuration, which automatically creates the required lookup fields.
- Navigate to a record of the object you added Chargent Anywhere.
- Click Configure in Chargent Anywhere to launch the Chargent Anywhere Configuration Wizard.
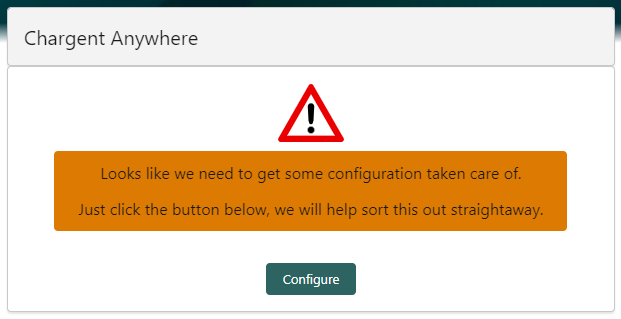
- Once you have read the details and are ready to proceed, type UNDERSTOOD (case sensitive) and click Create Relationship Fields, creating the following lookup fields on the object:
- Chargent Order
- Transaction
- Payment Request
The basic setup is now complete! Navigate to a record of the configured object, and you’ll see the Chargent Anywhere component in your chosen location on the record page. You’re ready to collect a one-time payment, set up a recurring payment, or send a Payment Request.
Using Chargent Anywhere #
Now that you’re all set up, check out the following video for a tour of the Chargent Anywhere component.
For more details about using Chargent Anywhere, check out the step-by-step guides linked below correlating to each button:
- Send Payment Request – Send an email with a URL to a secure payment page, allowing your customers to pay when it’s most convenient for them.
- Payment Console – Enter credit card information securely and either process one-time payments or set up recurring billing.
- Add Cash – Create a transaction record for a cash entry (does not get sent to your payment gateway).
- Add Check – Create a transaction record for a paper check entry (does not get sent to your payment gateway).
Customizing Chargent Anywhere #
Chargent Anywhere is designed as a flexible component that can be placed on any object in Salesforce. Many of the fields can be auto-populated with default values. Depending on how your company plans to use Chargent, you can also choose to show or hide various buttons.
To access the various configuration options, follow these steps:
- Navigate to a record for the object with Chargent Anywhere.
- Click the gear icon and select Edit Page
- Select the Chargent Anywhere Lightning Component.
- If you haven’t added Chargent Anywhere to your Lightning Page, drag the component to your page from the left sidebar under Custom – Managed.
The configuration options are described in the following sections:
Note: Some objects may not contain the currency and lookup fields referenced below. You may need to create a custom field. To learn how to create custom fields, visit Create Custom Fields.
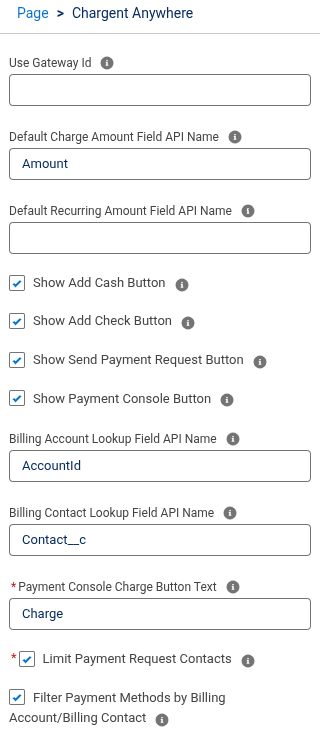
Use Gateway Id
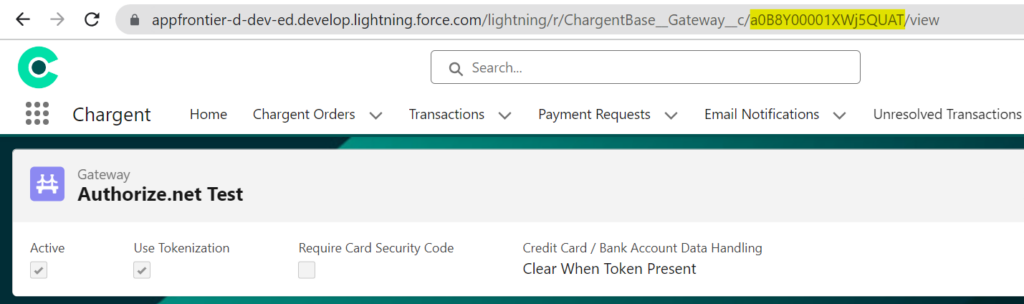
This field allows you to enforce a specific Gateway record for this object. Enter the Gateway Record ID to remove the ability to select a different gateway on this Lightning page. You can get the Gateway ID from the URL on the Gateway record.
Default Charge Amount Field API Name
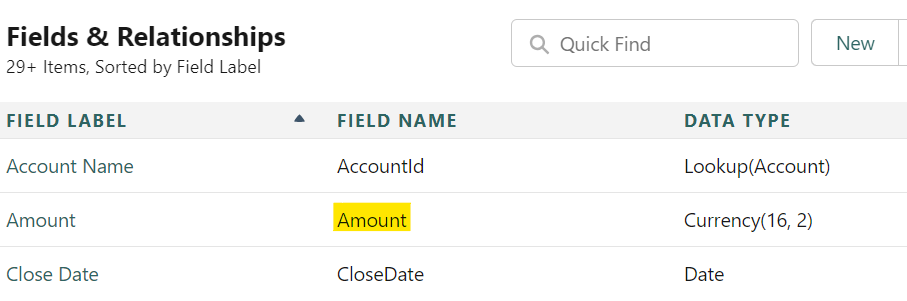
This field allows you to automatically populate an amount if you have a field representing the default charge amount on your object. You can use the API name of the desired currency field as the default charge amount. The API name of the field can be found by following these steps:
- Go to Settings > Object Manager
- Search for and select the object that Chargent Anywhere is placed on
- Click Fields & Relationships in the sidebar
- Find and Copy your currency’s Field Name
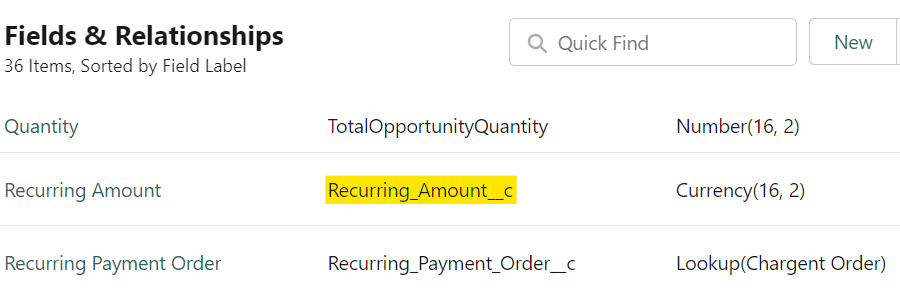
Default Recurring Amount Field API Name
Similar to the Default Charge Amount, if you have a default recurring amount to be processed, you can use an existing or custom currency field on the object containing Chargent Anywhere. The API name of the field can be found by following these steps:
- Go to Settings > Object Manager
- Search for and select the object that Chargent Anywhere is placed on
- Click Fields & Relationships in the sidebar
- Find and Copy your currency’s Field Name
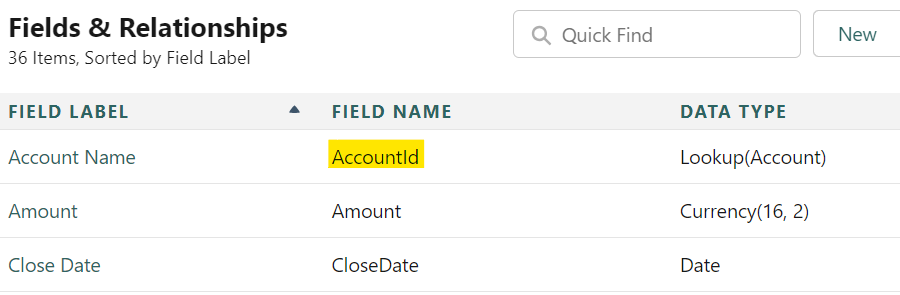
Billing Account Lookup Field API Name
You can set a lookup to the Account object, allowing you to choose from contacts related to an Account, auto-populating the contact’s billing info in the Payment Console. For more information, visit How do I auto-populate Billing Account or Contact information in Chargent Anywhere?
You will require the API name of the Account lookup field. If the component is placed on the Account object, the API name is “Id”. For other objects, the API name can be found by following these steps:
- Go to Settings > Object Manager
- Search for and select the object that Chargent Anywhere is placed on
- Click Fields & Relationships in the sidebar
- Find and Copy your Account Lookup Field Name
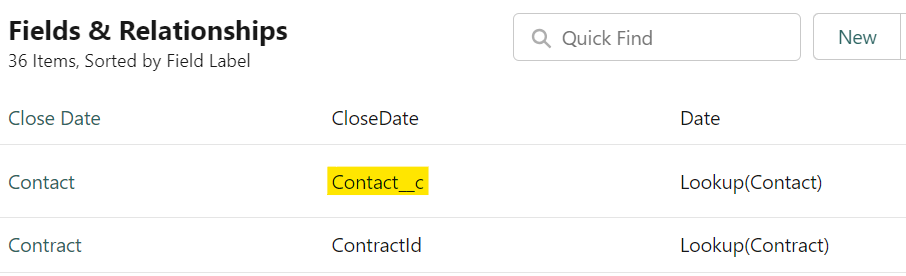
Billing Contact Lookup Field API Name
This field allows you to auto-populate a contact’s billing details using a contact lookup field on the record from which you are processing the transaction. For more information, visit How do I auto-populate Billing Account or Contact information in Chargent Anywhere?
You will require the API name of the Contact lookup field. The API name of the field can be found by following these steps:
- Go to Settings > Object Manager
- Search for and select the object that Chargent Anywhere is placed on
- Click Fields & Relationships in the sidebar
- Find and Copy your Contact Lookup Field Name
Payment Console Charge Button Text
This field will default to ‘Charge’, but will give you the option to change the text of the Charge button in the Payment Console.

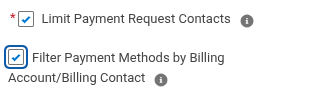
Limit Payment Request Contacts
Limit the contacts available when sending a payment request to those related to the billing account (specified via the Billing Account Lookup Field).

Filter Payment Methods by Billing Account/Billing Contact
You can also filter the Payment Methods searchable in the Payment Console based on the related account or contact record to which the Payment Console was placed. For more information, see How to filter the available Payment Method results in Payment Console.
See Also
Setting Up Payment Request
Setting Up Payment Console
Entering Cash and Paper Checks

