While Chargent’s primary purpose is processing your credit card and direct debit payments (e-check) in Salesforce, it also allows you to keep track of other types of payments. You may accept payments in the form of cash or paper checks, and you want to store them all in one place. To simplify bookkeeping, keep track of cash payments and checks using the Chargent Anywhere component.
As a note, cash and paper check transactions are not processed through your gateway. In Chargent, cash and paper check transactions allow you to verify you have received funds for record-keeping and reporting purposes.
Before You Begin #
Ensure the buttons are displayed in the Chargent Anywhere component. Chargent Anywhere is a component that can be added to any object, allowing you to process transactions from any Salesforce tab. Before you can begin entering cash and paper check payments, you must configure the Chargent Anywhere component.
To add or remove the Add Cash or Add Check buttons in Chargent Anywhere:
- Navigate to a record for the object with Chargent Anywhere.
- Click the gear icon
 and select Edit Page.
 - Click the Chargent Anywhere Lightning Component on the Lightning Page.
- If you haven’t added Chargent Anywhere to your Lightning Page, drag the component to your page from the left sidebar under Custom – Managed.
- Check or uncheck the Show Add Cash Button or Show Add Check Button fields.
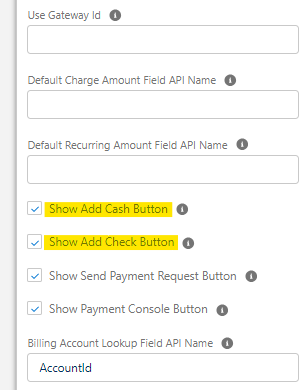
- Click Save. You can also hide these buttons if you want to prevent these types of transactions.
- Click Activate if you haven’t already activated Chargent Anywhere on this page layout.
To learn more about Chargent Anywhere’s configuration options, see Customizing Chargent Anywhere.
Creating Cash And Check Payments Using Chargent Anywhere #
Chargent Anywhere simplifies adding cash and paper check transactions. Remember, these transactions don’t go through your gateway so they are not verified. Chargent offers them for you to keep track of these payments so you can be sure Salesforce has all your payments.
- Navigate to a record for the object with Chargent Anywhere.
- Click Add Cash or Add Check in the Chargent Anywhere component.

- Enter the Date and Amount you wish to process for cash payments. Alternatively, enter the Check number and Amount for check payments.
- If existing Chargent order records are related to the record from which you are processing the cash or check transaction, you can choose a Chargent order to relate it to.
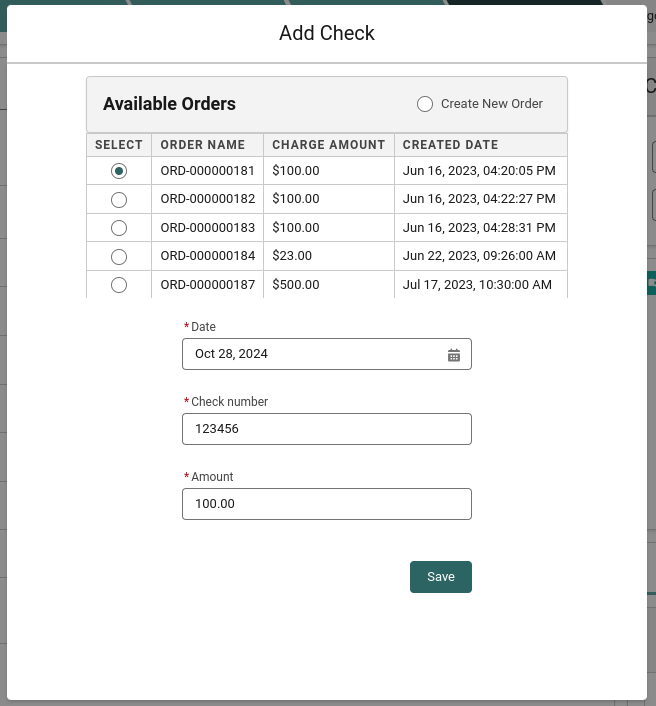
- Click Save to create a transaction record for a cash or check payment.
You have successfully created a cash or check payment!
Creating Cash And Paper Check Transactions Manually #
If you aren’t using Chargent Anywhere, you can create transaction records manually with a few extra steps. Before manually creating a cash or paper check transaction, you must create or use an existing Chargent order record. To learn more about creating a Chargent order record, visit Creating A Manual Transaction.
- Select the Chargent app from the App Launcher icon
 at the top-left of your screen.
 - Click the Transactions tab.
- Click New.
- Enter the fields listed below and click Save.
| Field Name | Value |
|---|---|
Gateway Date | Payment date and time |
Gateway ID | Enter either the check number or cash |
Type | Charge |
Response Status | Approved |
Amount | Amount of cash or check |
Payment Method | “Cash” or “Check” |
Viewing Your Cash And Check Payments #
For reporting and bookkeeping, it is important to know how to distinguish these types of transactions. You can identify your cash or check payments in two ways.
- The Payment Method field value for your cash payments will be “Cash”, and your check payments will be “Check (Paper)”.
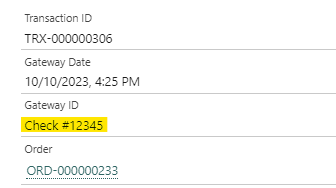
- The Gateway ID field value for your cash payments will be “Cash”, and your check payments will be “Check” followed by the check number, as shown below.
See Also
Chargent Anywhere
Chargent Terminology
Chargent Transaction Fields
Chargent Terminology

