These simple steps will guide you through the installation and configuration of Chargent. Before diving in, ensure you meet our basic requirements.
For more detailed information on any of the steps in this guide, please see our complete support documentation or search our knowledge base.
Ready to get started? Here we go!
Install Chargent #
Chargent includes three packages that can be installed into your Production or Sandbox Org: Base (ChargentBase), Orders (ChargentOrders), and Anywhere (ChargentAnyObj). Fortunately, installation and updates are made easy using the Package Installation Manager (PIM). We always recommend installing or updating in a Sandbox before doing so in a Production environment.
Note: Your Chargent packages will be push updated three times a year following Salesforce’s major releases, but to take advantage of our most recent updates, or to test any updates before a push update, we recommend updating Chargent using the process below.
You can access the PIM to install or update Chargent on our website’s installation & updates page. Click Install & Update Chargent. You will be instructed to log in to your Salesforce Sandbox or Production org and click Allow to grant access and install Chargent.

You will need to install three packages. To ensure that all three packages are version-aligned, do not click Skip Upgrade. Instead, click the box for the Base (ChargentBase) package, and wait for the installation to complete.
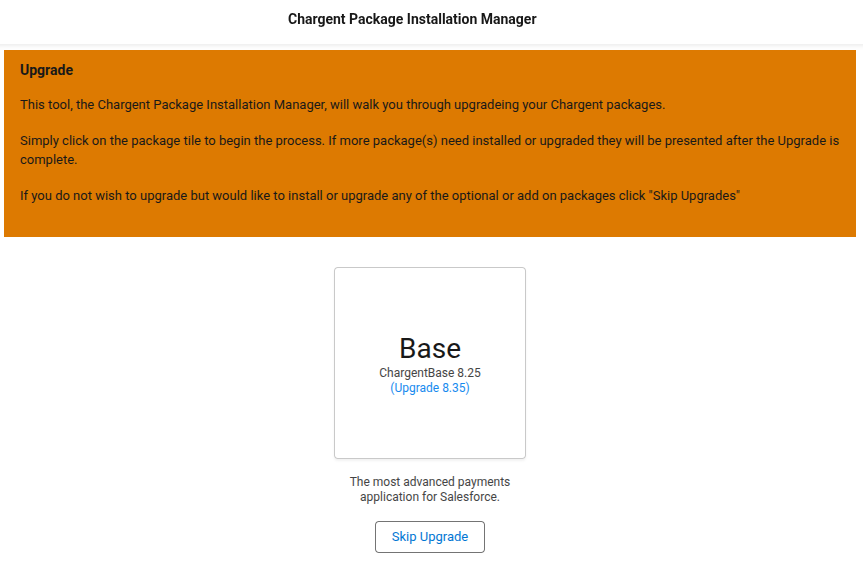
You will see the following screen while the PIM installs the package. It will take a few minutes to complete the installation or update. We recommend that you refrain from navigating away from the PIM webpage during installation. Some browsers include a memory mode that may interrupt your installation.

When the package completes installing or updating, you will see a screen noting that the Upgrade was successful.

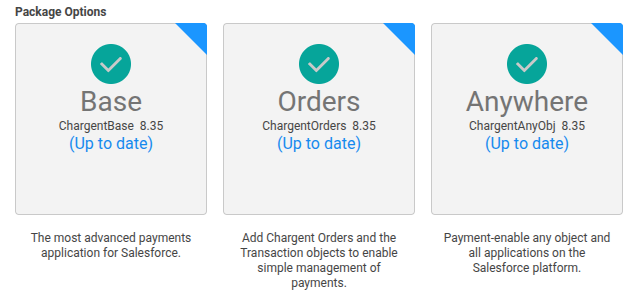
Click Continue to proceed. Repeat the steps above to install or update the remaining packages: Orders (ChargentOrders) and Anywhere (ChargentAnyObj). Once you have installed or updated all three packages, you will see the Base, Orders, and Anywhere package options checked, indicating they are installed and up to date.
Lastly, we recommend periodically checking for updates to ensure you get the most out of Chargent. To learn more about how we are improving Chargent, check out our latest Release Notes.
Problems with the installation? Find standard solutions here or search our extensive knowledge base for answers.
Please don’t hesitate to contact us with any questions.
Assign Chargent Licenses #
After installation, assign Chargent licenses to each user. Our base pricing package includes 20 user licenses, but you can purchase additional licenses as needed. The Chargent Transaction and Chargent Anywhere packages both require a license. The Chargent Base package does not require a license.
Note: This step is only required in Production and Developer orgs. You do not need to assign licenses in a Sandbox, allowing you to test all of Chargent’s features without the need to assign and manage your licenses.
Users not assigned a Chargent license cannot access Chargent objects, fields, tabs, or data and cannot use any of Chargent’s features.
To assign licenses, follow these steps:
- Click on the Gear Icon
 and click Setup.
 - In the Quick Find box, search for and click Installed Packages.
- Click Manage Licenses to the left of Chargent Orders, as shown below.

Note: If you do not see a Manage Licenses link, you may be in a sandbox environment or looking at the Chargent Base package.
- Click Add Users and select the checkbox next to all users requiring access to Chargent.

- Click Add.
- Repeat steps 4-6 for the Chargent Anywhere package.
Assign Chargent Permissions #
To view, create, and update records in Chargent, you must assign permissions to your users. Chargent uses role-based Permission Set Groups to make the user management process as easy as possible.
- Go to the App Launcher
 and click the Chargent app.
 - Click the Chargent Settings tab and choose the Manage User Permissions option under the Global Settings subtab.
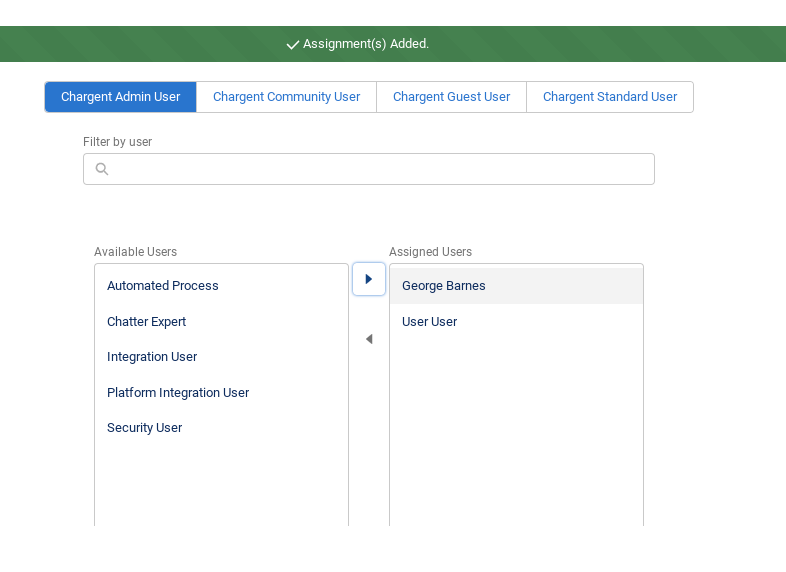
- Select the Permission Set Group tab for the role you want to assign.
- Select the user(s) you’d like assigned to the Permission Set Group.
- Click the right arrow button to add that user to the Permission Set Group. All changes are saved instantly.
Note: You can remove a Permission Set by selecting an Assigned User and clicking the left arrow button.
To learn more about each Permission Set Group, including which users should be assigned a specific role, visit Assigning Chargent Permissions.
Activate Your Remote Sites #
Remote Sites are used to call out from Salesforce to an external site, such as your gateway. Activate the Remote Sites for your specific gateway by following these instructions:
- Click the gear icon on the top right and choose Setup.
- In the Quick Find box, search for and select Remote Site Settings.
- Find all remote sites containing the name of your gateway. For a list of the required sites, visit your Gateway-Specific Guide and search for “Remote Site”.
- Click Edit next to the remote sites you wish to activate.
- Check the Active box.
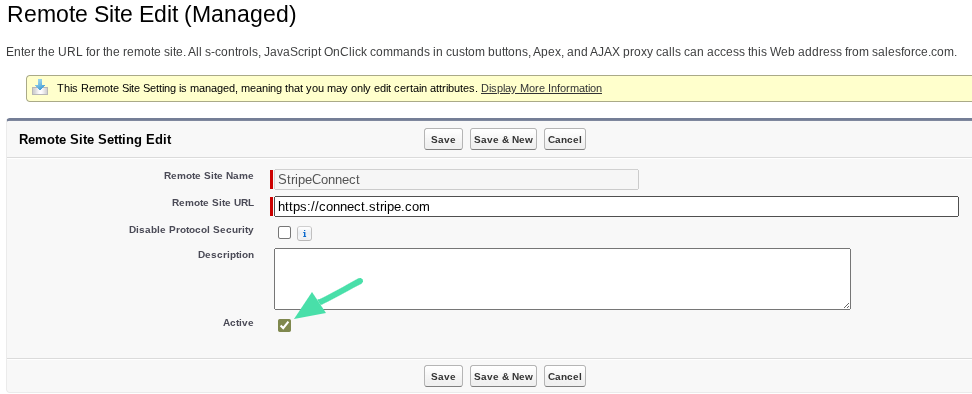
- Click Save.
Connect Your Gateway #
Chargent integrates with 30+ Payment Gateways. After assigning licenses (Production Only) and permissions to your users, the next step is to connect and configure a payment gateway. If you’re unsure which payment gateway to use, please contact us; we’re happy to help you determine the one that best suits your needs.
You will need your gateway credentials handy before proceeding. Access the Setup Wizard and create your Gateway record by following these steps:
- Go to the App Launcher
 and click the Chargent app.
 - Click the Chargent Settings tab.
- Click the Setup Wizard subtab.
- When prompted, “Do you have a Payment Gateway account?” click Yes.
- Select your payment gateway from the list and click Continue.
- Add your gateway account credentials and select whether or not this gateway will be processing test or live transactions. We recommend initially creating a test gateway record with test credentials until you have successfully completed any required test transactions.
Important: Make sure to select the Test Transactions or Live Transactions tab based on whether or not you are using a test or live gateway account.
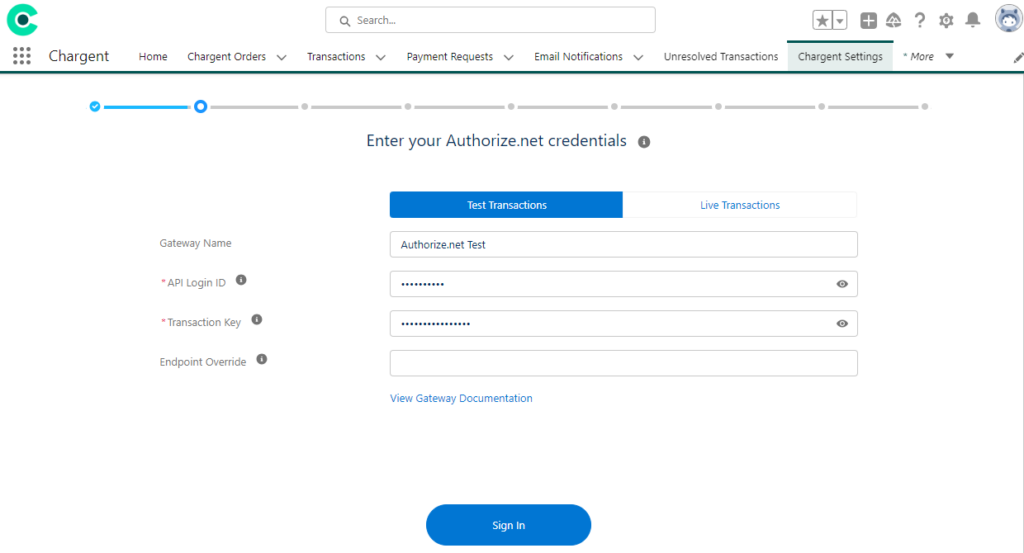
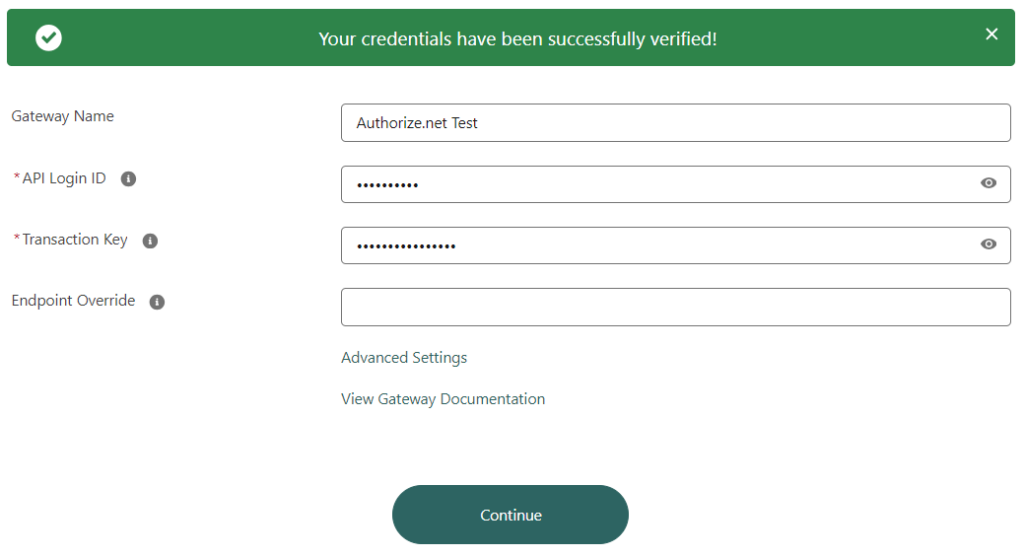
- Click Sign In. When you receive a message stating “Your credentials have been successfully verified!”, click Continue to complete the steps in the wizard. If you receive an error message in red, see our troubleshooting tips.
- Will you use tokenization? If you click yes, the Use Tokenization field will be checked, and the Credit Card / Bank Account Data Handling field will be set to “Clear When Token Present”. (recommended)
- What currencies will be available when using this gateway record? (USD, CAD, etc.)
Note: Ensure that your payment gateway supports your chosen currencies before making a selection.
- Do you want to enable Payment Console? Payment Console is a premium feature of Chargent and is included in Platform and Enterprise Editions of Chargent.
- Click Yes to request a Chargent Activation Key for Payment Console.
- Click No if you don’t require Payment Console or have already added a Chargent Activation Key to your org.
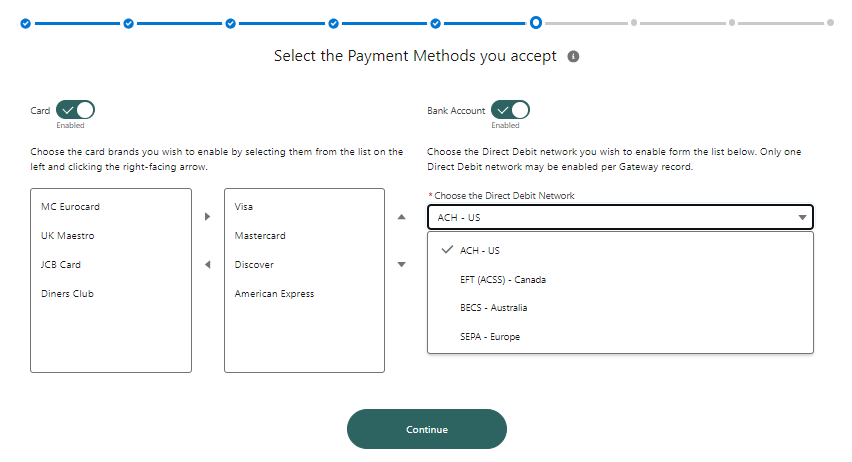
- What payment methods will you be accepting?
- Will you accept credit cards? If so, what credit Card types will you be accepting? (Visa, Mastercard, etc.)
- Will you accept Bank Account payments? If so, what Direct Debit Network will you use? You can choose any of the following Direct Debit Networks supported by your gateway and based on your location:
- ACH – US
- EFT (ACSS) – Canada
- BECS – Australia
- SEPA – Europe
- Will you be using ACH Validation? (Not all gateways support ACH Validation)
- Set up your Payment Console (this page only displays if you click Yes on step 9).
- Will you show the Charge, Create/Update Token, or Authorize buttons?
- Will you be using recurring, scheduled, or installment payments?
- If you click Yes, the Setup Wizard will continue and assist you with creating a Recurring Billing Batch.
- Click No if you’ve already created a Recurring Billing Batch or will not be taking recurring payments.
- If you click Yes in step 12, you will be asked if you want it to run the batch at 3 am (recommended) or a different time. If you choose not to run the batch at 3 am, you will be given the option to choose when to run the batch.
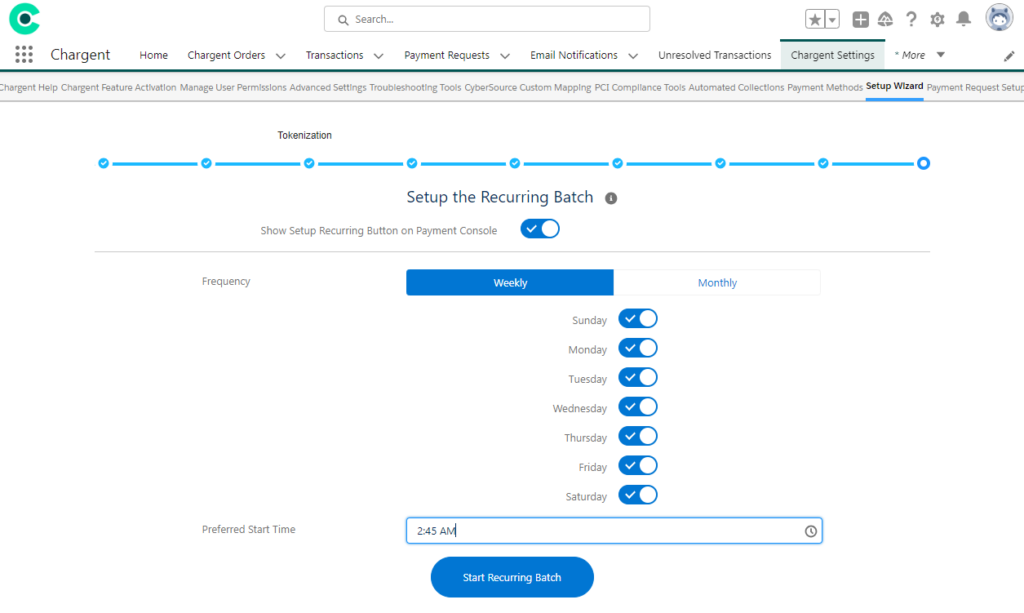
- Click Start Recurring Batch to create the Recurring Billing Batch.
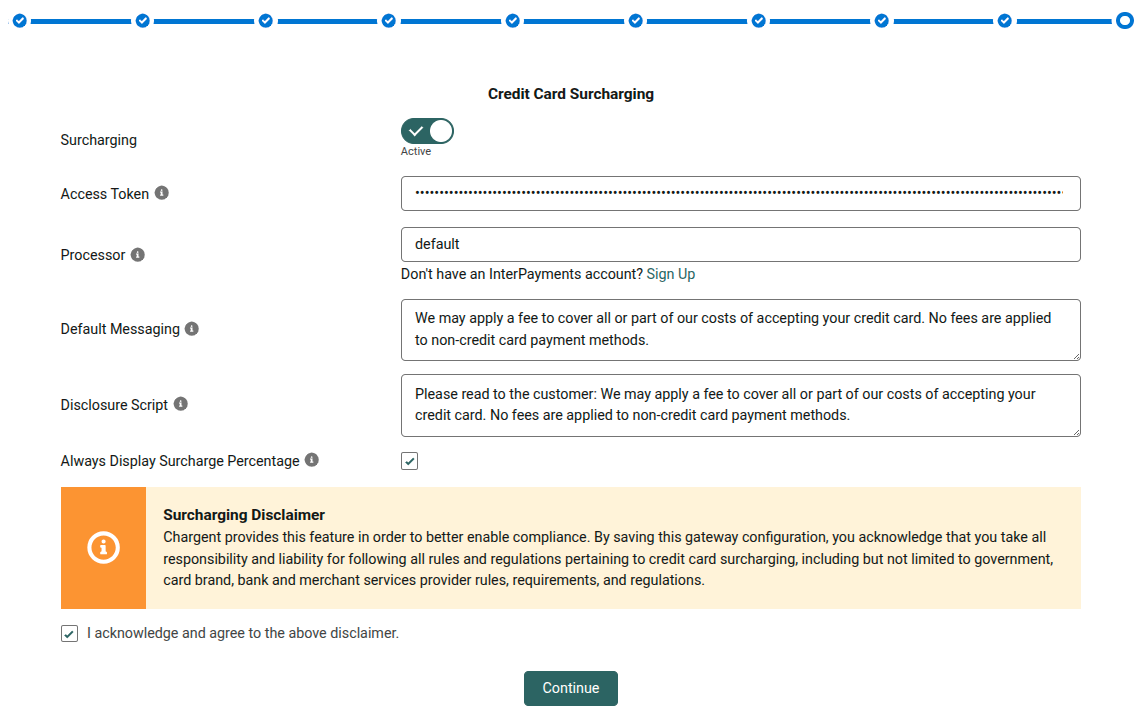
- The final step, “Credit Card Surcharging,” will allow customers with a supported gateway to enable surcharging for credit card payments.
- Visit Setting Up Surcharging to learn more about this feature and the gateways supported. If your gateway is not supported or you do not wish to enable surcharging, simply leave the feature deactivated and click Continue.
- Click the Sign Up link to access the surcharging sign-up form. Upon submitting this form, our team will be notified of your interest in surcharging. We will be in touch as soon as possible to help you get started!
Congratulations! You successfully configured your payment gateway. You can visit Gateway Setup Wizard to learn more.
Set Up Chargent Anywhere #
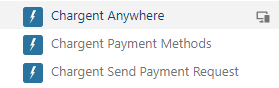
Chargent Anywhere allows you to process payments from any object in Salesforce. You must add the Chargent Anywhere component to the object you wish to process payments from. We also recommend adding the component to the Chargent Orders object.
To set up Chargent Anywhere, follow these steps:
- Navigate to a record of the object you want to add Chargent Anywhere to.
- Click the Gear Icon and click Edit Page.
- On the left, under Components, scroll down and find the Chargent Anywhere Component under Managed Components.
- Drag the component to the desired position on the page. We recommend placing it at the top for easy access.
For details about the Chargent Anywhere component’s configuration fields, please refer to Customizing Chargent Anywhere.
- Click Save and Activate the Page.
The final step is to complete the configuration, which creates the required lookup fields.
- Navigate to a record of the object you added Chargent Anywhere.
- Click Configure in Chargent Anywhere to launch the Chargent Anywhere Configuration Wizard.

- Once you have read the details and are ready to proceed, type UNDERSTOOD (case sensitive) and click Create Relationship Fields.

To learn more about the Chargent Anywhere component, see Chargent Anywhere.
The basic setup is now complete! Navigate to a record on the configured object, and you’ll see the Chargent Anywhere component on the record page. You’re ready to test a one-time or recurring payment using the Payment Console! Before we start testing, let’s finish setting up Chargent’s Payment Request feature, which allows you to email a payment link to your customers.
Set Up Payment Request #
Before setting up the Payment Request feature, ensure a Salesforce Site is created and configured by following these steps:
- Click the Gear Icon and click Setup.
- In Quick Find, search for and click Sites.
- Click New to create a new Site.
- Site Label: Payment Request
- Site Name: Payment_Request
- Clickjack Protection Level: Use the default or check with your IT department
- Active Site Home Page: PaymentRequest
- Active: Checked
- Require Secure Connections (HTTPS): Checked
- Click Save

After creating your Site, you must create a Payment Request Template via the Payment Request Setup Wizard:
- Use the App Launcher and click the Chargent app.
- Click the Chargent Settings tab.
- Click the Payment Request Setup subtab.
- In the left sidebar, click New to create a Payment Request Template.
- Click the new template and follow the steps in the Payment Request Setup Wizard.
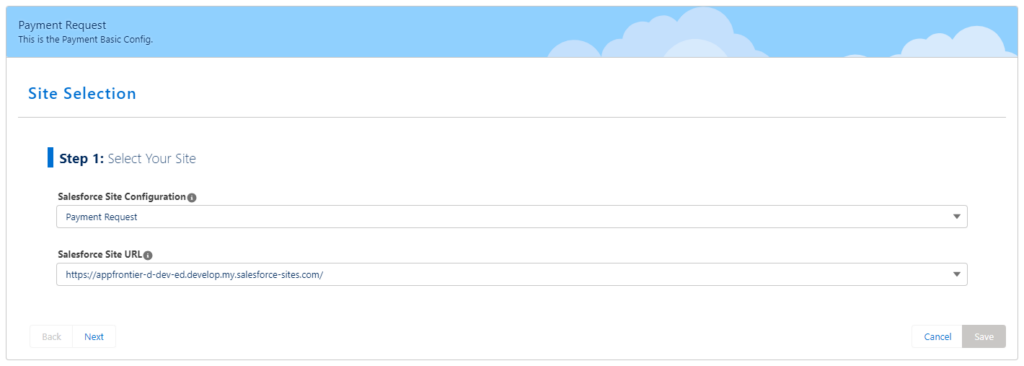
Site Selection
Step 1: Select Your Site
The Site Selection page will automatically populate an existing Salesforce Site or let you know that you must create one before configuring Chargent’s Payment Request.
Configure the Payment Request Payform
If this is your first time setting up Payment Requests, the page will populate the fields with our recommended settings.
Step 2: Enter a Name and Description
Give the Payment Request Template a name. If you have multiple Payment Request forms, the name should help you identify the correct template when you select it later.
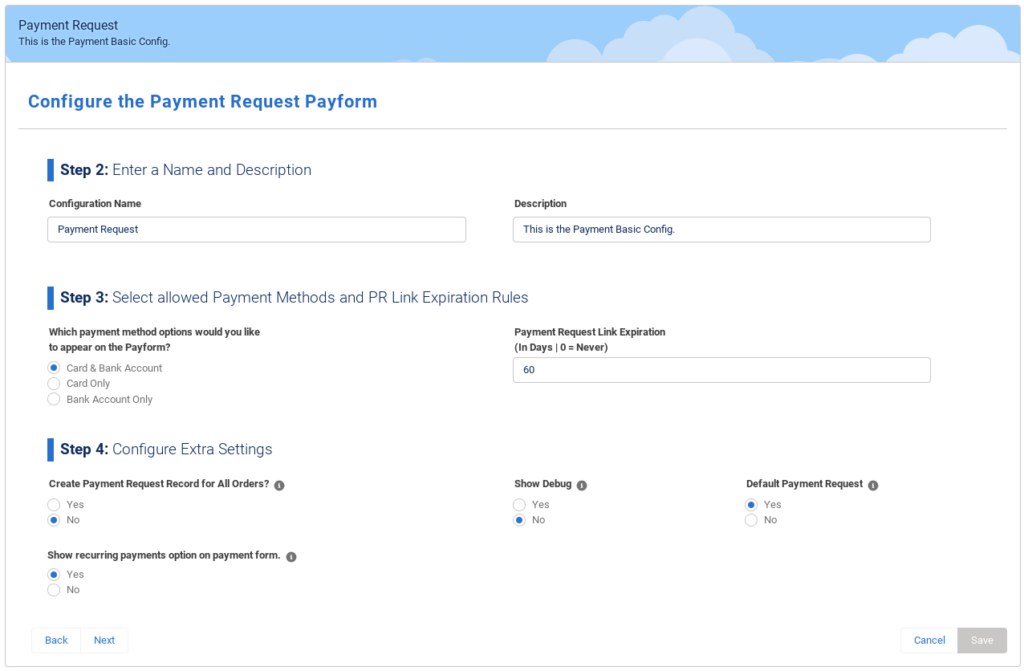
Step 3: Select allowed Payment Methods and PR Link Expiration Rules
Which payment methods will you be accepting? Card and Bank Account, Card Only, or Bank Account only. You can also set the number of days before a Payment Request link expires.
Step 4: Configure Extra Settings
- Create Payment Request Record for All Orders? – Only select Yes to create a Payment Request record for every Chargent Order record created. Most customers will select No.
- Show recurring payments option on payment form. – Displays if Payment Methods is Active. Select Yes to allow your customers to save their payment method for all payments in this series.
- Show Debug – Only select Yes if you are testing and require details about requests and responses sent to your Payment Gateway for all Payment Requests. Show Debug should be set to No if you are processing live transactions.
- Default Payment Request – Select Yes if you want this Payment Request Template to be the default payform. You can only have one default payform.
Customize Payment Request Page
Step 5: Edit your Welcome Text
Your welcome text should be friendly towards the customer and ask them to enter the billing information in your Payform.
Step 6: Edit your Payment Messages
Customize your Success, Cancel, and Fail Pages to let customers know if the payment they used was processed as expected, declined, or canceled. You can also edit the footer of your Payform.
Developer Pages
You should only use Developer Pages if you are a Salesforce Developer using custom Visualforce Pages.
Change Look & Feel
Step 7: Upload your Company Logo
Upload your company logo by clicking Upload Files or drag and drop your image. Make sure your logo is the actual size before uploading.
Step 8: Edit Your Tabs Names
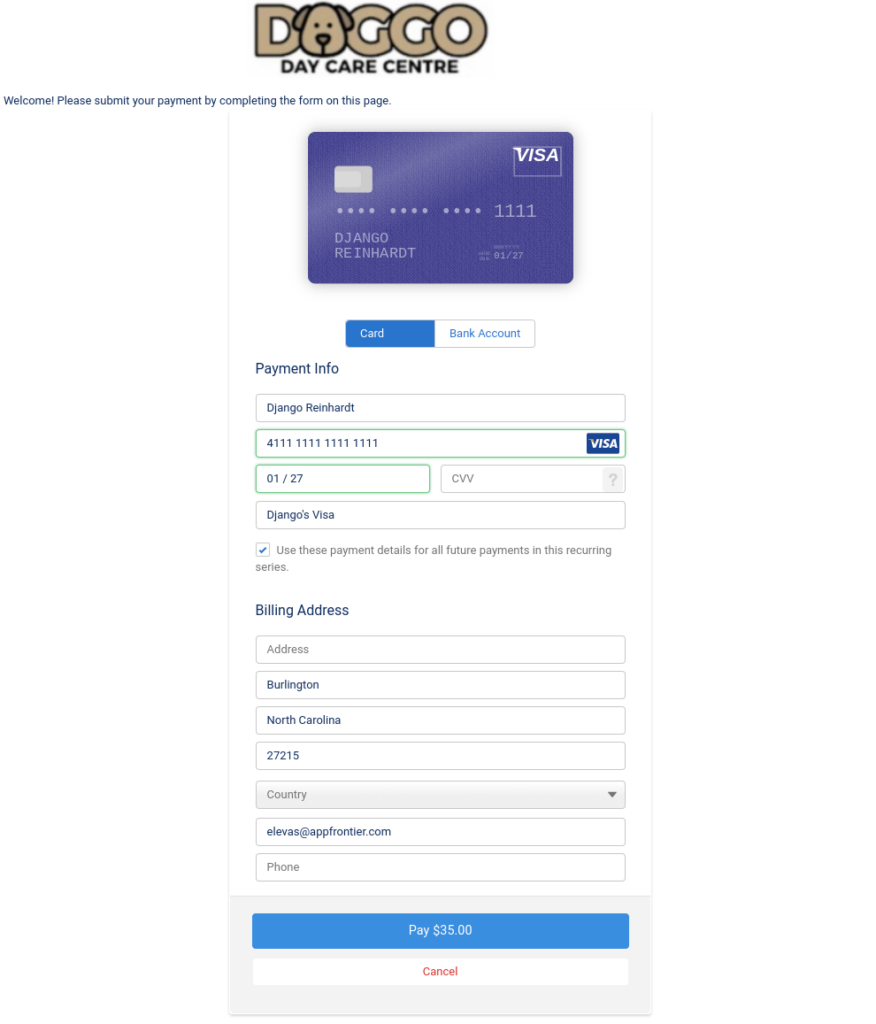
Your Payform has two sections — one for the Billing Address and another for the Credit Card details. Here you can edit the titles of each section to fit your company’s branding.
Step 9: Edit Your Payform Button
The default button name is Charge, but you can change the button to say Donate or Process Payment. You can also change the button’s color to fit your company’s branding.
Step 10: Select a Background
You will need to complete a few steps to change your background image.
- Upload your background image as a Public Static Resource in Salesforce.
- Copy the image’s URL.
- Check Enable Custom Background in the Payment Request Setup.
- Paste the URL for the Public Static Resource into the blank field.
Step 11: Choose your Payform Location
Payform Location aligns your form to the Left, Center, or Right.
Preview and Save your Payment Request
Preview and Save your Payment Request. Click Preview to see what your Payment Request form will look like. When you are happy with your Payment Request, click Save. After saving the form, you can always return to the Payment Request Wizard and make changes.
Explore Chargent Settings #
At this point, we recommend familiarizing yourself with Chargent’s Settings. You can find Chargent’s settings by clicking the Chargent Settings tab in the Chargent App.
Here, you will find links to our complete help documentation, access to advanced settings for Chargent, feature activation, and more. Take some time to explore each of the Chargent Settings tabs.
Testing Chargent #
Now that you’re all set up, it’s time to test your configuration! Always test your configuration in your Sandbox before deploying your app to production. At a minimum, we recommend that your testing includes the following:
- Test in a Sandbox using Test Credit Cards – Most payment gateways provide the ability to create developer or test accounts, allowing you to test various gateway responses.
- Test in Production using Live Credit Cards – As a final step in the testing process, ensure that everything works correctly in your production environment using live transactions.
Note: Remember to test again after making any updates or developing custom solutions related to Chargent.
We recommend testing your configuration using both the Payment Console and Payment Request before implementing and testing any additional features.
For more details, please read our extensive testing documentation.
Next Steps #
Chargent offers many additional features, including Recurring Billing, Payment Methods, Community Payments, and Automated Collections. Please refer to our complete documentation for further setup instructions, tips, and best practices.
Our Support Team is always happy to help with any questions or concerns.
Thank you for supporting Chargent. We look forward to helping you take payments everywhere in Salesforce!
If you love Chargent as much as we do, we always appreciate a review on the AppExchange.

