Chargent Anywhere is the standard method for processing payments in Chargent. If your process does not involve using Chargent Anywhere, you may want to use this legacy method of processing transactions directly from the Actions on the Chargent Order object.
Like Chargent Anywhere, which creates or updates a Chargent Order record, you can use the Charge, Authorize, Send Payment Request, or Payment Console actions to process transactions or send Payment Requests.
Chargent recommends you use tokenization rather than storing sensitive credit card information in Salesforce. Tokens can be used in place of credit cards in order to provide greater security. Storing credit card numbers is not recommended for PCI compliance, which is why Chargent provides settings to have the credit card data cleared after a successful transaction, after any transaction, or when a token is present on the Gateway record.
The minimum fields required to process a credit card transaction will vary slightly depending on your payment gateway and your settings. As a best practice, you should complete the basic fields below using the Payment Console or Payment Request tools.
Populate the following fields to use the legacy process of taking payments:
- Charge Amount: This amount will be sent to the payment gateway. This field defaults to the balance due unless the manual charge box is checked. If you don’t check the manual charge box, you’ll want to fill out the subtotal field and, optionally, the shipping and tax fields. See Chargent Order Amounts for more information.
- Billing First Name and Billing Last Name automatically populate the Card Name when the information is sent to the gateway.
- Billing Address: the address associated with the credit card.
- Billing Zip/Postal: the zip code for the billing address.
- Payment Method (Credit Card or Check — Check applies to ACH, electronic check, or Direct Debit)
- Card Type (Visa, Mastercard, Amex, Discover, and other payment sources)
- Card Number: the thirteen to sixteen-digit number on the card.
- Card Expiration Month (2 digits – MM)
- Card Expiration Year (4 digits – YYYY)
Depending on your configuration, the CVC (Card Verification Code) may be required after you press the Charge button. If your payment gateway is configured to require a CVC code, then this needs to be populated when the popup asks for it. If your payment gateway is not configured to require it, you can leave it blank and press the Charge button.
For recurring billing, use tokenization and provide the CVC for the initial transaction. Once a token is present, recurring payments will occur as scheduled.
Optional but commonly used:
- Billing Email may be used by your gateway to send a receipt to your customer. Chargent also sends a receipt to this email address when a transaction is processed.
- Invoice Number may reduce your fees and is useful for reconciliation.
- Order Information may appear on a customer receipt as a description.
For ACH or eCheck transactions:
- Bank Account Type such as Checking, Savings, or Business Checking
- Bank Account Number
- Bank Routing Number
- Bank Account Name for the person or company name on the bank account
- Bank Name, such as the name of the financial institution
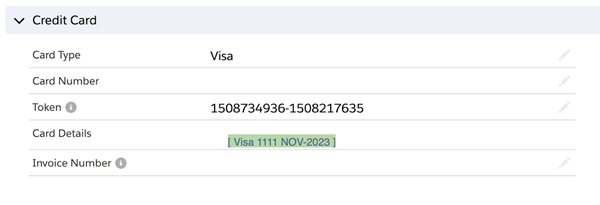
Card Details #
Chargent includes a Visualforce field called Card Details that you can add to the page layout to give you a summary of the card information, such as type, last four digits, and expiration date. It appears green if the card is more than two months from expiring, yellow if the card is within two months of expiring, and red if the card has expired. When adding this Visualforce field to your Page Layout, update the settings to include the field name by clicking the wrench icon and selecting a checkbox called Show Label.
Chargent Order Amounts #
The Chargent Orders Transaction package contains the following fields for calculating a payment value:
- Subtotal
- Tax
- Shipping
The Total field is automatically populated from these three fields. The Balance Due field is made up of the Total minus the total of all past transactions, including both charges and refunds. The Balance Due field also populates the Charge Amount field, which is the amount sent to be processed with your payment gateway.
The Charge Amount field is automatically populated with the Balance Due however this field can be updated with any Charge Amount if the checkbox for Manual Charge is checked. If the Manual Charge box is checked, Chargent sends the value in the Charge Amount field to the gateway.
Chargent Order Recurring Billing #
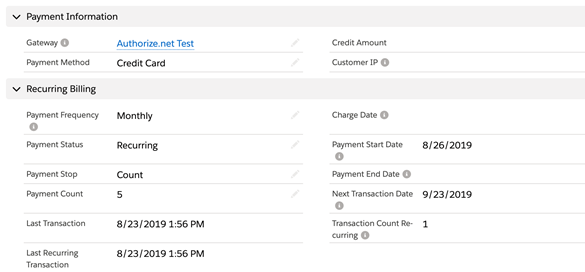
In order to set up recurring charges directly from the Chargent Order (versus using the Chargent Anywhere Payment Console above), create a new Chargent Order record. Some additional fields are required to process recurring or subscription billing. Here is a list of recurring billing options and their descriptions.
Payment Status
Chargent requires a value of “Recurring” to include a record in its batch. The following four Payment Status values regulate how recurring transactions work.
- Recurring: Allows the record to be picked up in the Recurring Billing Batch for processing based on the Payment Frequency and Payment Start Date.
- Error: If Chargent discovers a problem with the transaction such as a declined form of payment, the payment status will change to “Error” and no further transactions will be processed until the status is changed back to “Recurring.”
- Stopped: You may use the “Stopped” status to temporarily pause recurring transactions.
- Complete: When Chargent reaches a stop event, such as Balance Due, End Date, or Count, it will change the status to “Complete.”
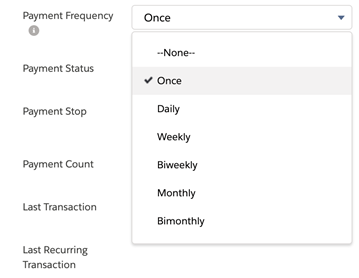
Payment Frequency
The Payment Frequency field tells the batch how often to process a payment. This field needs to be set in order for recurring payments to transact. Chargent looks at the last recurring transaction record, checks the frequency, then determines by the other recurring fields if the payment should be processed. Here are the different values available and what they mean.
- –None– (default) – This will not be processed in the recurring billing batch
- Once – a single transaction will occur on the Payment Start Date
- Daily – one transaction per day that the scheduled process is executed
- Weekly – one transaction per calendar week on the same weekday
- Biweekly – one transaction every two weeks on the same weekday
- Monthly – one transaction per calendar month on the same day as the Payment Start Date
- Bimonthly – one transaction every two months on the same day of the month
- Quarterly – one transaction every three months on the same day of the month
- Semiannual – one transaction every six months on the same day of the month
- Annual – one transaction every year on the same day
- Biennial – one transaction per every two years on the same day
Note: If you need to collect a down payment prior to setting up recurring billing, simply enter the amount in the Charge Amount field, then click the Charge action button. Once that transaction completes, set the Payment Start Date to the date you wish the next recurring transaction to occur and save the record.
Payment Stop
The Payment Stop field is dependent on Payment Frequency. This field determines when recurring transactions should stop running. Chargent offers you four options to manage the payment schedule of a recurring transaction. If this field is set to “Unending” or is left blank, the payment schedule will run indefinitely.
- Date – Chargent will process the last transaction on or before the Payment End Date, depending on frequency. Payment End Date needs to be set for this to end based on a date.
- Count – Chargent will stop processing transactions when the number of approved recurring transactions equals the value in the Payment Count field. This is helpful to follow an agreed-upon payment schedule based on the number of payments instead of the date.
Note: This only tracks against the total number of “Approved” recurring transactions and does not include manual transactions by clicking the Charge button. If you would like to monitor this field, you can display or report on “Transaction Count Recurring.”
- Balance Due – Chargent will continue to process transactions until Balance Due is less or equal to zero.
Note: If the number of payments exceeds the total balance due you may end up charging more than was intended, resulting in a negative Balance Due.
Chargent recommends only using Balance Due when the Charge Amount is evenly divided into the Total.
- Unending – Chargent will process transactions with no stop event for as long as the Scheduled Apex is automatically executed and the Payment Status remains “Recurring.”
Charge Date
This optional field can be set to a value of 1 to 31, and recurring charges will be completed on that day of the month, regardless of how long it took to get it paid last time. If a card is declined, then finally approved a week later, the customer will still be charged on the same date next month, rather than 30 days from the previous successful recurring transaction.
This field is not used in Daily, Weekly, or Biweekly recurring transactions, but will work for any time period Monthly or above. If this field is set to 31, Chargent will automatically charge on the 30th for months with 30 days, or on the 28th/29th of February.
Next Scheduled Payment
Chargent runs its logic and indicates when the next recurring transaction will occur in this field. This is useful for reporting and double-checking your configuration.
Please note that the Next Scheduled Payment field cannot be modified, as it is set automatically by Chargent when a record is saved.
Other Transaction-Related Fields
- Transaction Total: represents the sum of all transactions, including both charges and refunds.
- Status: indicates the status of the Chargent Order record. Based on the total minus all transactions, once the balance due is reached, the Status field gets updated to “Complete.”
- Transaction Count: displays the total number of Transactions related to this Chargent Order. This includes approved and declined transactions, as well as refunds.
- Transaction Count Recurring: displays the total number of approved or pre-settled transactions that were executed as part of a recurring payment series.
- Payment Received: is automatically updated to reflect this status after transactions are finalized and has no impact on transaction behavior. Values for Payment Received include None, Partial and Full. Note that this field is typically not updated for recurring Chargent Order records.
- Balance Due: automatically calculates the difference between Amount and Transaction Total and is a useful field to display below or near Amount. Remember that if Manual Charge is not checked, the Charge Amount will automatically reset to Balance Due.
Other fields that you may wish to send include:
- Order Information field, which shows up as the Description in most gateways, and email receipts to your customers.
- Invoice Number. Not all gateways use the Invoice Number, but you may get more favorable rates if it is populated, and many companies use it for reconciliation.
Note: Order Information and Invoice Number may be mapped to different fields within your Gateway. Please check our Gateway Guides to make sure your Gateway has these fields mapped and which fields are mapped within your gateway.
Process Builder and Validation Rules
Please be very cautious if you use Validation Rules or Required fields on your Chargent Orders with recurring billing. Validation rules can prevent the Chargent Order from saving properly after a transaction occurs, and because Recurring transactions run in a batch, you would only see the errors in the Apex Jobs monitoring page in Salesforce.
Certain validation rule problems can result in duplicate transactions, so please be sure to test any validation rules in Sandbox prior to deployment. Contact us for additional assistance.
Recurring Versus Manual Transactions
Chargent treats manual and recurring transactions separately. Many customers wish to charge the first transaction manually before setting a recurring billing schedule.
Remember, after you run a manual transaction, set the Payment Start Date for your recurring configuration ahead in order to prevent a duplicate charge. For instance, if you’re setting up a monthly recurring schedule, and have collected the first payment manually, today, set the Payment Start Date to a month from today’s date, and set the Charge Date field to the day of the month they should be billed going forward.
The Payment Start Date is the most effective way of preventing charges before a certain date, as Chargent does not evaluate records for possible charging until the Payment Start Date is today or in the past. So if the Charge Date is 15 and Payment Start Date is set for June 16th, the next transaction attempted will be July 15.
What determines a Recurring charge?
A record will only be considered for processing if the following criteria is met:
- The Payment Status = “Recurring”
- The Frequency is set
- The Payment Start Date is set to a date before the batch runs. The last transaction date was greater than the frequency. This only applies to transactions that are marked ‘Recurring.’ If no transactions are present, or only manually run transactions not marked as recurring, then it would also be counted as outside the frequency and not need to be charged.
Another consideration that determines if a transaction should be processed is the Charge Date.
- Charge Date: a specific day of the month the transaction should be processed.
If no Charge Date is set, Chargent evaluates the “last recurring transaction” and ensures that it has been the correct number of days since the last one was processed (for example, 9/15, 10/15, and 11/15 if monthly). Chargent only looks at the date of the last recurring transaction that was successful (Response = Approved, Recurring = True, not voided).
Chargent Orders that meet the criteria will then be processed, and a transaction with the Recurring field = true will be created (if the charge is successfully approved).

Installment Payments
The Charge Amount field is the amount to be charged or authorized by the next transaction. If there are multiple charges, it will automatically reflect the Total of the Chargent Order record, minus the total of past successful charges (also shown in the Balance Due field).
Check the Manual Charge checkbox when you want to specify an amount without factoring in the Tax or Subtotal fields on the Chargent Order record.
One thing to be aware of when using this manual override is that your Charge Amount will not be prorated. So if the Amount is $100, and you set the Charge Amount to $30, Chargent will charge 4 x $30. The system does not automatically prorate the last amount to equal the remaining balance (if less than the Charge Amount).
To automatically set the Charge Amount to the final balance that is smaller than previous installments, we recommend using Flow for this automation.
Usage Examples
Charge a card manually from Salesforce, and then set a recurring payment schedule:
- Click Payment Console.
- Select your payment gateway. If your payment console is configured with a lookup to Contacts, select the contact from the dropdown. Otherwise, enter the credit card billing address.
- Click Continue.
- Select the Recurring option and enter Payment Details.
- Enter both the Initial Amount and Recurring Amount.
- Click Next.
- Set the Frequency and Payment Start.
- Optional (set the Payment Stop)
- Optional (Set Day of the Month)
- Click Next.
- Review the Scheduled Payments.
- Press the “Charge One Time Amount and Start Recurring Billing” button.
Recurring Payment Setup from a Chargent Order
- Enter a Subtotal or Total in the Chargent Order record.
- Set Manual Charge to “TRUE” and enter Charge Amount (this prevents the Charge Amount from recalculating based on Total minus Transaction Total).
- Set Payment Method to “Credit Card.”
- Choose a Payment Frequency (anything from daily to Biennial).
- Optionally choose a Payment Stop (Date, Count, Balance Due, or unending)
- Optionally choose a Charge Date to have the customer billed on the same date of the month
- Set Payment Status to “Recurring.”
- Click Save.
Note: Be sure to set your Payment Start Date to when the next transaction should process. The recurring batch will not recognize the initial charge using the charge button since the transaction record will not have the Recurring box checked.
Single Scheduled Transaction
To run a single scheduled charge in the recurring batch, first complete the billing and credit card data as shown in the recurring billing setup above (Although it’s a one-time charge, Chargent still requires the recurring billing batch to pick it up automatically for a one-time charge in the future).
- Set Payment Frequency to “Once.”
- Set Payment Status to “Recurring.”
- Set Payment Start Date to the date you want the single charge to run.
- Click Save.
Recurring Billing Declines
If a card is declined as part of the scheduled Apex batch that runs recurring billing transactions, payment status will be changed from “Recurring” to “Error.” If you’ve enabled the Automated Collections add-on, and configured it to target this Chargent Order record, the Payment Status will update to “Automated Collection” upon a declined transaction.
If you’ve received a payment and need to manually update the Chargent Order record to resume the recurring payments:
- Add updated billing information to the record.
- Change the Payment Status back to “Recurring”.
- If you have processed a charge manually outside of the recurring billing schedule by clicking the Charge button, be sure to set the Payment Start Date ahead to the next time the record should be billed, to avoid a recurring charge the next time the batch runs.

