Automatically notify your customers when their credit cards are about to expire using Chargent’s Account Updater. You can schedule a batch to run in the background that sends an email to customers, asking them to update their payment methods using a secure payment link at their convenience.
Account Updater is an automated process that scans all your records for a billing email address and a Payment Status of “Recurring” and schedules an email to the customer when a credit card is about to expire. The email contains a link to a secure site where customers can update their billing information in order to prevent recurring payment failures before they happen.
Note: Chargent’s Account Updater works differently from the Automated Account Updater services offered by payment processors. The Chargent Account Updater looks for expiring credit cards in Salesforce and asks your customer to make a secure update online.
Updater services offered by payment processors typically update credit cards on the back end from a database of new credit cards, directly from the card issuers and the card brands. Chargent can support some of these services, depending on integration with existing tokens. For more information, please contact our support team
Prerequisites #
- Account Updater works with the latest version of Chargent Orders. Please use our PIM (Package Installation Manager) to update the current package if necessary.
- Account Updater requires that your payment request setup is done prior to setting up the Account Updater feature.
Schedule The Account Updater Batch #
In order for the Account Updater to search your Salesforce data for expiring credit cards, you must configure the batch. The batch runs automatically to find your recurring billing expiration dates and schedule an email to customers, reminding them to update their credit card details.
To set up the batch:
- Click the gear icon
 and choose Setup.
 - In the Quick Find box, enter “Apex” and select Apex Classes.
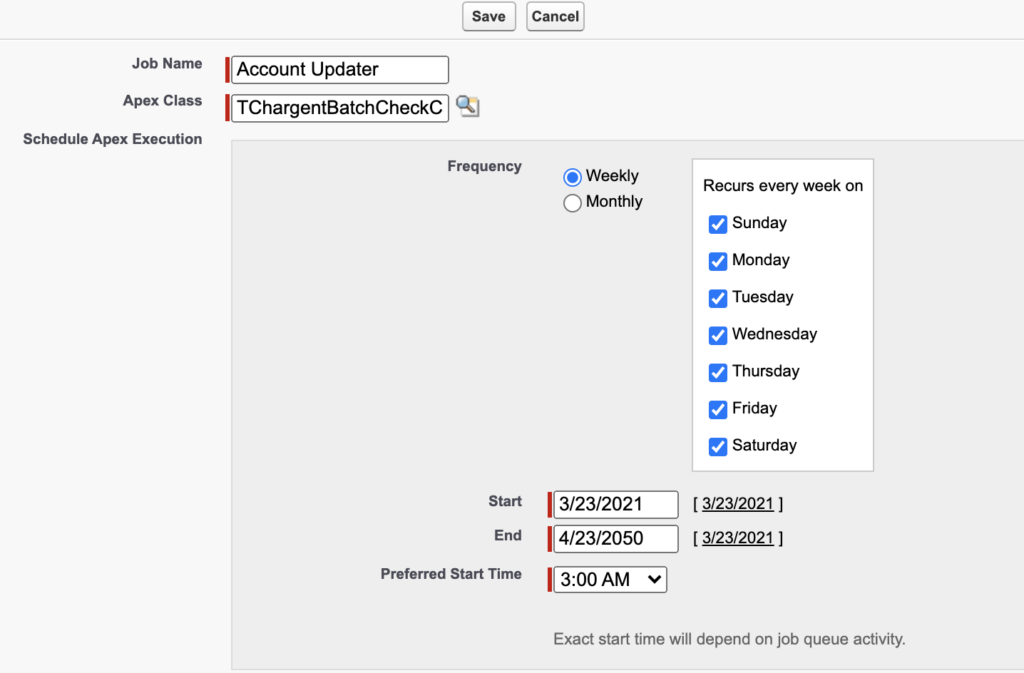
- Click Schedule Apex.
- Enter the Job Name “Account Updater.”
- Click the magnifying glass to search for the Apex Class “TChargentBatchCheckCards.”
- For Frequency, select “Weekly” and check every day of the week. This allows you to check all cards that need updating on a daily basis.
- Select today’s date for Start and a date in the year 2050 for End.
- Select any Preferred Start Time; however, we recommend times during the night and when no other process is running. This prevents batches from conflicting as they run..
- Click Save.
Add SOQL String To The Advanced Settings #
The next step is to add the SOQL string to the Advanced Settings. This tells the batch to search all records with a Payment Status of “Recurring.”
Note: This step is important; without it, you may email former customers or customers with expired cards on inactive billing records.
- Click the App Launcher icon
 at the top-left of your screen.
 - Search for and select the Chargent app.
- Click the Chargent Settings tab.
- Click the down arrow to the right of Global Settings.
- Click the Advanced Settings subtab.
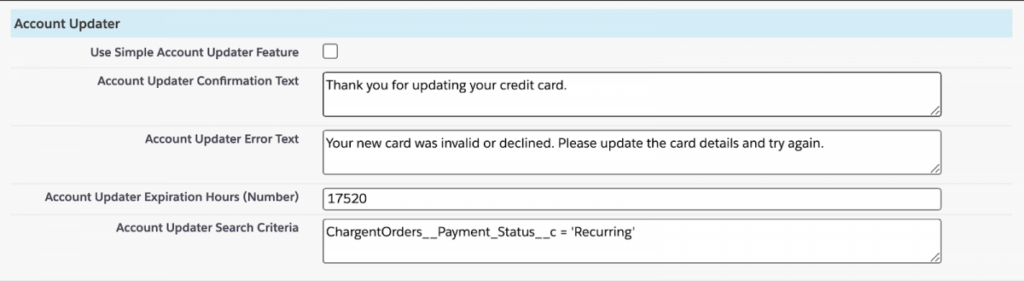
- Enter the following information in the Account Updater section:
- Use Simple Account Updater Feature – When unchecked, this attempts to validate the new credit card and process an authorization for the minimum amount (usually $1.00). Select this box to update the information, but do not attempt to validate the card.
- Account Updater Confirmation Text – Enter the message you want to be displayed when a new credit card is updated successfully.
- Account Updater Error Text – Enter the message you want to be displayed when a new credit card is updated and fails.
- Account Updater Expiration Hours (Number) – You can control how long an Account Updater link is valid before it expires. This number is represented in Hours (2184 hours is equivalent to 3 months).
- In the Account Updater Search Criteria, enter the following string:
ChargentOrders__Payment_Status__c = 'Recurring' |
- Click Save.
Tip: keep this window open for testing in the next step.
Test Using The Developer Console #
In order to test your work, create a Chargent Order with an expiration date in the current month. Next, run the batch using the Developer Console. Since you are checking for expired credit cards only, you don’t need to add information that would normally be filled in when processing test transactions.
- Select the Chargent app from the App Launcher icon at the top-left of your screen.
- Click the Chargent Orders tab.
- Click New.
- Fill in the following fields:
- Payment Status = Recurring
- Payment Frequency = Once
- Payment Start Date = today’s date
- Complete Billing Information
- First & Last Name
- Billing Address, including State, Zip Code, and Country
- Billing email address (Billing email address is important because this will be the email address that receives the Account Updater email.
- Card Type, Test Credit Card number, and Expiration Date. See Chargent Gateway guides for more information.
- Click Save. Next, run the batch from the developer console using the window from the previous step.
- Click Developer Console.
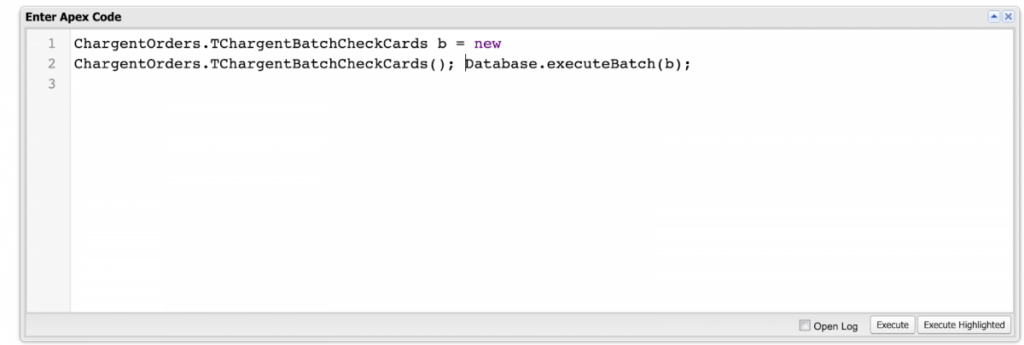
- Click Debug and choose Open Execute Anonymous Window.
- Copy the following code and click Execute.
ChargentOrders.TChargentBatchCheckCards b = new |
Review the email notification you receive that your credit card is about to expire. This email will be sent to the billing email address listed on the Chargent Order.
Customizing Your Email Template #
Now that you have tested Account Updater, you can choose to customize the email template that is sent to your customers.
- Click the gear icon and choose Setup.
- In the Quick Find box, enter “Classic Email Templates.”
- From the dropdown menu, select the “Chargent Templates” folder.
- Select the “Account Updater Feature Html.”
- Here you can edit the HTML and Plain Text versions of your template.
Note: be careful when you are modifying the email template and make sure you don’t remove the merge field for the Account Updater link.
{!ChargentOrders__Email_Notification__c.ChargentOrders__Account_Updater_Link_Formatted__c} |
Add More Merge Fields #
You can also add additional merge fields from any object in Salesforce. This can be either standard or custom fields.
- From the Select Field dropdown, choose the object that has the desired fields.
- Select the field you want from the Select Field dropdown.
- Copy the merge field into the template.
- Add the Card Details field so that the recipient can view the last four digits of the credit card number to distinguish it if they have multiple payment methods.

When you are done customizing the template, be sure to save the changes.

