What is Automated Collections? #
Chargent Automated Collections is an add-on tool that automatically retries payment collection on missed and late payments. It also communicates with those customers so that they know that they’ve missed a payment and provides them with a payment request link so they can update their payment information and get their account back in the black. All this on the schedule and cadence that you choose.
This great add-on takes minutes to configure and activate while requiring no developer work or coding. Once activated, there’s no more need to spend staff time sending emails and making phone calls to collect on late payments.
Before You Begin #
Before configuring Automated Collections, ensure Chargent is installed and configured using our step-by-step Installation and Setup Guide.
Specific requirements related to Automated Collections include:
- Assign Chargent licenses
- Create and test a Gateway record
- Activate Automated Collections
- Configure at least one Payment Request template
- Enable “View Setup and Configuration” and “Customize Application” permissions in your user profile
If you have any questions about the above prerequisites, please contact our Support Team.
Configuring Automated Collections #
Now that you’ve completed the prerequisites, you can enable and configure Chargent Automated Collections.
- Click the App Launcher icon
at the top-left of your screen, search for “Chargent,” then click the “Chargent” app.
- Click the “Chargent Settings” tab.
- Click the “Automated Collections” subtab from the settings navigation.
- If needed, enable Automated Collections by clicking the switch to the “Enabled” position.
- Click New at the top-left portion of the screen to create a new process.
- Choose the type of Automated Collections process you wish to create from the pop-up:

- Enter a useful process name in the AC Process Name field.
- Select an email address from the Sender Email Address picklist if you chose Automatic Retries + Emails above. Emails sent by this process will come from this email address. This picklist will populate with emails configured in Salesforce Setup | Organization-Wide Addresses.
- Select an option from the Criteria picklist:
- All Chargent Orders – This Automated Collections process will trigger when a scheduled payment is missed on any Chargent Order record.
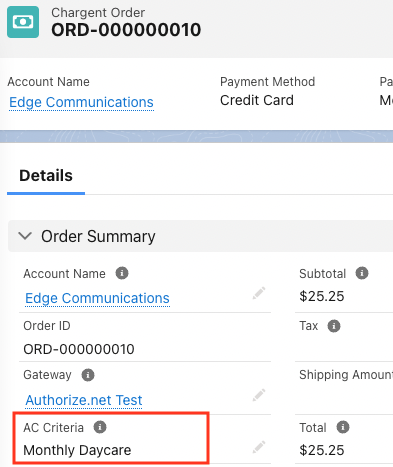
- Rule-based – this Automated Collections process will trigger only when the value in the AC Criteria field on a given Chargent Order record matches the AC Criteria Value populated on this configuration.


- Select an option from the Payment Request Page picklist. This is the Payment Request template that customers will see when clicking the link included in the email this process sends.
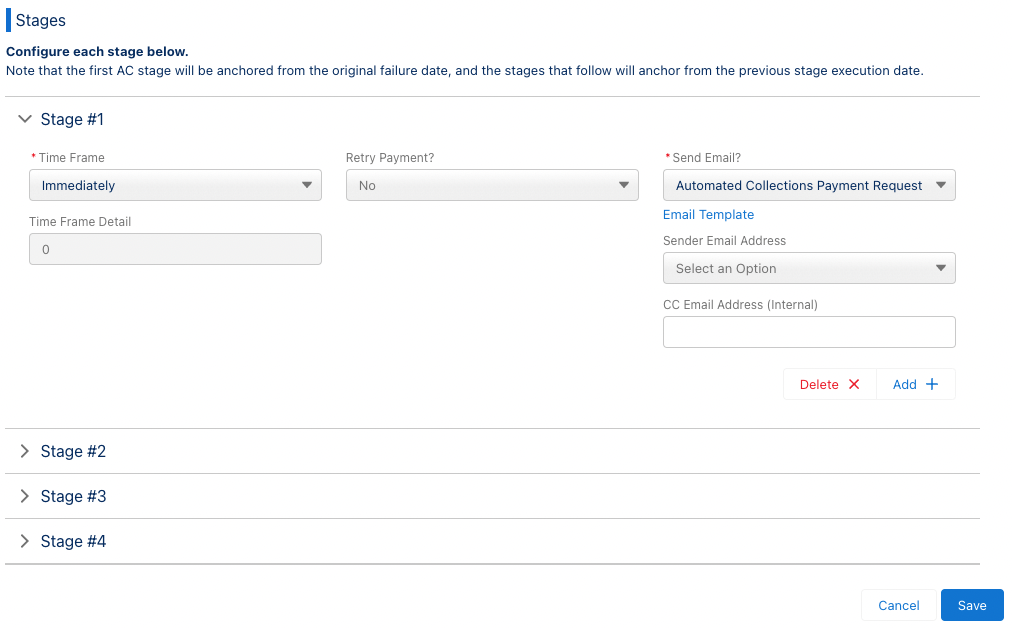
- For each stage, you may configure the timing, retry, and email options:
- Time Frame options (first column) determines when this stage will execute. For instance: Immediately, # of Days, # of Weeks, or Day of The Month. The “Immediately” option may only be used for sending an email for the first stage.
- Enter a numeric value for the number of days, day of the month, or day of the week in Time Frame Detail.
- Retry Payment options (second column) determine whether the Chargent application will automatically attempt to collect the payment during this stage.
- Yes
- No
- No – Mark order as error (typically only used for the last stage)
- Email options (third column) determine whether an email is sent during this stage, who that email is from (if different than the “Sender Email Address”) selection above, and whether that email will be CC’d to an internal email address.
- The Send Email? option only executes if the payment retry configured for the same stage fails to collect a payment.
- Click the Add + button to add and configure more stages. Alternatively, click Delete X to remove stages.

- Once you’ve configured all stages, click Save.
- Note that your new process will be enabled by default. To disable it, click the caret (downward arrow) button next to the process in the left-side navigation, then click Disable.
That’s it! In just a few minutes and a handful of clicks, you’ve configured Chargent’s Automated Collections feature.
Create Custom Email Templates #
You can create additional email templates that can be used in your Automated Collections process.
To create an email template:
- Click the gear icon
and click Setup
- In the Quick Find, search for and select Classic Email Templates
- In the Folder picklist, select Chargent Automated Collections Templates
- Click New Template or edit an existing template.
Once the email is created and saved, it will appear in the Send Email picklist when configuring an Automated Collections process.
Commonly Used Elements
The elements below can be added to your Automated Collections email templates in order to populate relevant information. They function similarly to standard Salesforce merge fields but use a different format in some cases.
- [[amount due]] – This will populate the Charge Amount on the Chargent Order record when Automated Collections was triggered.
- [[decline date]] – This will populate the date of the payment decline that triggered Automated Collections for this record.
- [[payment request link]] – This will provide a Payment Request link that the recipient may click to be taken to a secure page where they may update their payment information and submit the payment.
Commonly Used Merge Fields
The following standard merge fields are often used in Automated Collections emails as well:
- {!ChargentOrders__ChargentOrder__c.ChargentOrders__Payment_Title__c} – This displays the value in the Order Title field on the Chargent Order record. This is useful because it expresses the purpose of the payment being collected.
- {!ChargentOrders__ChargentOrder__c.ChargentOrders__Payment_Descriptor__c} – This displays the value from the Order Descriptor field on the Chargent Order record. This is useful in that it expresses the details of the payment being collected.
- {!Recipient.FirstName} – This will populate the first name found in the Billing First Name field on the Chargent Order record.
- {!Organization.Name} – This will populate the value found in the Organization Name field found in Salesforce Setup | Company Settings | Company Information.
Automated Collections Process Example #
If you’re just getting started with Automated Collections, and are looking for a boilerplate process, here’s a good template to start with. This template assumes a monthly recurring payment, and is designed to be friendly throughout, but to also escalate the tone as the stages are executed. Note the custom merge fields used that include [[ ]] wrappers.
| Stage | Timing & Actions | Messaging |
| 1 | Immediately Send email w/ Payment Request link No retry | Email Template Subject: Heads up – your payment was declined {!Recipient.FirstName}, Hey there! Your payment of [[amount due]] was declined on [[decline date]]. You can update your payment details and submit the payment again by clicking here: [[payment request link]]. {!ChargentOrders__ChargentOrder__c.ChargentOrders__Payment_Title__c}{!ChargentOrders__ChargentOrder__c.ChargentOrders__Payment_Descriptor__c} Thank you, {!Organization.Name} Payment Request Template The text of the Payment Request template should be friendly, and reflect that the consumer is updating their payment method and sending a payment for the product / service they’ve agreed to pay for. |
| 2 | 1 Day Later Retry payment No email | |
| 3 | 3 Days Later Retry payment Send email w/ Payment Request link | Email Template Subject: 2nd Notice – your payment was declined, please update payment method {!Recipient.FirstName}, We emailed you a few days ago about your recently declined payment. We tried to collect that payment again today using the payment method on file, but it was declined. Please update the payment method on file here [[payment request link]], or contact our Billing Team at: 555-555-5555 [email protected] Thank you, {!Organization.Name} |
| 4 | Day of Month = 16 Retry payment Send email | Email Template Subject: Warning: Your payment was not received {!Recipient.FirstName}, Your recent scheduled payment was declined. We’ve attempted to collect this missed payment, and have emailed you about it. Please contact our Billing Team to prevent account suspension: 555-555-5555 [email protected] Thank you, {!Organization.Name} |
| 5 | 3 Days Later No retry – Mark as Error Send email | Email Template Subject: Account Suspended for non-payment {!Recipient.FirstName}, As we have not been able to collect your previously declined payment, your account has been suspended. Please contact our Billing team to arrange payment and reinstate your account: 555-555-5555 [email protected] Thank you, {!Organization.Name} |
How Automated Collections Works #
Now that you’ve activated Automated Collections, let’s take a look at how this feature works. In a nutshell, Automated Collections includes three major stages:
| 1st | Automated Collections is Triggered (automatically or manually) |
|
| 2nd | Stages are Scheduled and Executed |
|
| 3rd | Automated Collections Completes |
|
Triggering Automated Collections #
Automated Collections can be triggered in many ways:
When a Scheduled Payment Fails
A typical method used by most businesses is that a scheduled payment is declined, and the Automated Collections process begins because of that decline. To leverage this approach, either configure an Automated Collections process with the Criteria value of “All Chargent Orders,” or “Rule-Based,” and ensure that the AC Criteria field for each Chargent Order record is populated with the value that matches the AC Criteria Value field on the Automated Collections configuration.
Start Automated Collections Action
Chargent understands that your business will sometimes need the option to start the Automated Collections process manually. With Chargent’s Collect Any Payment feature, users can click the Start Automated Collections action on the Chargent Order record to initiate an Automated Collections process.
Note: The button referenced below is only available in Salesforce Lightning Experience.
- Click the App Launcher icon
at the top-left of your screen and choose Chargent.
- Select the Chargent order record from the Chargent Orders tab.
- Click Start Automated Collections.
- Select the Automated Collection Process you want to trigger.
- Click Start Collections.

Customizing Automated Collections #
Chargent makes it easy to collect payments anywhere in Salesforce. This is why we have enabled Flow for Automated Collections. We’ve even included an Automated Collections Flow Template to help get you started. Additionally, Automated Collections can be triggered using the API.
For more information, visit Customizing Automated Collections.
Automated Collections Objects #
The two main objects packaged with Automated Collections are “Chargent Automated Collections” and “Chargent Automated Collections Stages.”
Chargent Automated Collections
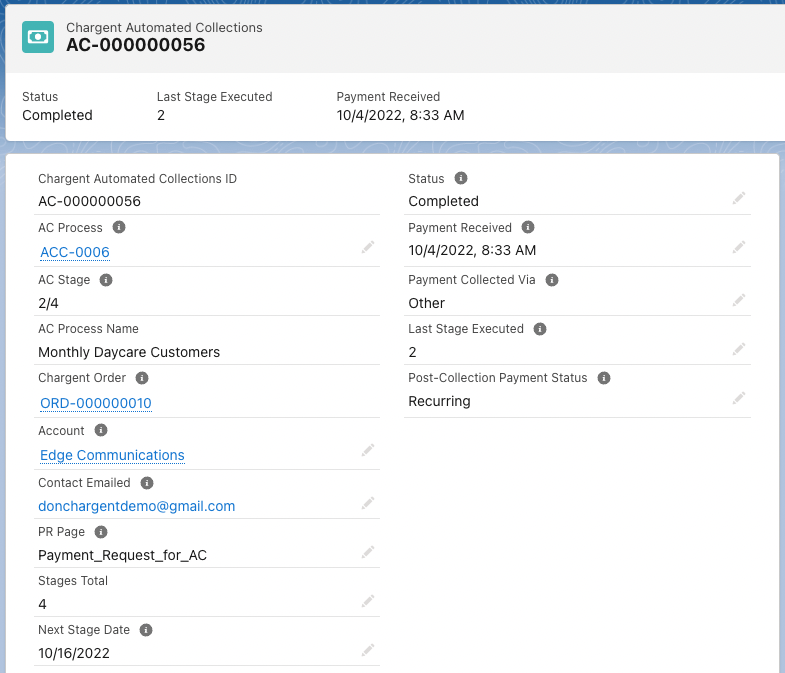
This record is created when an Automated Collections process has been triggered for a given record. It is the Master object in a Master-Detail relationship with the Chargent Automated Collections Stages object. The fields on the page layout by default are listed in the table below.
| Field Name | Field Purpose |
| Chargent Automated Collections ID | The automatically generated unique identifier for this record. |
| Chargent Order | The Chargent Order Record from which the failed payment occurred. |
| Account | The Account record associated with that Chargent Order. |
| Contact Emailed | The Contact emailed when the payment failed and the Automated Collections process began. |
| Status | The status of this Automated Collections process; Completed or In Progress |
| Payment Received | The date on which the successful payment that completed this process was received. |
| Payment Received Via | Indicates how the payment was collected. |
| Last Stage Executed | The last Chargent Automated Collections Stage that was executed before the successful payment was received |
| Post-Collection Payment Status | This field indicates what the value of the ‘Payment Status’ field will be on the related Chargent Order record after this Automated Collections process has collected a payment. |
| AC Process | Provides a lookup to the record for the Automated Collections configuration triggered. |
| AC Process Name | Displays the name of the Automated Collections configuration triggered. |
| PR Page | Displays the name of the Payment Request template used for the automatically generated Payment Request record used for this process. |
| States Total | Displays the total number of Automated Collections Stages scheduled for this process. |
| Next Stage Date | Displays the date that the next scheduled stage will execute. |

Chargent Automated Collections Stage
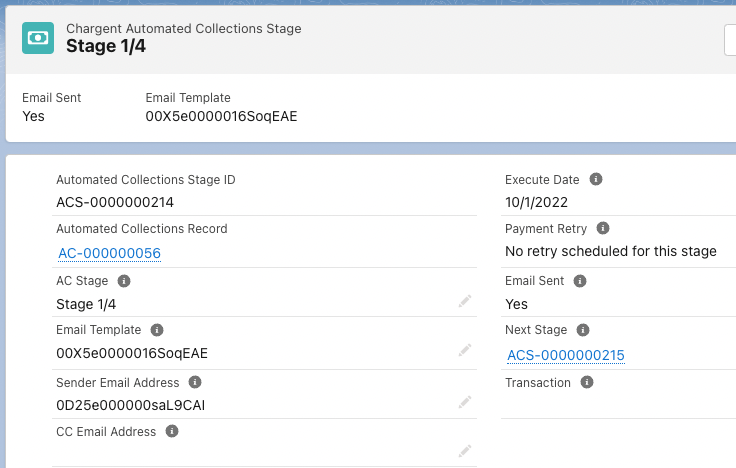
These records are created when Automated Collections is triggered. They represent the stages that were configured, and which will execute for this process. This object is the Detail object in the Master-Detail relationship with the Chargent Automated Collections object.
| Field Name | Field Purpose |
| Automated Collections Stage ID | The automatically generated unique identifier for this record. |
| Automated Collections Record | The Chargent Automated Collections record, which is the Master in the Master-Detail relationship for this record. |
| AC Stage | The stage number in the series of stages configured for this Automated Collections process. For instance: “Stage 2/3” |
| Email Template | The record ID of the email template used for this stage. |
| Next Stage | A lookup to the next Automated Collections Stage record to be executed. |
| Sender Email Address | Displays the record ID of the Organization-Wide Address used as the Sender Email Address for this stage. |
| Execute Date | The date on which this stage will / did execute. |
| Emailed Sent | Indicates whether an email was sent as part of this stage. |
| CC Email Address | Displays the email address if this stage was configured to CC one during this stage. |
| Transaction | Displays a link to the Transaction record generated if a payment retry was executed during this stage. |
| Payment Retry | This field indicates the automatic retry status of this stage. This will display whether the charge is scheduled or not, and whether that retry resulted in a successful payment collection. |

Test Your Configuration #
Like all software, it is a best practice to test Automated Collections in a Sandbox environment before deploying to your Production environment. This will enable you to develop a full understanding of how the tool works and ensure that it is functioning as intended.
Now that you’ve configured an Automated Collections process visit Testing Automated Collections to begin the testing process.
See Also
Customizing Automated Collections
How to Grow ROI With Accounts Receivable Automation
What is Automated Collections?
Collections Analytics (Reports & Dashboards)


