Chargent supports over 30 gateway integrations, but if your gateway is not listed on our Salesforce Payment Gateways page, it may be supported via Authorize.net emulation.
If your gateway is supported using the Authorize.net emulator, follow these steps to get up and running:
- Understand the limitations of Authorize.net emulation.
- Add your gateway’s Endpoint to Salesforce’s Remote Site settings.
- Create an Authorize.net gateway record via the Gateway Setup Wizard and populate the Endpoint Override field with your gateway’s endpoint.
See the sections below for more information about each step.
Limitations of Authorize.net Emulation #
Tokenization is not supported. Authorize.net emulation enables you to integrate Salesforce with gateways that you would otherwise be unable to. However, gateway emulation comes with limitations. Specifically, Authorize.net emulation does not support tokenization. Due to this limitation, if you plan to use tokenization (recommended), see our Gateway-Specific Guides page for a list of gateway integrations that do support tokenization.
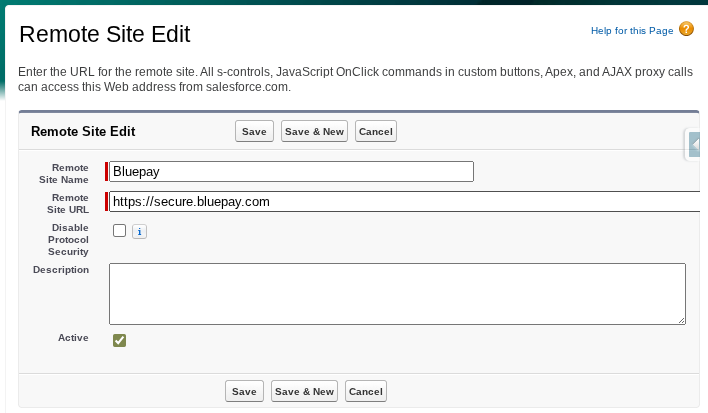
Add Your Gateway to Salesforce’s Remote Site Settings #
After understanding the limitations of Authorize.net Emulation, you must add your gateway to Salesforce’s Remote Site Settings, which allows you to make Callouts to your gateway’s endpoint.
- Click on the Gear Icon
 and click Setup.
 - In the Quick Find box, search for and click Remote Site Settings.
- Click New Remote Site.
- Enter the following:
- Remote Site Name: Enter the name of your gateway.
- Remote Site URL: This is the endpoint that directs your transactions to the correct endpoint URL. Contact your gateway provider to obtain this value.
- Protocol Security: Unchecked (Do not select this unless you understand the security implications. See the Configure Remote Site Settings for more information.)
- Description: We always recommend adding a description.
- Active: Checked
- Click Save.
Create Your Gateway Record in Salesforce #
Now that you’ve added your gateway as a Remote Site in Salesforce, you can create your Gateway record using the Gateway Setup Wizard, choosing Authorize.net as your gateway.
- Go to the App Launcher
 and click the Chargent app.
 - Click the Chargent Settings tab.
- Click the Setup Wizard subtab.
- When prompted, “Do you have a Payment Gateway account?” click Yes.
- Select “Authorize.net” from the list and click Continue.
- If available, select the “Live Transactions” tab.
- This option will not be available in a sandbox; see the note below for more information.
- Enter the following information:
- Gateway Name: Enter the name of your gateway.
- API Login ID: Populate your gateway’s account ID (this value may be named differently depending on your gateway).
- Transaction Key: Populate with your gateway’s key (this value may be named differently depending on your gateway).
- Endpoint Override: Populate with your gateway’s endpoint.
- If you don’t know your gateway’s endpoint, contact your payment gateway directly.
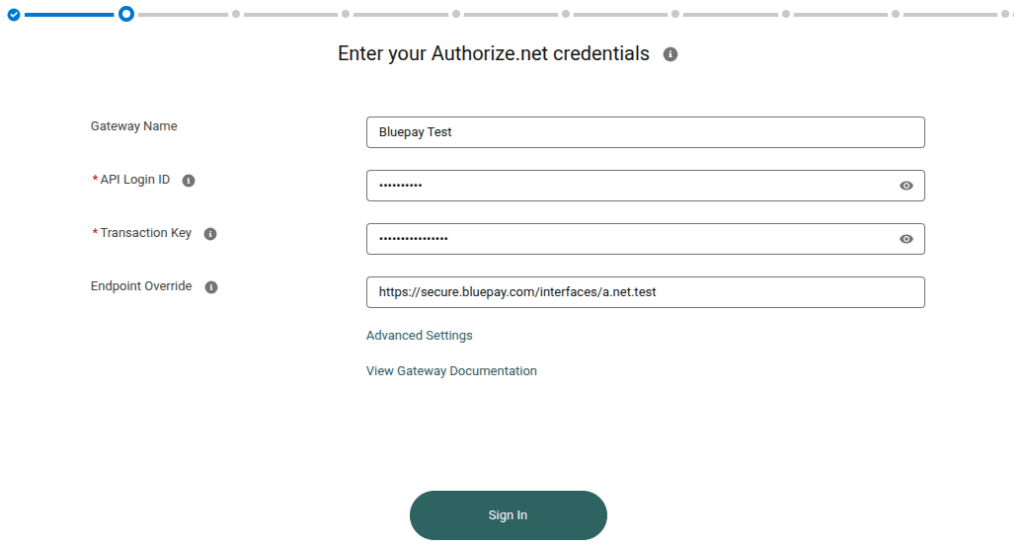
- Click Sign In to verify your credentials.
- Click Continue to save your credentials.
- Complete the remaining steps in the Gateway Setup Wizard.
Note: Sandbox orgs will automatically default to Authorize.net’s test gateway endpoint to prevent accidental charges to real cards of bank accounts. Populating the Endpoint Override field overrides this setting, allowing you to connect to your specific gateway. If testing, ensure you are using a test endpoint and test gateway accounts when processing test transactions. Contact your gateway provider for information about a test account.
See Also
Gateway-Specific Guides
Supported Gateways
Testing In Production

