Integrating PayPal Complete Payments (PPCP) With Chargent In Salesforce
Salesforce Payments by Chargent is the leading payments application available on the Salesforce AppExchange. Chargent’s PayPal Complete Payments (PPCP) integration is fully featured, allowing you to directly charge credit cards and take PayPal Wallet payments directly in Salesforce! This guide shows you how to easily connect PPCP with Salesforce using Chargent.
Table of Contents

About This Guide
This guide provides the steps required to integrate Chargent with the PayPal Complete Payments (PPCP) gateway. For simplicity, this guide will refer to PPCP as PayPal. Links are provided to installation, user management, and configuration topics where more details are available so you can get up and running quickly. We have also included links to gateway-specific documentation for configuration instructions. Screenshots and details may differ based on updates to Chargent, Salesforce, or PayPal.
In addition to PPCP, we also integrate with the following separate PayPal-owned gateways: Braintree and Payflow Pro.
Before You Begin
Before integrating PayPal with Salesforce using Chargent, make sure you have completed the following steps:
Install and Configure Chargent
Before setting up your gateway, install the latest version of Chargent and configure your user permissions. The PayPal gateway integration is available in Chargent version 8.10 or later. Guides for these topics are available below to help you get started.
- Installing and Updating Chargent
- Assigning Chargent Licenses (Production Only, not required for Sandbox)
- Assigning Chargent Permissions
Access Your PayPal Business Account
To integrate with PayPal, you will need to create a PayPal Business Account, understand the transition between your account’s Sandbox and Live modes, and obtain credentials that will be used to validate your integration in Salesforce.
Create Your PayPal Business Account
If you don’t already have a PayPal Business Account, you can create one via the following link: Create a business account.
Follow the instructions by filling out the form. You will receive a confirmation email to finalize your account’s setup.

Your PayPal Business Account will be used for both test and live transactions. There is a toggle allowing you to transition your account from Sandbox to Live and vice versa. We recommend all customers perform extensive testing in Sandbox mode (within a Salesforce sandbox org) prior to switching your PayPal Business Account to Live mode.
How to toggle your account from Sandbox to Live Mode or vice versa:
- Log in to your PayPal Business Account.
- Click the Developer Dashboard Icon
 in the top right.
 - Click the Sandbox/Live toggle in the top right corner, as shown below:

Please note that your account must be fully set up in order to switch the toggle to Live. To learn more about PayPal’s Sandbox Mode, visit the PayPal Sandbox Testing Guide.
See the Test Your Transactions in a Salesforce Sandbox section below for more information about testing your transactions in Sandbox mode.
To create your gateway integration in Salesforce, Chargent requires the following credentials, obtained from your PayPal Business Account:
- Client ID
- Client Secret
You can access your PayPal Business Account credentials by following these steps:
- Log in to your PayPal Business Account.
- Click the Developer Dashboard Icon in the top right.
- Click the Apps & Credentials tab.
- Perform one of the following actions, based on your account’s status (Sandbox or Live) assigned in the previous section:
- When your account is in Sandbox mode, In the ‘App Name’ column, click Default Application.
- When your account is in Live mode, you must create a new app. For instructions, visit the Obtain Your Live Gateway Credentials section of this guide.
- Copy and save the following credentials:
- Client ID: Click the Copy to Clipboard Icon
 to the right of ‘Client ID’ and save the credential in a secure location.
 - Client Secret: Click the Copy to Clipboard Icon to the right of ‘Secret key 1’ and save the credential in a secure location.
- Client ID: Click the Copy to Clipboard Icon
PayPal Business Account Support
Please contact PayPal with any questions related to your PayPal Business Account.
Create Your PayPal Gateway Record in Salesforce
Now that you have your credentials in hand, you can complete your integration via the Gateway Setup Wizard, which creates a gateway record in Salesforce. You can create multiple gateway records using the same credentials, different credentials, or different settings, depending on your use case(s). In a production environment, we recommend creating a separate gateway record for both test mode and live mode.
- In Salesforce, click the App Launcher
 .
. - Click the Chargent app.
- Click the Chargent Settings tab.
- Select the Setup Wizard subtab.
- When prompted, “Do you have a Payment Gateway account?”, click Yes.
- Select ‘PayPal’ from the gateways list and click Continue.
- (Production Only) Select the Test or Live Transactions tab based on your PayPal Business Account’s mode:
- If your account is in Sandbox Mode, select the Test Transactions tab.
- If your account is in Live Mode, select the Live Transactions tab.
Note: When switching your PayPal Business Account from one mode to another, the endpoint and your credentials are different. Selecting the correct tab ensures your credentials are verified at the correct endpoint.
Additionally, in a Salesforce sandbox org, the Test Transactions and Live Transactions tabs are not present, and transactions are automatically sent to your gateway’s test endpoint.
If your testing process requires creating live transactions in your sandbox environment, see Test Live Transactions in Sandbox.
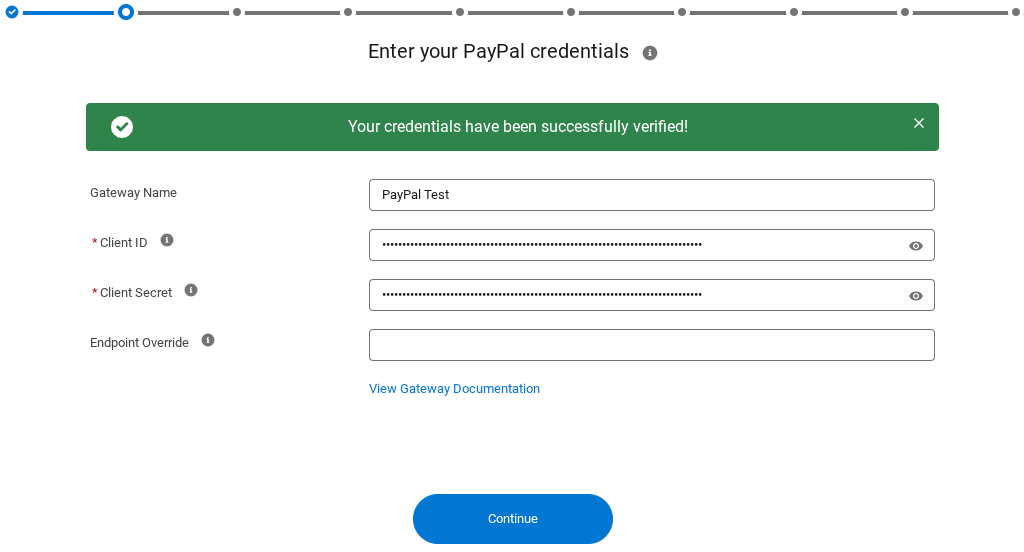
- Enter the following PayPal Business Account credentials:
- Client ID
- Client Secret
- To verify your credentials, click Sign In.
- If successful, you will receive a message stating “Your credentials have been successfully verified!”
- If unsuccessful, you will receive an error message in red. See the following tips:
- (Production Only) Verify that you’ve selected the correct tab: Test Transactions or Live Transactions.
- Verify that your PayPal Business Account is toggled to the correct mode: test or live.
- Ensure your remote site is active by visiting the Checking Your Remote Site Settings section below.
- Visit our troubleshooting tips knowledge article.
- To save your credentials, click Continue.
The remaining choices in the Gateway Setup Wizard are determined by your specific use case. For more detailed information about the various steps, see Gateway Setup Wizard. For more information about specific features available when using the PayPal gateway, refer to the Supported Features section of this guide.
The remote sites for your gateway should automatically activate when completing the Gateway Setup Wizard using the steps in the previous section. If you encounter any issues connecting to Chargent using your gateway credentials, ensure they have been correctly activated in your org by following these steps:
- Click the gear icon
 at the top right and choose Setup.
 - In the Quick Find, seach for and select Remote Site Settings.
- Locate the following Remote Site names and ensure the “Active” box is selected:
-
- PayPalTest
- PayPalLive
- If the “Active” box is not selected:
- Click Edit.
- Select Active.
- Click Save.
Our PayPal gateway integration uniquely allows customers to make payments via their PayPal account using the Digital Wallet payment method. This feature is enabled after creating your gateway record via the Gateway Setup Wizard.
Follow these steps to get PayPal Wallet up and running for your existing PayPal gateway record:
- In Salesforce, click the App Launcher
 .
. - Search for and select Gateways.
- Click your PayPal gateway record.
- In the top right, click Edit.
- Click Advanced Settings.
- Under ‘Available Payment Methods’, in the ‘Available’ column, select Digital Wallet.
- Click the right arrow to add it to the ‘Chosen’ column.
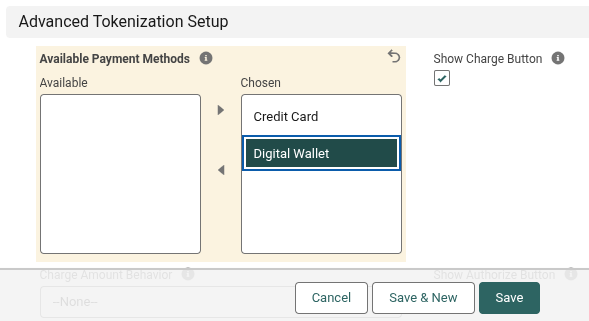
- Click Save.
You’re ready to start testing and accepting payments via PayPal Wallet! Visit Using PayPal Wallet for additional instructions.
Test Your Transactions in a Salesforce Sandbox
After successfully creating a test gateway record, you can create a test transaction. See Testing in Sandbox for general instructions and best practices for testing. Every gateway has its own test credit card numbers and response codes. See the list below for information and resources specific to PayPal.
Test Your Credit Card Transactions
Visit PayPal’s documentation, Card Testing, for a complete list of test credit card numbers. To quickly verify your integration, you can use the following test credit card number to ensure Chargent is appropriately configured:
| Processing Network | Card Number | Expiration | CVC |
|---|---|---|---|
| Visa | 4012000033330026 | Any date in the future | Any 3-digit number |
| Mastercard | 2223000048400011 | Any date in the future | Any 3-digit number |
| American Express | 371449635398431 | Any date in the future | Any 4-digit number |
| Diners Club | 36259600000004 | Any date in the future | Any 3-digit number |
| Maestro | 6304000000000000 | Any date in the future | Any 3-digit number |
You can also test generated card numbers for additional card networks, such as Discover or JCB.
Your PayPal Business Account allows you to create sandbox test PayPal accounts that can be used to test PayPal Wallet functionality in Chargent.
- Log in to your PayPal Business Account.
- Click the Developer Dashboard Icon in the top right.
- Click the Testing Tools tab.
- Click the Sandbox Accounts subtab.
- Either click Create account and follow the steps to create a new sandbox account or select an existing account.
- Copy the Email and Password fields to use when testing the PayPal Wallet in Chargent.
From your sandbox PayPal account, you can manage the credit cards, bank accounts, and PayPal balance to meet your specific test criteria. We recommend testing both personal and business accounts. For more information, see PayPal’s documentation, Sandbox Accounts.
Start using your sandbox PayPal account by visiting Using PayPal Wallet.
Test Your Response Codes
It’s important to test different gateway responses to ensure that your gateway is configured correctly. The gateway’s response is stored in a transaction record (specifically the Response, Response Code, and Response Status fields) in Salesforce. See the Gateway Responses section of this guide for more information about Chargent’s response fields.
Every gateway has its own response codes. When using PayPal, you can test error response codes by entering a rejection trigger in the Billing First Name field on the Chargent Order record (or the Account Holder Name field in the Payment Console), as noted in Simulate Card Error Scenarios.
Example: In the Payment Console, input the trigger ‘CCREJECT-REFUSED’ in the Account Holder Name field to generate the response code 0500 (DO_NOT_HONOR).

It is not considered best practice to test live transactions in your sandbox environment. If you still wish to send live transactions from a Salesforce Sandbox as a final step in testing, add the PayPal Production Endpoint URL noted below to the Endpoint Override field on your gateway record. You will also require your gateway’s Live credentials, which differ from the Sandbox credentials. For more information, refer to the Obtain Your Live Gateway Credentials section below.
PayPal Production Endpoint URL: https://api-m.paypal.com
For more information, see Testing Live Transactions in Sandbox.
Prepare to Go Live in Production
Once you’ve tested your gateway integration in a Salesforce sandbox, you’re ready to move to production. See Moving from Sandbox to Production to learn how to migrate your Chargent configuration changes to your production environment. After moving Chargent to production, see Testing in Production for best practices prior to going live.
Your Live credentials will differ from your Sandbox credentials. To obtain your Live PayPal Business Account credentials, follow these steps:
- Log in to your PayPal Business Account.
- Click the Developer Dashboard Icon in the top right.
- Ensure your account is toggled to Live mode.
- Click the Apps & Credentials tab.
- Click Create App.
- Enter the following information:
- App Name: Choose a name for your app, for example, “Live Application”.
- Type: Select the ‘Merchant’ radio button.
- Live Account: Select your account.
- Copy and save the following credentials:
- Client ID: Click the Copy to Clipboard Icon to the right of ‘Client ID’ and save the credential in a secure location.
- Client Secret: Click the Copy to Clipboard Icon to the right of ‘Secret key 1’ and save the credential in a secure location.
- Client ID: Click the Copy to Clipboard Icon
To learn more, see How do I create PayPal REST API credentials?
Create Your Live Gateway Record in Salesforce
Create a new gateway record in your production org specifically for processing live transactions by following the instructions in Create Your PayPal Gateway Record in Salesforce. Unique to your live gateway record, before validating your credentials on the ‘Enter Your PayPal Credentials’ page, ensure the following:
- Select the ‘Live Transactions’ tab, as displayed in the image below:

- Ensure your PayPal Business Account has been toggled to Live mode. See PayPal Business Account Test and Live Modes.
- Enter your live credentials. Learn more by visiting Obtain Your Live Gateway Credentials above.
Test Live Transactions in a Production Org
With your live gateway record created, you are ready for the final phase of testing: running live transactions in a production environment. Visit Testing in Production for considerations and best practices related to testing in your production environment.
When testing live payment information, you can prevent transactions from settling by refunding them immediately afterward. For more information, see Refunding and Voiding Transactions with PayPal. As a precaution, we recommend using very low amounts to minimize any impact in the event you forget to refund them.
To test gateway responses in the live environment, submit live transactions with the correct street address, zip code, and CVC information to generate successful responses. Likewise, submit incorrect street address, zip code, and card code information to generate other responses.
Congratulations! You have successfully integrated Salesforce and PayPal! You can now process transactions through PayPal directly in Salesforce using Chargent!
Supported Features
All of Chargent’s gateway integrations support most of Chargent’s core features. Some features are reliant on support by the gateway itself. Chargent’s integration with PayPal includes, but is not limited to, the following features:
Quick Look
See the table below for a quick overview of the features supported when using the PayPal Gateway. For more information about supported features for Chargent’s PayPal integration, refer to the sections that follow.
| Feature | Supported? |
|---|---|
| ACH Validation | No |
| Address Verification System (AVS) | Yes |
| Auth.net Emulated | No |
| Bank Account Processing | Yes (via Digital Wallet) |
Credit Card Processing
|
Yes |
Data Levels
|
Yes |
| Multiple Currencies | Yes |
| PayPal Wallet | Yes |
| Saved Payment Methods | Yes |
| Strong Customer Authentication (SCA) | Yes |
| Surcharging | No |
| Tokenization | Yes |
| Transaction Sync | No |
| Transaction Types | Yes – Authorize, Capture, Refund (Captured only), and Void (Authorization Only)
No – Partial Capture, Partial Refund, Credit (aka Unreferenced Credit), and Unlinked Refund |
Address Verification System (AVS)
Chargent’s integration with PayPal supports Address Verification System (AVS), a technology used to prevent fraud by validating the ownership of a credit card using the billing address associated with the credit card and matching it with the data on file at the credit card issuing company.
Your AVS results are stored in Salesforce using the AVS Response Code field on your transaction record. For definitions, see PayPal’s REST API documentation.
For more information, see Address Verification System (AVS).
Currencies
For a list of currencies supported by our PayPal gateway integration, see PayPal Supported Currencies. Examples include the following:
| AUD – Australian dollar | EUR – Euro | MXN – Mexican peso | GBP – Sterling |
|---|---|---|---|
| BRL – Brazilian real | HKD – Hong Kong dollar | TWD – New Taiwan dollar | SGD – Singapore dollar |
| CAD – Canadian dollar | HUF – Hungarian forint | NZD – New Zealand dollar | SEK – Swedish krona |
| CNY – Renminbi | ILS – Israeli new shekel | NOK – Norwegian krone | CHF – Swiss franc |
| CZK – Czech koruna | JPY – Japanese yen | PHP – Philippine peso | THB – Thai baht |
| DKK – Danish krone | MYR – Malaysian ringgit | PLN – Polish złoty | USD – United States dollar |
Additionally, this gateway integration supports Salesforce’s Multiple Currencies feature.
For more information about currencies in Chargent, see Understanding Currencies.
Data Levels
Data levels allow you to send more information with each transaction, ensuring the security and authenticity of the payment. Higher data levels result in lower transaction fees. The following levels of data are supported by PayPal using Chargent:
- Level I
- Level II
- Level III
For more information about data levels, see Understanding Data Levels.
Payment Method Types
Below, we’ve listed the payment method types that are supported when using the PayPal gateway integration. For more information about payment methods supported by Chargent, see Payment Methods Supported.
Credit Card
- Visa
- Mastercard
- Discover
- American Express
- MC Eurocard
- UK Maestro
- JCB Card
- Diners Club
For more information, see Understanding Credit Card Payments.
Bank Accounts
Bank account payments are supported using the PayPal Wallet.
PayPal Wallet
The PayPal gateway integration allows you to accept PayPal Digital Wallet payments alongside credit cards. With the Digital Wallet, your customers can make payments using any PayPal-supported payment method, including:
- PayPal Balance
- Credit Card
- Bank Account/Checking
- PayPal Credit (Buy Now, Pay Later)
Get started by visiting Using PayPal Wallet.
Strong Customer Authentication (SCA)
Strong Customer Authentication (SCA, aka 3DS) is a two-factor authentication (2FA) requirement wherein, during a consumer-initiated transaction, the cardholder must provide two of the three elements: something the cardholder knows, something the cardholder owns, or something the cardholder is.
With SCA enabled, a pop-up window will appear when your customers make a payment via Payment Request or Take Payment, asking them to authenticate with 2FA, adding an additional layer of security to your customer-initiated transactions.
Learn more by visiting Strong Customer Authentication (SCA).
Understanding SCA with PayPal in Chargent
Our PayPal integration is designed to trigger a 2FA challenge for your customer only when required by regulations, such as the second Payment Services Directive (PSD2) in the European Economic Area (EEA).
Tokenization
Tokenization enables you to store payment information at your gateway, rather than in Salesforce. Tokenization helps you decrease the scope of your PCI compliance and improve security by storing your customers’ payment information on PayPal’s servers and not in Salesforce.
Chargent’s PayPal integration supports tokenization for Credit Card and PayPal Digital Wallet payments.
The token returned by PayPal is stored in the Token field on the Chargent Order and Tokenization on the Transaction records in Salesforce. Additionally, tokens are stored in a Chargent Tokens record when Payment Methods is enabled in your org.
To learn more, visit Understanding Tokenization.
Transaction Types
Chargent’s integration with PayPal supports the following transaction types:
- Authorize
- Capture
- Refund (for Captured transactions only)
- Void (for Authorizations only)
Currently, partial capture and partial refund are not supported using the PayPal gateway integration. Instead, you can refund or void the transaction and create a new one with the desired amount.
For more information about Transaction Types, see Understanding Payments.
Field Mapping
Salesforce sends payment information to your gateway based on the field values in your Chargent Order records. PayPal stores the payment information as a transaction in your PayPal account. Then, PayPal returns a response to Salesforce, which is stored in a Transaction record. Below, we have listed a few important examples of how the data is mapped between Salesforce and PayPal.
| Chargent Field | Salesforce Object | Direction | Authorize.net Field |
|---|---|---|---|
| Gateway ID | Transaction | > | purchase_units.payments.captures.id |
| Token | Chargent Order | < | card.vault_id |
| Customer Token* | Chargent Order | > | card.vault_id.customer.id |
| Credit Card Name | Chargent Order | > | card.name |
| Billing Address | Chargent Order | > | card.billing_address.address_line_1 |
| Billing Address 2 | Chargent Order | > | card.billing_address.address_line_2 |
| Billing City | Chargent Order | > | card.billing_address.admin_area_1 |
| Billing State / Province | Chargent Order | > | card.billing_address.admin_area_2 |
| Billing Zip Code / Postal Code | Chargent Order | > | card.billing_address.postal_code |
| Billing Country | Chargent Order | > | card.billing_address.country_code |
| Billing Phone Number | Chargent Order | > | card.attributes.customer.phone |
| Charge Amount | Chargent Order | > | purchase_units.amount.value |
| Invoice Number** | Chargent Order | > | purchase_units.invoice_id |
*The Customer Token field represents the customer ID, useful if the customer has several payment cards. Learn more by visiting Customer Token vs. Token Fields.
**The Invoice Number field allows you to send custom invoicing or additional information about your transaction. Chargent does not automatically populate this field. If used, PayPal requires a unique value for this field (see PayPal Error: UNPROCESSABLE_ENTITY).
Gateway Request and Response
Every transaction involves a request sent from Salesforce to the gateway and a response sent from the gateway to Salesforce. You can view the request or response to help you test and troubleshoot your transactions.
To view the gateway responses in Salesforce, visit the transaction record:
- In Salesforce, click the App Launcher .
- Click the Chargent app.
- Click the Transactions tab.
- In the Transaction ID column, find and click your desired transaction.
- Examine the following fields:
| Transaction Field Name | Description |
|---|---|
| Response Status | The state of the transaction, such as “Approved,” “Declined,” or “Error,” received from the payment gateway. See Understanding Response Statuses. |
| Response | The Processor Response Code. This value provides a reason for a decline or error. When a transaction is successful, the value is “0000”. See Simulate Card Error Scenarios. |
| Reason Code | The HTTP Status Code provided by PayPal. This value provides additional insight into the transaction’s success or failure. See PayPal’s HTTP Status Codes to learn more about the possible values. |
| Gateway ID | Corresponds to the transaction’s ID in PayPal. Use this field to reconcile your Salesforce transaction records with PayPal’s transaction records. |
| Gateway Response | Contains the entire response message received from PayPal. This field is helpful when troubleshooting your transactions. |
To view the Request and Response in the PayPal Developer Dashboard:
- Log in to your PayPal Business Account.
- Click the Developer Dashboard Icon in the top right.
- Mouse over the Event Logs tab and click API Calls.
- Set the following values:
- Call type: Apps
- Application: Select an app, for example, Default Application.
- Start date and End date: Select your desired timeframe.
- Click Search.
- Click the value in the Debug ID column next to your transaction.
- Click the Request tab to view the transaction request sent from Chargent to PayPal.
- Click the Response tab to view the transaction response sent from PayPal to Chargent.

Considerations
This section outlines unique considerations and tips related explicitly to integrating Salesforce with PayPal Complete Payments (PPCP).
When using tokenization, the token is stored in the Token field. PayPal also uses the Customer Token field, which represents the customer ID, useful if the customer has several payment cards. In other words, the Customer Token field will be the same for multiple payment cards belonging to the same customer, whereas the Token field will represent a specific payment card.
- Token: Represents a single payment card belonging to a specific customer.
- Customer Token: Represents all payment cards belonging to a specific customer.
PayPal performs validation to prevent duplicate transactions processed by the gateway. This check can be disabled in the PayPal Business Account.
The ‘Void’ transaction type is only available for the ‘Authorization’ transaction, and the ‘Refund’ transaction type is only available for captured transactions, which differs slightly from the typical functionality documented in Refunding and Voiding Transactions.
- Void: Used to reverse an authorization and release the funds held. Cannot be used for completed transactions.
- Refund: Used to reverse a captured transaction. Can be performed immediately after the transaction processes.
Troubleshooting
If you are having trouble connecting to your gateway, we recommend starting with these troubleshooting steps.
For additional help, visit our extensive Knowledge Base.
Getting Help
Contacting PayPal Support
Please contact PayPal with any questions related to your PayPal Business Account.
Contacting Chargent Support
Contact our support team if you encounter any issues related to the Chargent app in Salesforce.

