
Integrating Authorize.net With Chargent In Salesforce
Salesforce Payments by Chargent is the leading payments application available on the Salesforce AppExchange. Chargent allows you to charge credit cards and Bank Account transactions directly from within Salesforce. This guide shows you how you can easily connect the Authorize.net gateway with Salesforce using Chargent.

About This Guide
This guide walks you through the steps needed to integrate Chargent with Authorize.net (aka Auth.net). It assumes you have already installed and configured Chargent, but links are provided to installation, user management, and configuration topics where more detail is available to get you up and running quickly. It also assumes you have already chosen the Authorize.net gateway and includes links to gateway-specific documentation for configuration instructions.
Video Tutorial
If you’re a visual learner, like many of us, check out our overview video to get started. The text in this guide covers the video’s content in greater detail, so if you have any questions, make sure to follow along with the content here.
Before You Begin
Before you start integrating Authorize.net in Chargent with Salesforce, make sure you’ve completed the following steps:
Installing and Configuring Chargent
Before setting up your gateway, install the latest version of Chargent and configure your user permissions. Guides for these topics are available below to help you get started.
- Installing and Updating Chargent
- License Assignment (Production Only, not required for Sandbox)
- Permission Assignment
Setting Up Your Test Environment
Before installing Chargent in production, we highly recommend installing and testing in a Salesforce sandbox. The following topics provide instructions for obtaining your test gateway credentials and creating a test Gateway record in Salesforce. Remember to refresh your sandbox beforehand to ensure that your sandbox is aligned with your production configurations.
Creating Your Authorize.net Sandbox Account
If you don’t already have Authorize.net credentials for testing, set up a sandbox account.
Using Your Authorize.net Sandbox Account
After you create your account, you’ll receive an email providing your Authorize.net sandbox login credentials. The default answer to the secret question from your Authorize.net sandbox account, “What is your Pet Name?” is “Simon.”
Always use your Authorize.net sandbox in “Live Mode” because it does not connect to the card networks. The purpose of an Authorize.net sandbox is for you to safely use it in “Live Mode” without fear of creating actual transactions. For more information, see What Is test mode and how do I turn It off and on?
Obtaining Your Authorize.net Sandbox Credentials
To verify your test gateway credentials in Salesforce, Chargent requires your Authorize.net sandbox API Login ID and Transaction Key. You can access your credentials by following these steps:
- Log in to your Authorize.net sandbox account.
- Click the Account tab.
- Click API Credentials & Keys.
- Your API Login ID will be displayed on the page.
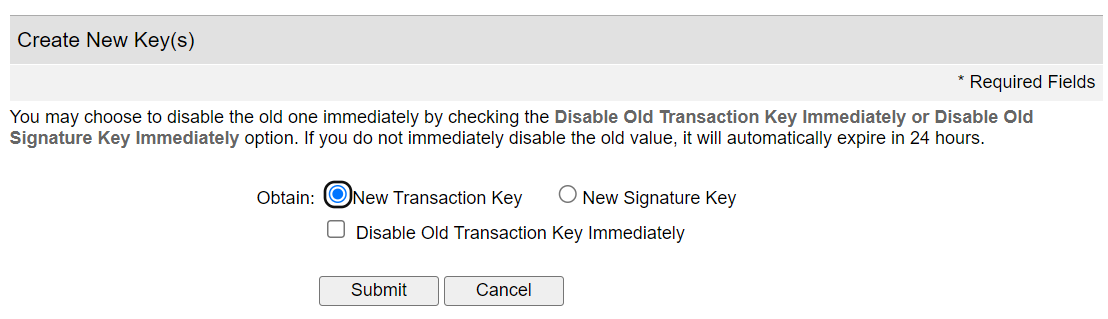
- Your Transaction Key will need to be generated by selecting the New Transaction Key radio button and clicking Submit. Your Transaction Key will only be displayed once, so ensure you save it now. If you lose this key, you will need to generate a new one and update your gateway credentials in Salesforce.
Creating Your Test Gateway in Chargent
Now that you have your credentials in hand, it’s time to create a gateway record in a Salesforce sandbox and verify your Authorize.net sandbox credentials.
- Login to your Salesforce sandbox (partial, full, or developer sandboxes work).
- Go to the App Launcher
 and click the Chargent app.
 - Click the Chargent Settings tab and choose the Setup Wizard subtab.
- Click Yes when prompted, “Do you have a Payment Gateway account?”.
- Select ‘Authorize.net’ from the list and click Continue.
Note: In your Salesforce sandbox instance, Chargent automatically sends your transactions to your gateway’s test endpoint URL to ensure you don’t accidentally send live transactions from your Salesforce sandbox environment.
If your testing process requires creating live transactions in your sandbox environment, see Running Live Transactions in Sandbox.
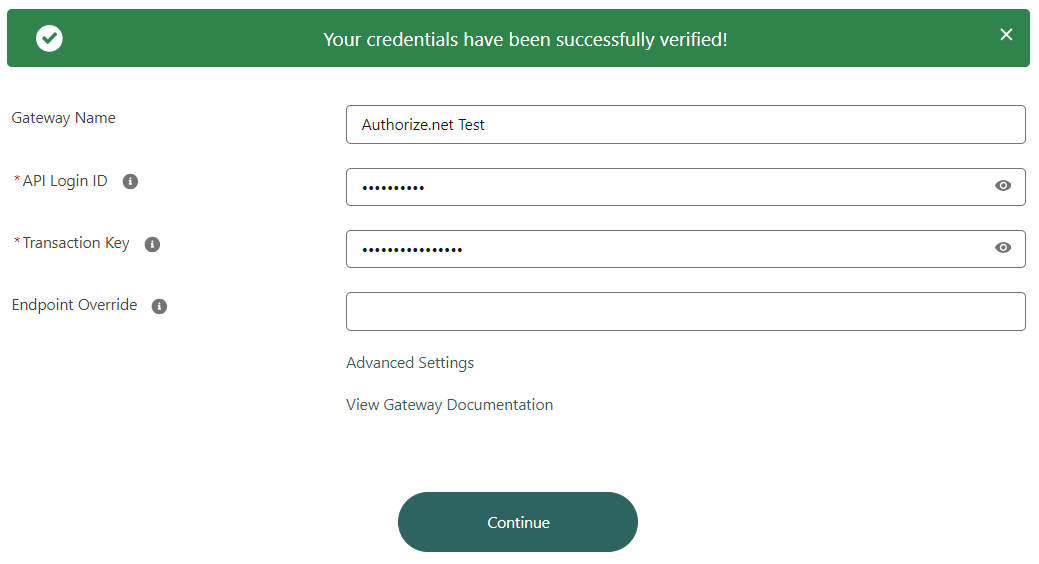
- Enter your Authorize.net sandbox credentials, leaving the Endpoint Override field blank.
- Click Sign In.
- When you receive a message stating “Your credentials have been successfully verified!”, click Continue to complete the steps in the wizard.
- If you receive an error message in red, see the Checking Your Remote Site Settings section below or check out our troubleshooting tips.
The remaining choices in the Gateway Setup Wizard are determined by your specific use case. For more detailed information about the steps, see Gateway Setup Wizard.
The remote sites for your gateway should automatically activate when completing the Gateway Setup Wizard. If you encounter any issues connecting to Chargent using your gateway credentials, ensure they have been correctly activated in your org.
- Click the gear icon
 at the top right and choose Setup.
 - Enter “remote” in the Quick Find box and choose Remote Site Settings.
- Locate the following Remote Site names and make sure the “Active” box is selected:
-
- AuthNetAPI2
- AuthNetCIMAPI
- AuthNetTestAPI
- AuthNetTestCIMAPI
- If the “Active” box is not selected, click Edit, select Active, and click Save.
Setting Up Your Direct Debit Network
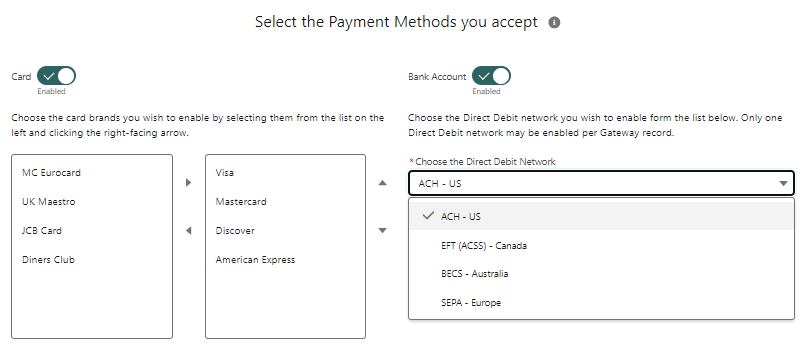
Setting up your Direct Debit Network is optional but recommended. When you reach the Gateway Setup Wizard page labeled “Select the Payment Methods you accept,” select the Direct Debit Network for your region.
Authorize.net supports the ACH – US Direct Debit Network. Choosing the correct Direct Debit Network will allow you to accept Bank Account payments and display the correct Direct Debit Network fields in Chargent.
For more information, see Understanding Bank Account Payments.
Running Test Transactions
You can attempt your first test transaction after successfully creating your test gateway record. See Testing in Sandbox for instructions and best practices for testing. Every gateway has its own test payment methods and response codes. See the list below for information and resources specific to Authorize.net.
Testing Credit Card Transactions
Visit Authorize.net’s Testing Guide for a complete list of test credit card numbers. To quickly verify your integration, you can use the following test credit card numbers to ensure Chargent is appropriately configured:
| Processing Network | Card Number | Expiration | CVC |
|---|---|---|---|
| Visa | 4111111111111111 | Any date in the future | Any 3-digit number |
| Mastercard | 5424000000000015 | Any date in the future | Any 3-digit number |
| American Express | 370000000000002 | Any date in the future | Any 4-digit number |
| Discover | 6011000000000012 | Any date in the future | Any 3-digit number |
Testing Bank Account Transactions
To test bank account transactions in Salesforce using Authorize.net, use a valid routing number and any random number for bank account transactions. You can search for a valid routing number on The Federal Reserve Services website. We’ve included a sample test bank account number below so you can quickly verify your bank account transactions:
| Routing Number | Account Number | Bank Name | Account Type |
|---|---|---|---|
| 122000247 | Any 10-digit number | Any bank name | Checking |
Testing Response Codes
It’s important to test different gateway responses to ensure that your gateway is configured properly. The gateway’s response is stored on a transaction record (see the Response Code and Response Status fields) in Salesforce.
Every gateway has its own response codes. You can test response codes by inputting specific billing information, as noted in Authorize.net’s Testing Guide. For example, use the following zip code to simulate a declined transaction.
| Zip Code | Response Code | Response Text |
|---|---|---|
| 46282 | 2 | This Transaction has been declined. |
It is not considered best practice to run live transactions in your sandbox environment. If you still wish to send live transactions from a Salesforce Sandbox as a final step in testing, see Authorize.net: Testing Live Transactions in a Salesforce Sandbox.
Going Live in Production
Once you’ve tested your gateway integration in a Salesforce Sandbox, you’re ready to move to production! See Moving from Sandbox to Production to learn how to migrate your Chargent configuration changes to your production Salesforce environment. After moving Chargent to production, see Testing in Production for best practices prior to going live.
Creating Your Authorize.net Live Account
In Authorize.net, live and test credentials are different. To process live transactions in Salesforce, you will need to register for a live Authorize.net account.
Creating Your Live Gateway Integration in Salesforce
So far, you’ve been using your test Authorize.net credentials and created a test gateway using the Test Transactions tab. Now, it’s time to click the Live Transactions tab and enter your live Authorize.net account credentials:
- Log in to your production Salesforce org.
- Go to the App Launcher
 and click the Chargent app.
 - Click the Chargent Settings tab and choose the Setup Wizard subtab.
- Click Yes when prompted, “Do you have a Payment Gateway account?”.
- Select ‘Authorize.net’ from the list and click Continue.
- Click Live Transactions and enter your new live gateway credentials to process live transactions.
- Click Sign In.
- When you receive a message stating “Your credentials have been successfully verified!”, click Continue to complete the steps in the wizard. If you receive an error message in red, see our troubleshooting tips.
For more detailed information about these steps, see our documentation for the Gateway Setup Wizard.
Testing with Live Credentials in “Test Mode”
Next, you can use your live Authorize.net credentials rather than the test credentials but set Authorize.net to “Test” mode so the transactions sent will not be processed as real transactions. For more information, see What Is test mode and how do I turn It off and on?
- Log in to your Authorize.net live account.
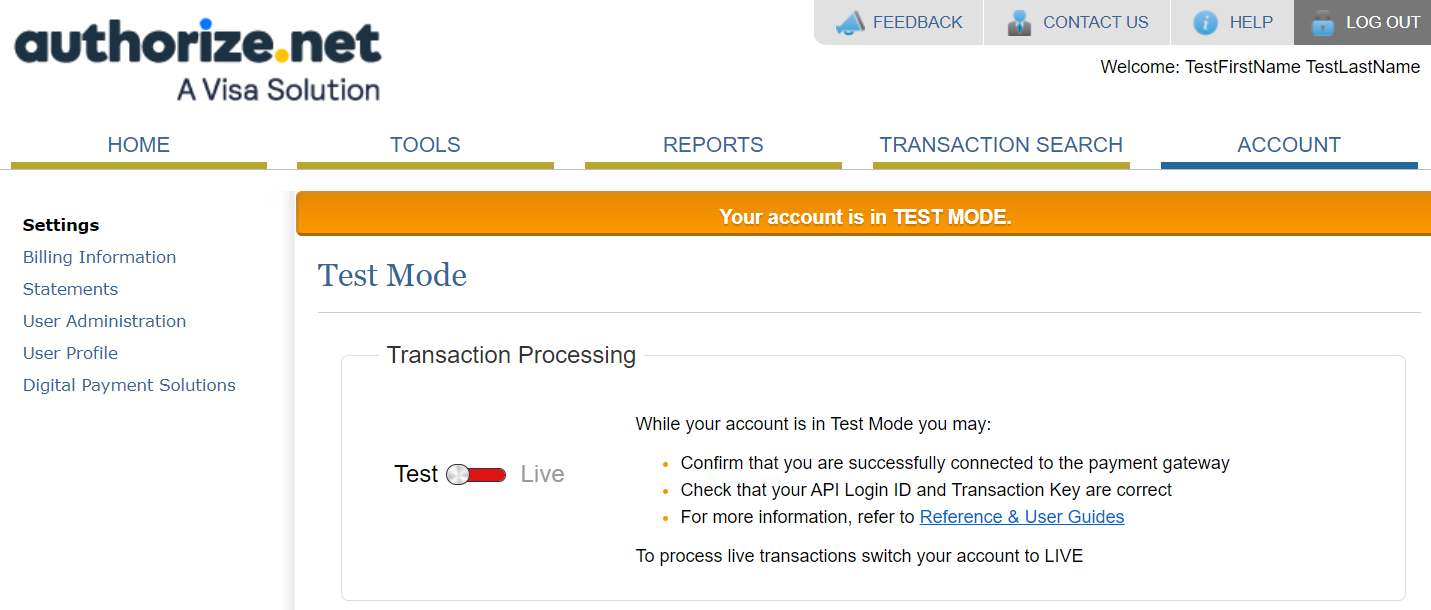
- Click Account and choose Settings to find the Test Mode link in the Security Settings area.
- Move the slider to Test.
- Run several test transactions using your live credentials in test mode.
When processing test transactions in Test Mode, Authorize.net returns a transaction ID of “0”. This means you cannot test follow-on transactions, such as credits or voids, while in Test Mode because the original transactions will not have the required Transaction IDs stored in the Gateway ID field in Chargent.
To test follow-on transactions, you can process a test transaction with any valid credit card number in live mode.
Running Live Transactions
After tests in the live environment are successful, you are ready for the final phase of testing: running live transactions.
- Ensure Test mode is turned off by moving the slider back to Live in your Authorize.net live account.
- You can now run live transactions using valid credit card numbers.
If you wish to test some live transactions, you can void them immediately after to prevent the transactions from settling. To do this, go to the transaction record in Salesforce and click Void.
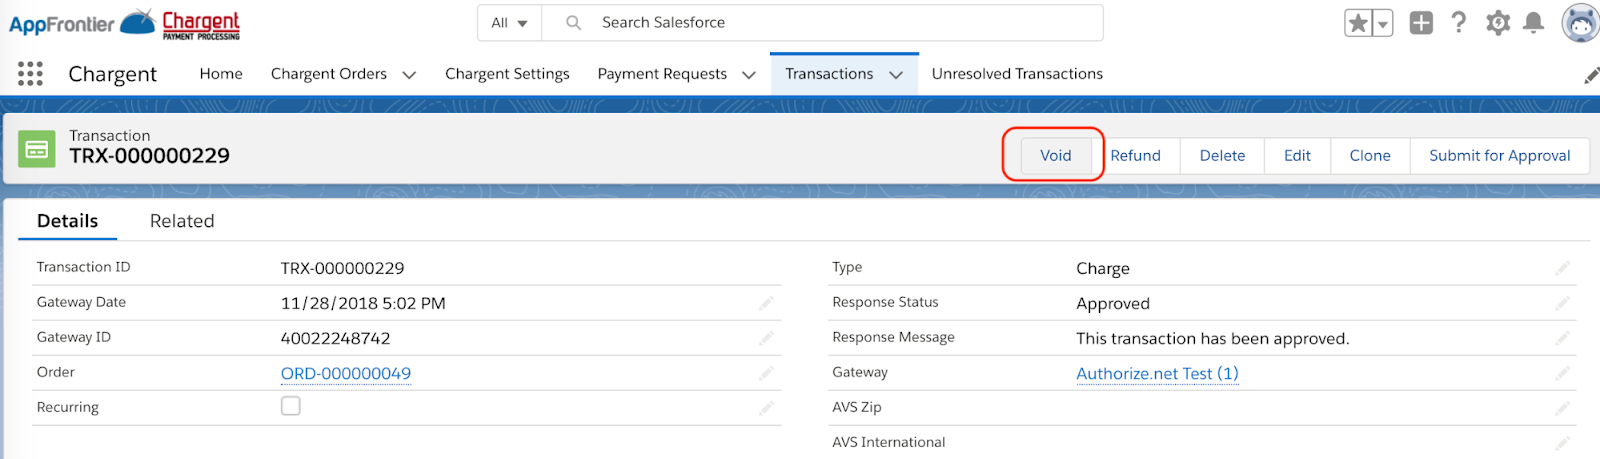
If you do run live transactions as a test, we recommend making very low amounts to minimize any impact in the event you forget to void them.
To test gateway responses in the live environment, submit live transactions with the correct street address, zip code, and card code information to generate successful responses. Likewise, submit incorrect street address, zip code, and card code information to generate other responses. You can void successful transactions immediately to prevent live test transactions from being processed.
Congratulations! You have successfully integrated Salesforce and Authorize.net via the Chargent for Salesforce app. You can now process one-time or recurring credit card payments directly from Salesforce through Authorize.net.
Supported Features
All of Chargent’s gateway integrations support most of Chargent’s core features. Some features are reliant on support by the gateway itself. Chargent’s integration with Authorize.net includes, but is not limited to, the following features:
ACH Validation
Chargent’s Authorize.net integration supports ACH Validation through the Lyons Account Verification Service, allowing you to validate US bank accounts on the Automated Clearing House (ACH) network before attempting a transaction. This validation confirms that the bank account and routing numbers exist and that the account is available for payment transactions, satisfying NACHA’s mandate—Supplementing Fraud Detection Standards for Web Debits. We strongly recommend that all ACH customers implement ACH Validation.
See our ACH Validation documentation for more information about implementing validation for your ACH transactions.
Address Verification System (AVS)
Chargent’s integration with Authorize.net supports Address Verification System (AVS), a technology used to prevent fraud by validating the ownership of a credit card using the billing address of a credit card and matching it with the data on file at the credit card issuing company.
Your AVS results are stored in Salesforce using the AVS Response Code field on your transaction record. For definitions, see Authorize.net’s AVS Responses.
For more information, see Authorize.net’s documentation or check out Address Verification Systems (AVS).
Currencies
The following currencies are supported when using our Authorize.net integration:
- USD
- CAD
- CHF
- DKK
- EUR
- GBP
- NOK
- PLN
- SEK
- AUD
- NZD
Only one currency can be set at a time. For more information about currencies in Chargent, see Understanding Currencies.
Data Levels
Data levels allow you to send more information with each transaction, ensuring the security and authenticity of the payment. Higher data levels translate to higher savings on transaction fees. The following levels of data are supported by Authorize.net using Chargent:
- Level I
- Level II
For more information about data levels, see Understanding Data Levels.
Duplicate Window Setting
Authorize.net’s duplicate window setting allows you to set a time frame, in seconds, for the gateway to search for duplicate transactions. To set this parameter, add the Duplicate Transaction Window field to your gateway page layout and enter the time frame in seconds in that field. Possible values are:
- Empty. If the field does not contain a value, it is not set. The parameter isn’t sent, and Authorize.net will use the default setting of 120 seconds.
- 0. A value of zero disables the duplicate check.
- 1 – 28800 – time frame in seconds. 28800 seconds (8 hours) is the maximum time frame value. If a greater value is set, Authorize.net will fall back to 28800. 1800 is 30 minutes.
Payment Method Types
Below, we’ve listed the payment method types that are supported when using the Authorize.net gateway integration. For more information about payment methods supported by Chargent, see Payment Methods Supported.
Credit Card
- Visa
- Mastercard
- Discover
- American Express
- JCB Card
- Diners Club
For more information, see Understanding Credit Card Payments.
Bank Accounts
- ACH – US (aka echeck or electronic check)
For more information, see Understanding Bank Account Payments.
Surcharging for Card Payments
Surcharging represents a growing trend in the payment industry, allowing you to pass your credit card fees on to your customers. Chargent has partnered with InterPayments, a leader in the surcharging space, to help you take control of your credit card fees and improve your Salesforce payment process.
To learn more, see Setting Up Surcharging.
Tokenization
Chargent supports Authorize.net’s Customer Information Management (CIM) feature for tokenization. Tokenization helps you decrease the scope of your PCI compliance and improve security by storing transaction data, such as credit card numbers and bank account numbers, on Authorize.net’s servers and not in Salesforce.
Chargent’s Authorize.net integration supports tokenization for the following payment method types:
- Credit Card
- Bank Account
The token returned by Authorize.net is stored in the Token field on the Chargent Order and the Tokenization field on the Transaction record in Salesforce. To learn more about using tokenization, see Understanding Tokenization.
Transaction Sync
Chargent sends charges and authorizations to the payment gateways, recording the result in a real-time transaction in Salesforce. Chargent also updates Salesforce records long after the initial transaction if, for example, ACH transactions are returned for non-sufficient funds (NSF) or credit card authorizations that expire.
The following list provides the different values that can occur when an ACH transaction settles in Authorize.net. Once the ACH transaction settles, it will no longer be updated when the Transaction Sync Batch runs.
- couldnotvoid
- communicationerror
- declined
- expired
- failedreview
- generalerror
- refundsettledsuccessfully
- settledsuccessfully
- settlementerror
- Voided
See Transaction Sync for more information.
Transaction Types
Chargent’s integration with Authorize.net supports the following transaction types:
- Authorize
- Capture
- Partial Capture
- Refund
- Partial Refund
- Void
For more information about Transaction Types, see Understanding Payments.
Field Mapping
Salesforce sends payment information to your gateway based on the field values in your Chargent Order records. The gateway stores the payment information as a transaction. Then the gateway sends a response to Salesforce, storing it in a Transaction record. Here are a few important examples of how the data is mapped between Salesforce and Authorize.net.
| Chargent Field | Salesforce Object | Direction | Authorize.net Field |
|---|---|---|---|
| Gateway ID | Transaction | > | Transaction ID |
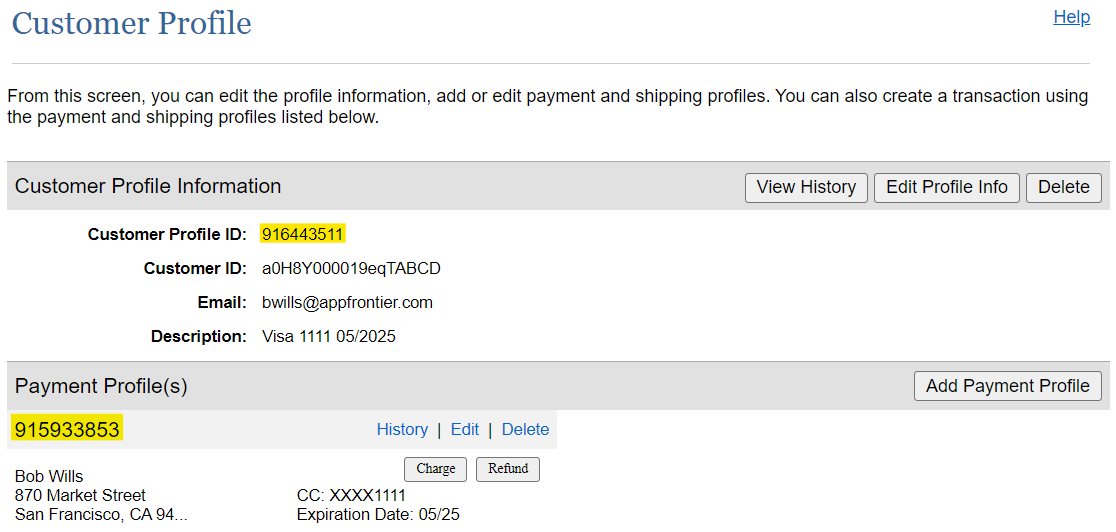
| Token* | Chargent Order | < | Customer Profile ID-Payment Profile |
| Invoice Number | Chargent Order | > | Invoice Number |
| Order Information | Chargent Order | > | Description |
| Billing First Name / Billing Last Name | Chargent Order | > | Name |
| Billing Company | Chargent Order | > | Company |
| Billing Address / Billing Address 2 | Chargent Order | > | Address |
| Billing State / Province | Chargent Order | > | State / Province |
| Billing Zip Code / Postal Code | Chargent Order | > | Zip Code |
| Billing Country | Chargent Order | > | Country |
| Billing Phone Number | Chargent Order | > | Phone |
| Billing Fax Number | Chargent Order | > | Fax |
| Billing Email Address | Chargent Order | > | |
| Tax | Chargent Order | > | Tax |
| Shipping | Chargent Order | > | Freight |
| Batch ID** | Transaction | < | Batch ID |
*The Token field on the Chargent Order combines the Customer Profile ID and the Payment Profile, separated with a dash. For example, a Token equaling 916443511-915933853 can be derived from the following Customer Profile in Authorize.net.
**The Batch ID field is not unique and reflects all transactions processed in the same batch. Support for the Batch ID field was added in Chargent version 7.85. Please ensure that you are on Chargent v7.85 or higher to see this field. To find out what version you’re on, check out What version of Chargent am I on? You may need to add this field to your Page Layout.
If you want to learn more about using Authorize.net’s fields programmatically, see Authorize.net’s developer website.
Gateway Response Codes
The Reason Code field on a Transaction record stores a response code provided by Authorize.net. To learn more about a specific response code, see Authorize.net’s Transaction Response Codes and search for the specific code you’d like more information on.
To review gateway responses in Salesforce, go to the transaction record in Chargent and examine the following field values:
| Transaction Field Name | Description |
|---|---|
| Response Status | The state of the transaction, such as “Approved,” “Declined,” or “Error” received from the payment gateway. |
| Reason Code | The code provided by the gateway, indicating why the transaction was successful or not. Authorize.net stores a code of 1 for successful transactions. |
| Gateway ID | Corresponds to the transaction ID in the gateway. Use this field to reconcile your Salesforce transaction records with your gateway’s transaction records. |
| Gateway Response | Contains the entire message received from the gateway, stored in the Salesforce transaction record. This field is helpful when troubleshooting your transactions. |
Troubleshooting
If you are having trouble connecting to your gateway, we recommend starting with these troubleshooting steps. To understand how to handle error response codes returned by Authorize.net, see General Error Transaction Troubleshooting.
For additional troubleshooting tips or frequently asked questions about Authorize.net, check out Chargent’s knowledge base articles.
Getting Help
Contacting Authorize.net Support
Authorize.net has many support channels. Visit How do I contact Authorize.net? to choose the one that best suits your needs. You can also contact them by phone at 1-888-323-4289.
Contacting Chargent Support
Contact our support team if you encounter any Chargent issues with your implementation.

