
Chargent is a sophisticated but simple-to-use Salesforce add-on that enables businesses to collect money faster and get more control over their payments. As the top payments application for the Salesforce Exchange, Chargent has been deployed across hundreds of organizations since 2008.
Once installed, Chargent offers a myriad of features for your business – from allowing you to payment-enable any Salesforce object or native app to providing you with over 30 ready-to-go payment gateway integrations including Stripe, Vantiv, and Payflow Pro. Furthermore, it provides your business with new abilities like automating recurring payments and collections.
Here’s the best part – setting up Chargent doesn’t require the help of a developer. In fact, we’ve made it so easy that even the most novice Salesforce user can install it in five minutes or less. In this post, we’ll show you the exact steps that you need to take to get Chargent set up and take your payment system to the next level.
Before Installing Chargent
Prior to installing Chargent, there are a few prerequisites that you should consider. These factors will ensure a successful installation and put you on the right path to easier payments.
- Test in Salesforce Sandbox: We recommend installing and testing Chargent in your Salesforce Sandbox first. This will allow you to verify any customizations you have made without changing your production Salesforce setup or impacting account data.
- Download from the PIM: Always install and upgrade Chargent using the Package Installation Manager on our website, or as we like to call it – the PIM. This step will ensure that you always have the most current and up-to-date software, tested by our team prior to a release.
- Make Your Salesforce Org Lightning-Ready: It is also important to ensure that your Salesforce Org is Lightning Ready. To complete this step, ‘My Domain’ should be enabled in Salesforce. It’s likely that you’ve already completed this step, but if not, it includes selecting a domain, registering it, and deploying it to all your users.
How To Install Chargent
Once all the prep work is accomplished, you’re only minutes away from installing Chargent. From here, all you need to do is install the packages, assign licenses to your Salesforce users, connect your payment gateway, and set up Chargent Anywhere.
1) Install Chargent Packages
We’ve created our Package Installation Manager (PIM) to ensure that you have access to the latest-releases of all Chargent products.
To access the PIM, follow this link: Chargent Installation. Upon installation, Chargent will automatically install three packages: Chargent Base, Chargent Transactions, and Chargent Anywhere.
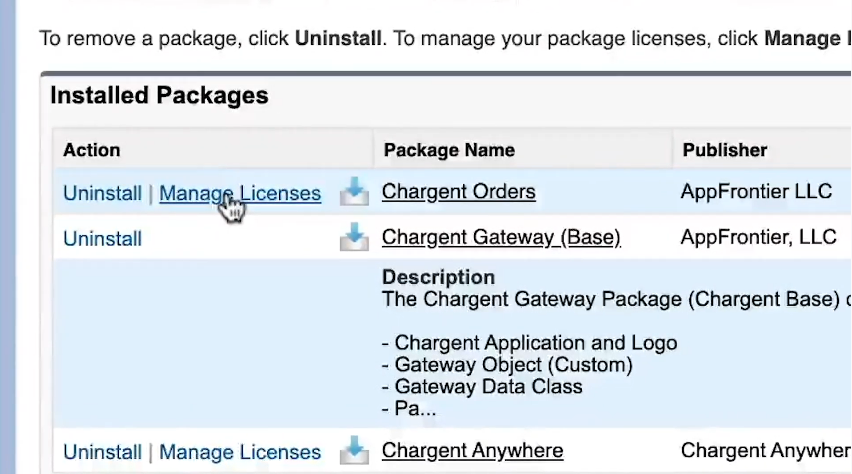
2) Assign Licenses to Users
Chargent licenses don’t need to be assigned in Sandbox, it is only necessary in your Production and Developer organizations.
To assign licenses, navigate to your Installed Packages in the Setup menu. Assign licenses to both the Chargent Orders and Chargent Anywhere packages. Chargent Base doesn’t need a license assigned.
3) Assign Chargent Permission Set Groups
To view, create, and update records in Chargent, you must assign permissions to your users. Chargent uses role-based Permission Set Groups to make the user management process as easy as possible.
- Go to the App Launcher
and click the Chargent app.
- Click the Chargent Settings tab and choose the Manage User Permissions option under the Global Settings subtab.
- Select the Permission Set Group tab for the role you want to assign.
- Select the user(s) you’d like assigned to the Permission Set Group.
- Click the right arrow button to add that user to the Permission Set Group. All changes are saved instantly.
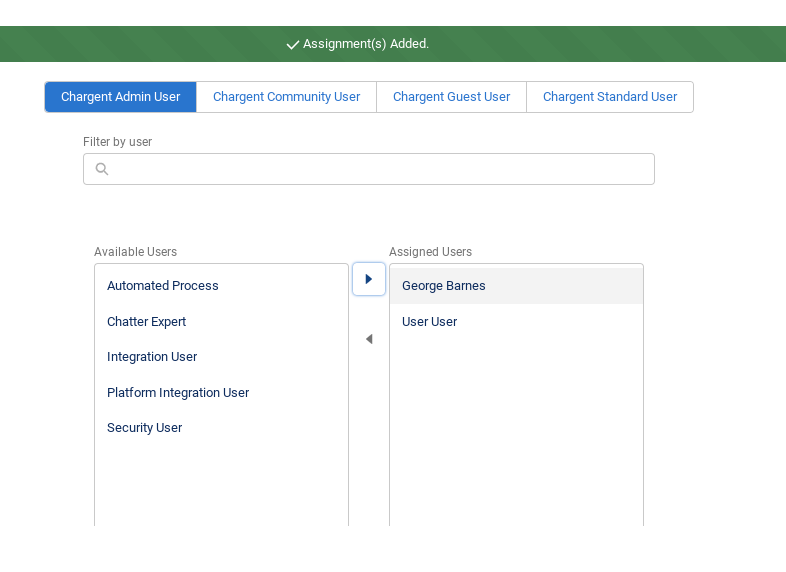
To learn more about each Permission Set Group, including which users should be assigned a specific role, visit Assigning Chargent Permissions.
4) Connect Your Payment Gateway
Now, you are ready to set up your payment gateway. Chargent integrates Salesforce with over 30 popular payment gateways. With your credentials, you can use the Chargent Setup Wizard to quickly connect your gateway to Salesforce.
To link your payment gateway, follow these simple steps:
- Click the App Launcher (waffle icon) on the top left corner of Salesforce.
- Select the Chargent app.
- Choose the Chargent Setup Wizard.
- Select your gateway.
- Enter your credentials.
- Follow the prompts to enable Chargent’s most popular features, such as Payment Requests and Payment Console.
5) Setup Chargent Anywhere
Finally, we recommend adding Chargent Anywhere to a page in Salesforce. You can install Chargent Anywhere on any object that you prefer, but for this example, we will use the Opportunity object. Apply the following steps:
- Click the gear icon and choose Edit Page.
- On the left, you will be able to access the Salesforce Lightning Components. Scroll to the bottom until you see Custom Managed and the Chargent Anywhere Component.
- Drag Chargent Anywhere into the page and click Save.
- You will now be prompted to assign it in your organization.
- Choose “Assign as Org Default” and select for “Desktop and Phone”
- Click the Save button.
At this point, you can return back to your record to complete the setup. The last step to complete installation is to associate Chargent Anywhere to the page by creating the lookup fields. Click the Configure button and evaluate everything for correctness. If everything looks correct, type “UNDERSTOOD” in all caps. Click the “Create Relationship Fields” button to complete the setup.
Chargent is now installed, and you are ready to process a transaction.

Processing A Test Payment
Before fully launching Chargent, ensure that everything is working properly by processing a test payment.
To test a payment, click on the Payment Console button. If you set up a test gateway, it will process as a test transaction using a test credit card. A common credit card number that is used when running tests is 4111 1111 1111 1111.
If, on the other hand, you set up a live gateway account, you will be processing a live transaction, and Chargent will require a real credit card number. In this case, process a small account – such as $1.00 – which you can void afterwards.
Once you’ve entered your credit card, billing address, and the amount to be charged, click the Charge button. If successful, a green Success message will appear and the system will create a new transaction record.
To void the transaction, click the Transaction ID and select the Void button. Another success message will appear and the transaction will change from Approved to Void.
In a few simple steps and less than five minutes, you’ve fully installed Chargent and can now process real payments from Salesforce.
Getting Started with Chargent
Chargent is simple to use but dynamic in its features and abilities. With dozens of payment partners and an easy-to-use interface, we’re certain that Chargent is the solution to all of your payment challenges.
Whether you need more payment gateway options or a simple way to collect subscription payments, Chargent is the payment processing application you need. Ready to give it a try? Download our free 30-day trial and experience the benefits of Chargent yourself.