Does This Situation Sound Familiar?
Your organization has been operating on Salesforce for a while. Although things are running great, you’ve decided that you want to make a few adjustments – install a new app, tweak a few configurations, or even play around with different features. Your team makes a few changes here, a few changes there, and deploys them across the account.
Immediately, you realize that things aren’t working as you expected, and you can no longer return to the original version. What happened?
Well, many things may have happened! One app may have clashed with another, or maybe one of your configurations caused an error in the system. Debugging is time-consuming and difficult – but the entire situation could have been avoided by testing first in a Salesforce Sandbox.
But what is a Salesforce Sandbox? What are the different sandbox types, and how do you use them? In this article, we’ll explain what a Salesforce Sandbox is and fill you in on when to use each type. Also, we’ll provide ten expert considerations you should make when working in a sandbox environment.
Sandboxes are test environments that Salesforce provides as a “safe space” for testing and training or experimenting with different configurations, new apps, or significant changes to your setup. It enables you to create multiple copies of your production environment for testing, training, and development.
Creating a Salesforce Sandbox allows you to test new changes without worrying about those changes affecting your current production organization. Although the two may seem similar, a sandbox is not a data backup, but a replica or copy of your production environment, as it was on the date that the sandbox was created.
Why Should I Test in a Salesforce Sandbox?
There is one significant benefit to using a Salesforce Sandbox – it is independent of your production organization. In other words, changes made to the sandbox have no effect on the current production environment, and changes to the production org don’t affect the sandbox. Even if you obliterate the entire sandbox environment, your production organization still remains intact.
Salesforce organizations can be extensive, with many different areas of data and multiple applications. A Sandbox gives your team the freedom and ability to test changes without impacting operations or data in your production environment.
Adding a Process Builder, for example, may seem like a minor change – but even small actions can impact large parts of your data or your system configuration. When testing in a sandbox though, you can ensure that any new automation or customization is working exactly how you expected before deploying it to production.
Different Salesforce Sandbox Types
Salesforce offers four different sandbox types. Each one has a different intent, so it’s important to choose the right one depending on your particular situation.
| Sandbox Type | Intended For: | When To Use |
| Developer Sandbox | Development and testing in an isolated environment. | Development and testing tasks. |
| Developer Pro Sandbox | Development and testing in an isolated environment. | Development and quality assurance tasks, integration testing, or user testing. |
| Partial Copy Sandbox | Used as a testing environment. | Quality assurance tasks, such as user acceptance testing, integration testing, or user training. |
| Full Sandbox | Used as a testing environment. | Support performance testing, load testing, or staging. |
Salesforce Developer Sandbox Considerations
When developing or testing with Salesforce Sandbox, there are many considerations you should acknowledge. The following tips will help you use your sandbox most effectively while avoiding any errors that could cause issues or derail your progress.
General Sandbox Considerations
There’s much to learn about developing in Salesforce Sandbox. As you create, develop, and test in new sandbox environments, keep these factors in mind:
- Customer Data: For those using a Partial or Full Sandbox, it is important to remember that the sandbox organization contains either a complete or partial copy of your real customer data. This can include their credit card and bank account information, so be careful when making updates to avoid inadvertently charging them, sending them accidental emails, or affecting them in another way.
- Syncing: Sandboxes are separate organizations, and they have a different Org ID than your production org. When a sandbox is created, data does not update or sync between the two organizations. In other words, changes made in one environment will not reflect in the other.
Creating Refreshing a Sandbox Environment
There are several considerations you should make when creating or refreshing your Salesforce Sandbox. Failing to consider these factors can result in project delays or lost work.
- Estimated Completion Time: Depending on the size and complexity of the project, it can take hours, days, or even weeks to create or refresh a sandbox that includes larger data sets. Estimated time until completion is driven by several factors, including the level of customization, size of the data, number of objects, server load, and your specific configurations.
- Refreshing: Be careful when refreshing your Salesforce Sandbox. When you refresh, a copy is made from the current production environment. This means that you will lose any data or configurations that you may have been working on in the sandbox if those changes don’t exist in the current production org.
Handling Email Addresses in a Sandbox
Knowing how your Salesforce Sandbox handles email addresses is critical. Managing email addresses improperly in a sandbox environment can cause you to send out emails unexpectedly or fail to complete scheduled email deliveries.
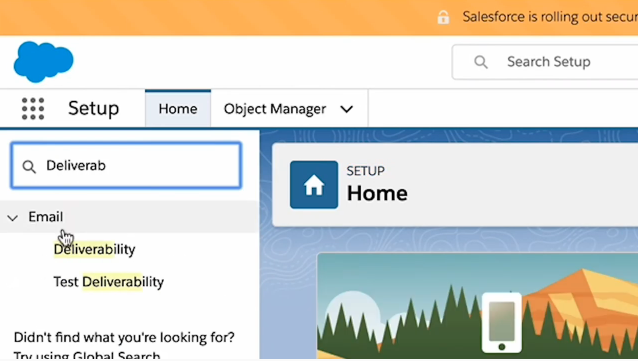
- Email Deliverability: By default, sandbox email delivery is set to “System Email Only.” You can easily change this to “All Email” by navigating to Salesforce Setup Delivery if you want to test specific email features. Caution is necessary when doing so, however, since all of your customer emails will now be present in non-developer sandboxes.
- Appending Email Addresses: User emails are automatically appended with a .invalid path. If you want users to receive system-generated emails from the sandbox, update their email addresses, and remove the .invalid tag. Keep in mind, however, that Sandbox will not attach the .invalid path to email addresses in your Leads and Contacts. For these cases, use the “System Email Only” deliverability setting or delete their email addresses from the sandbox entirely to ensure that you don’t email them.
Using Chargent in a Salesforce Sandbox
Chargent is a popular application that provides payment integrations to Salesforce. Although the following considerations relate specifically to using Chargent in a Salesforce Sandbox, they are also applicable to many other Salesforce applications.
- Licensing the Application: Like most Salesforce Applications, Chargent provides a site license when installed in Sandbox. As a result, assigning Chargent licenses to your Salesforce users in a sandbox is not necessary. Chargent’s open site license is highly useful as a Sandbox feature, but it also introduces other factors that you should consider. For example, you may not have access to all the features in your production organization that are available in the Sandbox.Additional testing may be required in production, where it is necessary to assign user licenses. Add some extra time in your schedule to test in production and avoid any surprises related to different permissions.
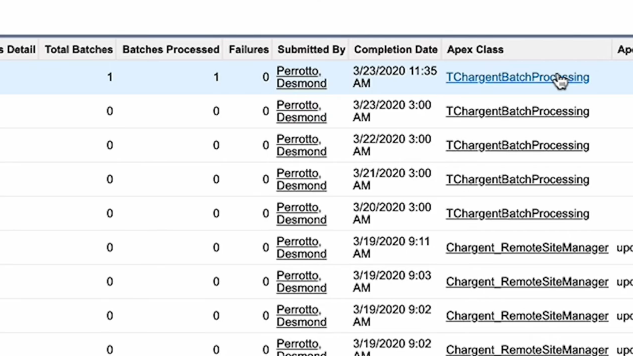
- Batches Scheduled Jobs: Identify anything that is copied from your production org but isn’t necessary for the sandbox environment. For example, Chargent has a recurring billing job that runs daily. After creating your sandbox, make sure that it isn’t processing any real customer records in a way that you would want to prevent.Also, keep in mind that when you refresh a sandbox, Scheduled Apex Jobs usually won’t run. Navigate to Salesforce Setup Scheduled Jobs and ensure that there aren’t any scheduled jobs running in your sandbox.
- Chargent Payment Gateways: In Sandbox, all Chargent Payment Gateway records are sent to the test payment gateways, regardless of whether you set them up as test or live. The “Test Endpoint” checkbox is effectively disabled, so transactions are always sent to a test endpoint.If you want to run a few real credit card transactions prior to going live –a workaround is available. Use the “Endpoint Override” field on the Gateway record to override the setting and send transactions from a Salesforce Sandbox to a live server.If you’re creating a Full or Partial Copy sandbox, the Endpoint Override setting will copy from your production org. As a best practice, remove the Recurring Billing batch and the endpoint to make sure no live transactions are sent.
Managing Test Data
As you’re working in a sandbox, remember that test data is not equal to real customer data. Test data created solely for the sandbox (such as data made in a spreadsheet) is often much cleaner than real data, especially if you are moving real data from another system.
Unlike test data, real data is usually entered into a system by multiple people – variants of abbreviations, country names, and other entries can vary on different records. Occasionally, the record may have incomplete, blank, or transposed fields. When data is created on a spreadsheet, however, it is unlikely that you will have these same informational inconsistencies and mistakes.
- Using Real Data for Testing: Whenever possible, test in the sandbox with real sample data from the system you plan on running. By doing so, you can ensure that customer data in the test environment truly reflects the production org and that the sandbox system performs the same way it would in a live situation.
Planning for Salesforce Sandbox Testing
Testing is critical to the proper implementation of Salesforce, Chargent, and other Salesforce apps. The tips we’ve provided in this article, along with our support and documentation, will help you use Salesforce Sandbox with skill and confidence.
Since Chargent is a financial application, it is especially important to plan for a sandbox testing phase as part of the app’s launch in your Salesforce environment. This includes making test and live payments in both your sandbox and production organizations. In our experience, these testing guidelines have led to the most successful implementations of Chargent, especially when moving from other billing or payments software.
Chargent allows you to collect payments faster and have more control over your payments, from recurring billing to automated collections. Ready to give it a try? Check out our free trial and install a full version of Chargent in your Salesforce Production or Sandbox org for 30 days!


