Integrating BluePay With Chargent In Salesforce
Salesforce Payments by Chargent is the leading payments application available on the Salesforce AppExchange. Chargent allows you to charge credit cards and Bank Account transactions directly from within Salesforce. This guide shows you how you can easily connect the BluePay gateway with Salesforce using Chargent.
Table of Contents
Obtain a BluePay Sandbox Account
Prior to setting up BluePay in Salesforce
Setting Up Salesforce to Connect to BluePay
Add a BluePay Gateway record in Salesforce using Chargent’s Gateway Wizard
Add a BluePay Gateway record in Salesforce (Chargent versions prior to 5.40)
Testing the Integration
BluePay Test Credit Cards

About This Guide
Chargent supports BluePay’s card-not-present transactions for merchants and suppliers of any size in the United States and Canada. BluePay processes business-to-consumer and business-to-business payments while providing real-time settlement, reporting, and reconciliation. Integrate BluePay using Chargent to start processing payments in Salesforce today!
Using the instructions in this guide, connecting Salesforce to the BluePay gateway with Chargent is easy. Chargent’s integration with BluePay uses Authorize.net emulation. Emulation supports most standard credit card and ACH transaction types, including Authorize, Charge, Refund, and Void. Advanced features like tokenization and some fraud screening features are not supported via emulation.
Before You Begin
Before you start integrating BluePay in Chargent with Salesforce, make sure you’ve completed the following steps:
Install and Configure Chargent
Before setting up your gateway, install the latest version of Chargent and configure your user permissions. Guides for these topics are available below to help you get started.
- Installing and Updating Chargent
- License Assignment (Production Only, not required for Sandbox)
- Permission Assignment
Create a Remote Site in Salesforce
The BluePay gateway integration utilizes the Authorize.net Emulator, so you will need to add a Remote Site in Salesforce.
- Click the gear icon
 at the top right and choose Setup.
 - Enter “remote” in the Quick Find box and choose Remote Site Settings.
- Click New Remote Site.
- Enter the following information:
-
- Remote Site Name: BluePay
- Remote Site URL: https://secure.bluepay.com
- Active: Checked
- Click Save.
Obtain a BluePay Sandbox Account
The first task is to get a test account from BluePay so that you can run test transactions from Salesforce.
To request a sandbox account, email [email protected].
Upon approval, you’ll receive an email that contains these testing credentials:
- Account ID
- User ID
- Password (temporary)
Production account: You’ll eventually need a production account. Work with BluePay Support to get set up with a production account.
NOTE: You must obtain your test credentials from BluePay before proceeding to the next section.
Obtain the Secret key from your BluePay test account
As we explain in the next section, it’s necessary to enter the Security Key into Salesforce. Follow these steps below to locate your Secret Key for your BluePay account:
- Login to the BluePay Account page.

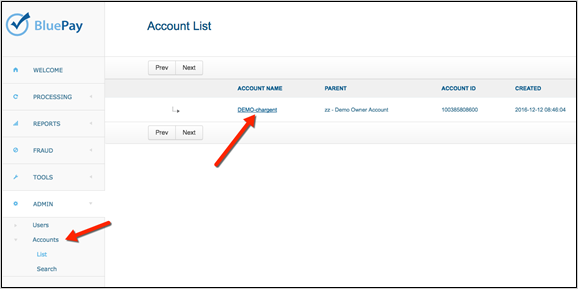
- In the menu, click Admin > Accounts.
- In the Account List panel, click the Account Name link.

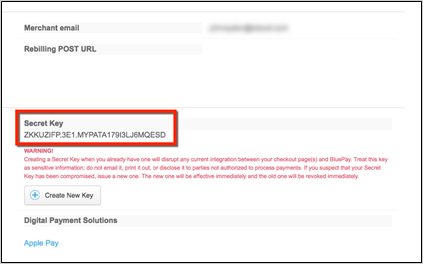
- Scroll down to find the 32-character Secret Key. It is this key that you need to copy and paste into the Merchant Security Key field on the Gateway page in Salesforce (as given in the instructions in the next section).

Setting Up Salesforce to Connect to BluePay
Add a BluePay Gateway record in Salesforce using Chargent’s Gateway Wizard.
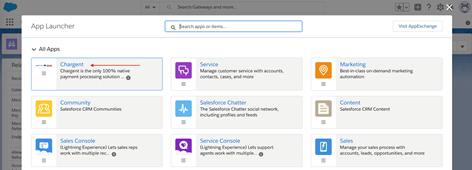
- Click on the App Launcher on the top left side in Salesforce.

- Select Chargent as the App
- Select the Chargent Settings Tab
- Choose Chargent Setup Wizard

- Do you have a Payment Gateway account – Select Yes
- Select Authorize.net as your Payment gateway (BluePay uses emulation of Authorize.net)
- Select Test Transactions for testing or Live Transactions if you are looking to process real payments.
- Follow the prompts to configure your gateway.
- Name your Gateway (BluePay Test or BluePay Live)

You will need the following information:
- API Login ID:This is your BluePay Account ID
- Transaction Key:This is the BluePay Secret Key
- Endpoint Override:https://secure.bluepay.com/interfaces/a.net.test
Other information that will be asked:
- Will you be using tokenization? Select No since Tokenization is not available through the Authorize.net Emulator.
- What currency will you be using? (USD, CAN, etc.)
- What payment methods will you be accepting?
- Credit cards and/or Direct Debit / ACH (electronic check)
- What Credit Card types will you be accepting? (Visa, Mastercard, etc…)
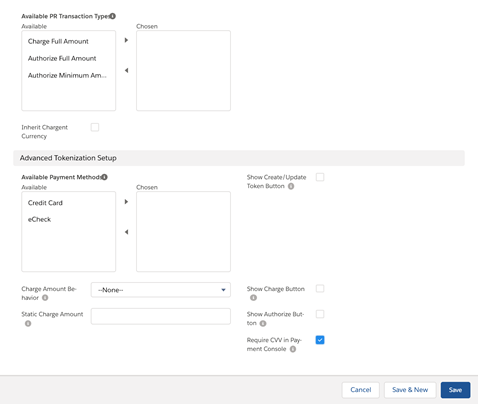
- Payment Console Setup (Premium feature for Platform Edition)
- Show Charge Button
- Show / Create Update Token Button (this should be turned off since BluePay does not support tokenization)
- Show Authorize Button
Add a BluePay Gateway record in Salesforce (Chargent versions prior to 5.40)
- Click on the AppLauncher on the top left side in Salesforce.

- In the Search for apps or items box, Search for Gateways and select

- Click New and select Authorize.net as the Gateway Type (BluePay uses emulation of Authorize.net)
- Name the Gateway BluePay Test (or BluePay Live if you’re processing live credit cards)
- Map the following fields in Chargent with your credentials from BluePay:
-
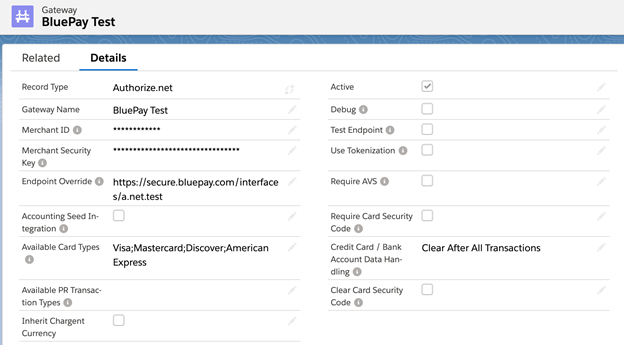
- Merchant ID:BluePay Account ID
- Merchant Security Key: Your BluePay Secret Key
- Endpoint Override: https://secure.bluepay.com/interfaces/a.net.test
-
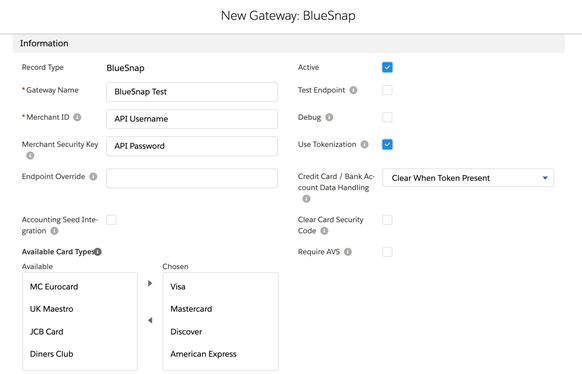
- Setup the following Gateway fields

-
-
- Active – Check to make the Gateway active
- Use Tokenization – Leave this unchecked since Tokenization is not available through the Authorize.net emulator.
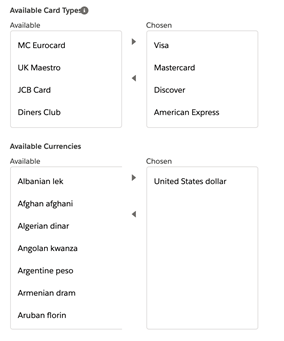
- Available Card Types – Select the cards you will be accepting (this is based on your gateway settings and what card types they can process – Visa, Mastercard, American Express, etc..)
- Available Payment Methods – Will you be accepting just Credit Cards or Direct Debit / ACH
- Available Currencies – What currencies will you accept (this is based on your payment gateway and the currencies they accept payment in.
- Credit Card / Bank Account Data Handling – This lets Chargent know when to clear the information in Salesforce. You have 4 options.
-
-
-
-
- Never Clear
- Clear After Successful Charge
- Clear After All Transactions
- Clear When Token is Present (recommended)

-
-
When using Payment Requests or Payment Console the following should also be set. Please note these features come with Sites and Platform edition & require activation in your Production Org.
-
- Available PR Transaction Types
- Charge Full Amount – Charges the credit card immediately
- Authorize Full Amount – This option won’t charge the card but only holds the funds available until you capture them.
- Authorize Minimum Amount – This option won’t charge the card but only holds the minimum amount that your gateway will allow. You will need to charge the correct amount in order to capture the transaction

- Show Charge Button
- Show Authorize Button

- Available PR Transaction Types
Your Gateway page should look similar to the figure below once you have saved.
Testing the Integration
Now that you have created the BluePay gateway record in Salesforce, it is time to run some test transactions to ensure it was set up correctly, and understand how Chargent works to take payments within Salesforce.
Create a Chargent Order in Salesforce to run test transactions
- Click on the App Launcher in the top left side and select Chargent as the App.

- Click the Chargent Orders Tab.
- Click on New
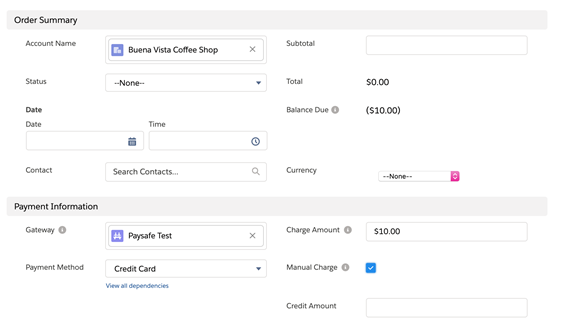
- Enter in the following information:
-
- Account: The Account the Chargent Order should be associated with.
- Payment Type should either be credit card or check depending on if you are testing credit cards
- Billing Information
-
-
- Billing First Name
- Billing Last Name
- Billing Address
- Billing City
- Billing State / Province
- Billing Zip Code / Postal Code
- Billing Email Address(if you want to test the email receipt that gets triggered upon a successful transaction)
-
-
- Charge Amount- The amount you want to test with in order to process a test transaction. This can be any amount
- Manual Charge check this box to enter a number directly in the Charge Amount. If you are entering Subtotal, Tax, and/or Shipping then the Charge Amount will be automatically calculated and the Manual Charge box does not need to be checked.
- Credit Card Number = See BluePay test credit card information. BluePay uses different test credit card numbers to determine the response message and whether it’s approved or declined for specific reasons. For ACH testing see BluePay’s Test ACH Account and Routing Numbers.
- Card type (Visa, MasterCard, etc..)
- Card Expiration Month and Card Expiration Year should be in the future

- Click Save
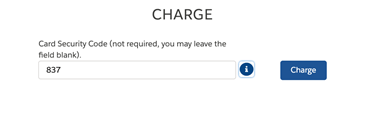
- Click the Charge button. You will receive a pop-up asking for the CSC (Card Security Code). You can enter 123 for credit cards (1234 for American Express).

- Press the Charge button
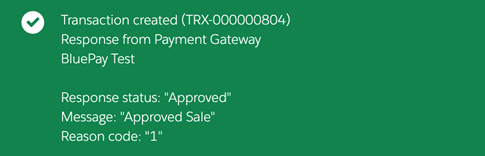
You should receive a popup that shows the test transaction was approved.
Going Live
This section contains the procedure for configuring the integration in a production system.
First, obtain the production credentials for the BluePay production gateway account (similar to the method given for sandbox credentials in Obtain a BluePay Sandbox Account.
- Get these production credentials from your enrollment email message:
- Account ID
- User ID
- Password (temporary)
Sending Live Transactions from a Salesforce Sandbox
When Chargent is installed in a Salesforce Sandbox, transactions are typically sent to the payment gateway’s test / sandbox / development environment, regardless of whether Chargent’s Test Endpoint checkbox is checked. This is done as a security precaution, to prevent real transactions from being accidentally sent from a Salesforce Sandbox.
When Chargent is installed in a production or developer Salesforce org, checking the Test Endpoint checkbox on the Gateway record will route transactions to the test environments provided by the gateway.
Note: Some gateways use the same endpoint for live and test environments. For these gateways, the Chargent application does not prevent live transaction processing. As such, it is best practice to deactivate your live gateway records in orgs used for testing.
If you wish to send live transactions from a Salesforce Sandbox, as a final step in testing, simply use Chargent’s Endpoint Override field on the Gateway record, and enter the production endpoint of your chosen gateway there.
Here is the production endpoint URL for Chargent’s integration with BluePay:
https://secure.bluepay.com/gateway/transact.dll
Note that the full endpoint URL must be entered in the Endpoint Override field, and the domain must be present in the Remote Site Settings (for standard Chargent integrations it should be already present).
Going Live in Production
Repeat the steps in the Configuring Salesforce for BluePay Integration section above, but substitute the production credentials.
For the production Endpoint Override field, enter:
https://secure.bluepay.com/gateway/transact.dll
Repeat the steps in the Testing the BluePay Integration section above with respect to the SalesForce production environment, using the production credentials using live credit card data.
Void the transactions: If you’re using an actual credit card and want to prevent the charge from settling, remember to void the transaction after testing.
Be sure to successfully transmit at least one real credit card transaction using company or personal accounts. We recommend that you submit a transaction with a very small amount and then void that transaction afterwards. This ensures that the system works with your production credentials.
Understanding Transactions
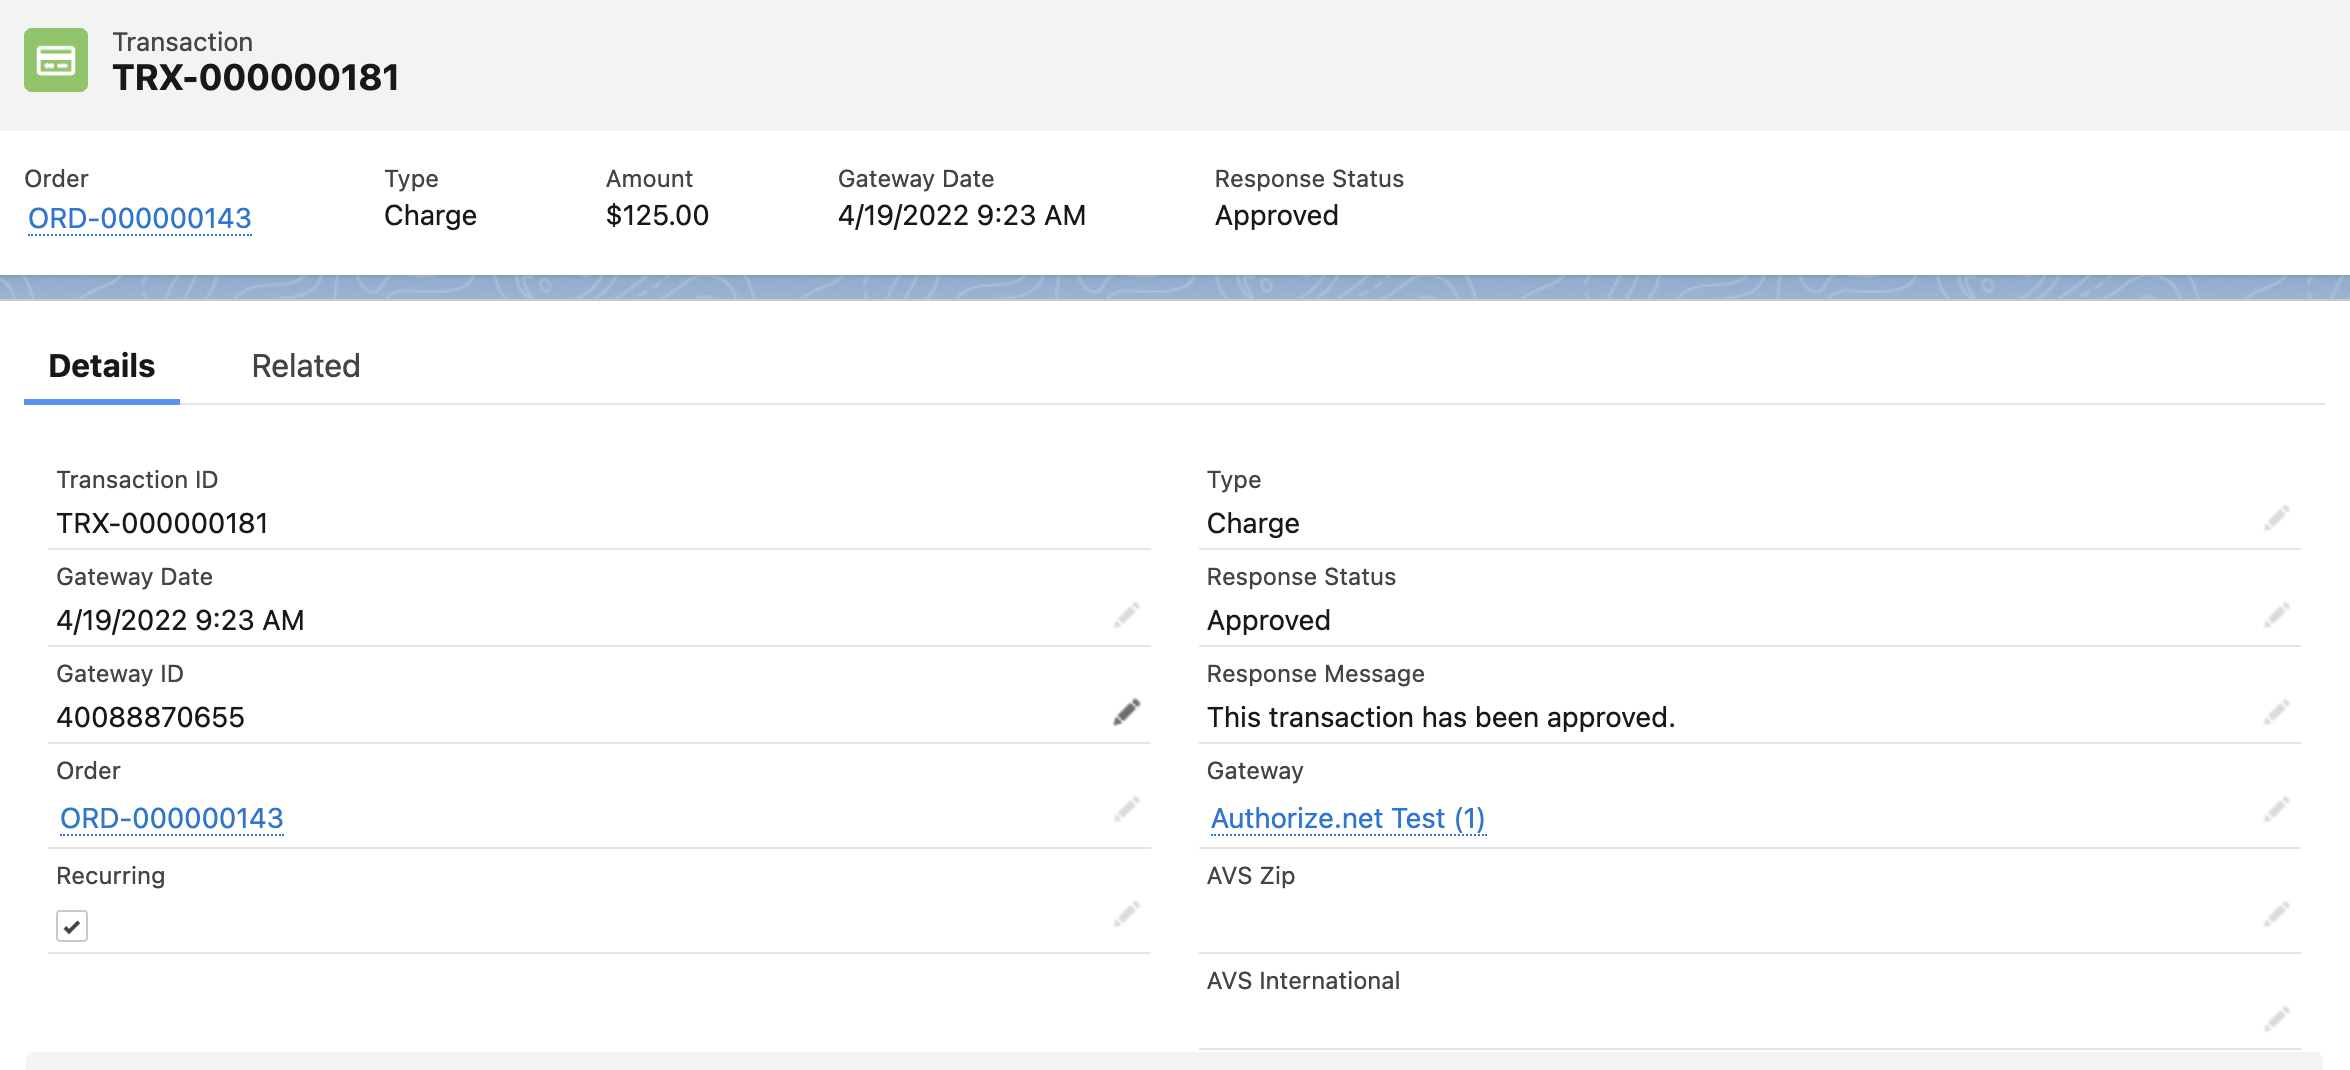
When a transaction occurs between Chargent and the BluePay gateway, a new transaction record is created in Salesforce. The listing of transactions can be found under the Related tab of the Chargent Order.
Click a Transaction ID
link to see the details, as shown in the figure below.
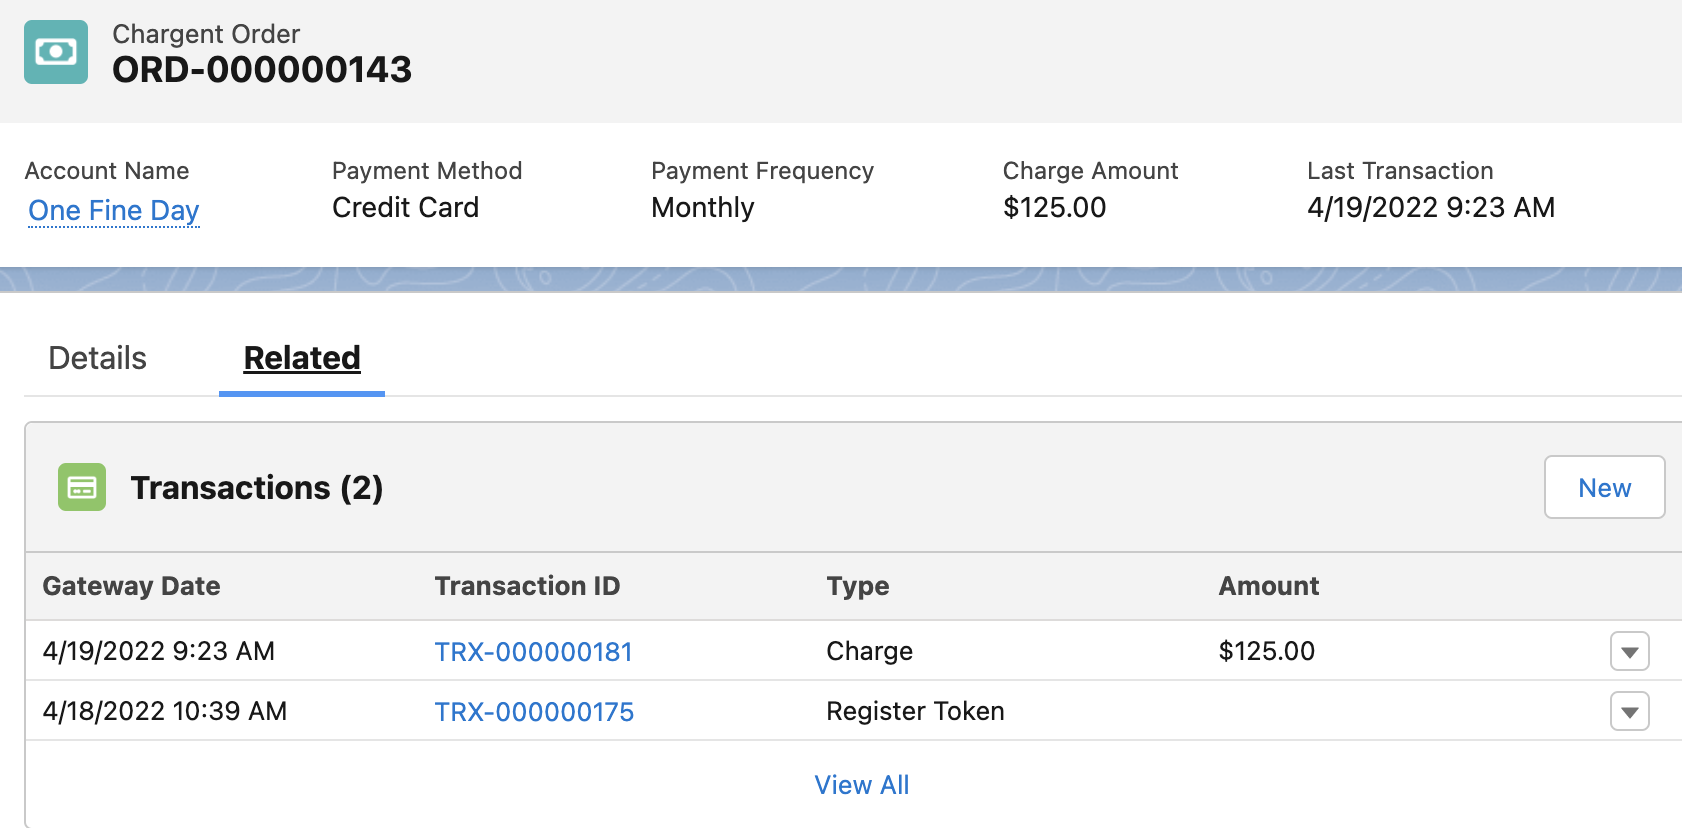
This transaction record contains the entire set of data that BluePay sends in its response, including transaction Type (Charge, Authorize, Refund or Void), the Response Status (Approved, Declined, Error), and any related approval or error messages.
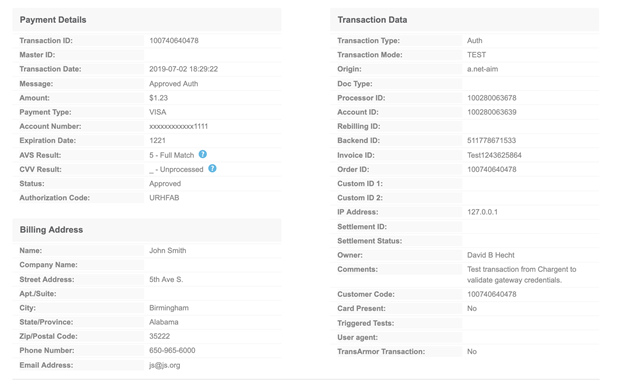
You can compare the transaction records in Salesforce with the records in your BluePay administrative app. As shown in the figure below, click the Processing menu category, then click Transactions > Transaction List. Then click the link for a specific transaction to view details.
![]()
Correspondence in the Transaction Fields
The Gateway Date is the timestamp for the submission to BluePay, and the Gateway ID field corresponds to the BluePay Transaction ID for use in reconciliation between two systems.
This table contains the mapping information between BluePay and Salesforce fields.
| Salesforce field | Direction | Gateway field |
| Gateway ID | < | Transaction ID |
| Invoice Number | > | Invoice ID |
| PO Number | > | Order ID |

