Integrating Forte and Salesforce using Chargent

Connect Forte and Salesforce with Chargent
See all Forte transactions, manage refunds, send payment links and more, all inside Salesforce with Chargent, the top rated payments app on the Salesforce AppExchange.
Not yet a Chargent customer?
Contact us for a no-obligation 30 day trial, and see for yourself!
Overview
Forte is a merchant acquirer and global processor that offers unique and scalable enterprise-class solutions. Forte helps organizations of all sizes build, manage, and perfect the way they take payments.
Integrating Forte with Chargent gives you the ability to easily build a seamless process for completing payments in Salesforce. The integration connects the Forte payment gateway directly to Salesforce. The Chargent integration uses the tokenization of the gateway for processing credit card payments, and Bank Draft (ACH, eCheck, Direct Debit) payments.
Prior to setting up Forte in Salesforce
- Install both Chargent Base and Chargent Orders Package into your Salesforce org. The Chargent Anywhere Package is Optional although necessary to process payments on any object.
- Configure Chargent according to the Installation and Setup Guide.
Obtaining Forte Credentials
In this section you will find the steps to obtain your Forte credentials which will be used to configure the integration between Forte and Salesforce.
Begin by contacting Forte to obtain a merchant account and get access to Dex, the Forte Payment Platform. You will need these credentials for both a sandbox account and a production account.
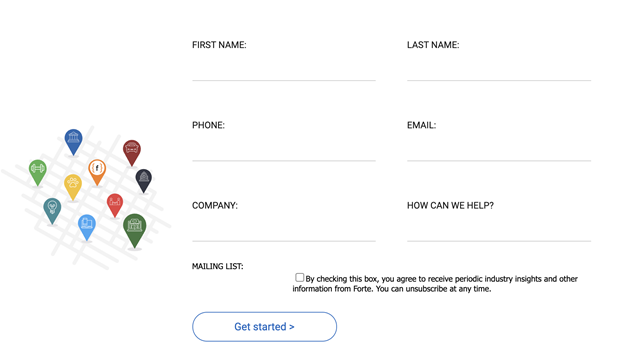
You can register for a sandbox account by going to https://www.forte.net/test-account-setup.
Enter all of the information in the request form (see the figure below).
NOTE: The Chargent integration between Forte and Salesforce has already been certified by Forte, but it is still necessary for you to obtain a sandbox account for your own testing needs. There is no official certification process.
You will receive two emails from Forte support.
- Email to confirm your account and email address.
- Invitation to join Dex, Forte’s payment platform..
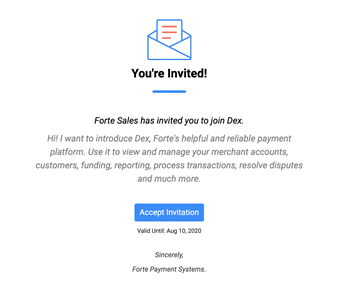
Once you accept the invitation, you will now have access to the Forte Sandbox for testing. You will need the following information to configure Forte in Salesforce:
- Account ID
- Location ID
- API Key (API Access ID)
- Secure Transaction Key (API Secure Key)
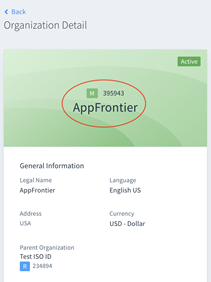
Account ID:
To obtain the Account ID click your profile icon in the top right and select Organization. You will see the Account ID listed above your organization name on the Organization Detail page.
Location ID:
You can obtain the Location ID by clicking on Location. You will find the Location ID above your organization name on the Location Detail page.

API Access ID & API Secure Key
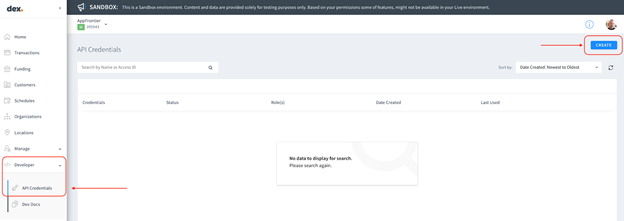
You will need to create the API Access ID & API Secure Key within Dex.
- From the menu on the left select Developer and then choose API Credentials
- Click the [Create] button on the top right.

- Enter a name for the API Key and click the [Create New API Key] button

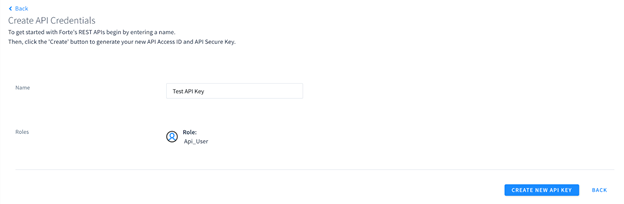
You will receive both the API Access ID and the API Secure Key. You should copy both credentials in order to setup the Gateway in Salesforce in the next step.

Note: The app may time out if you aren’t using it and you may have to generate a new API Secure Key. You can regenerate the key by logging back into the app, navigating back to the API and clicking on the Access ID. There will be a link that allows you to Regenerate Secure Key.

Once you have all of your credentials, you are ready to set up Forte in Salesforce.
Add Forte Gateway to Salesforce using Chargent’s Gateway Wizard.
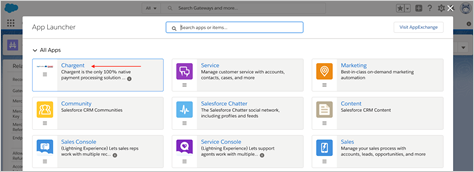
- Click on the App Launcher on the top left side in Salesforce.

- Select Chargent as the App
- Select the Chargent Settings Tab
- Choose Chargent Setup Wizard

- Do you have a Payment Gateway account – Select Yes
- Select Forte as your Payment gateway.
- Select Test Transactions for testing or Live Transactions if you are looking to process real time payments.
- Follow the prompts to configure your gateway.

You will need the following information:
- Add your credentials based on your Sandbox (Test) or Production Live CyberSource account.
-
- Account ID
- Location ID
- API Key (API Access ID)
- Secure Transaction Key (API Secure Key)
Other information that will be asked:
- Will you be using tokenization? (recommended)
- What currency will you be using? (USD, CAD, etc..)
- Want to enable the Payment Console?
- What payment methods will you be accepting?
- Payment Console Setup (Premium feature for Platform Edition)
- Show Charge Button
- Show / Create Update Token Button
- Show Authorize Button
- Will you be using recurring, scheduled or installment payments?
- What time should the batch run? (Chargent recommends 3am)
Direct Debit Network
Starting with Chargent version 6.15, you can now select the Bank Account network for your region during the gateway setup process. Authorize.net uses the ACH Network. This will allow for the correct Direct Debit Network fields to be displayed on Payment Requests and Payment Console based on your region.
You should choose ACH – US as the network. ACH is also known as echeck or electronic check.
- US – ACH (also known as echeck or electronic check)
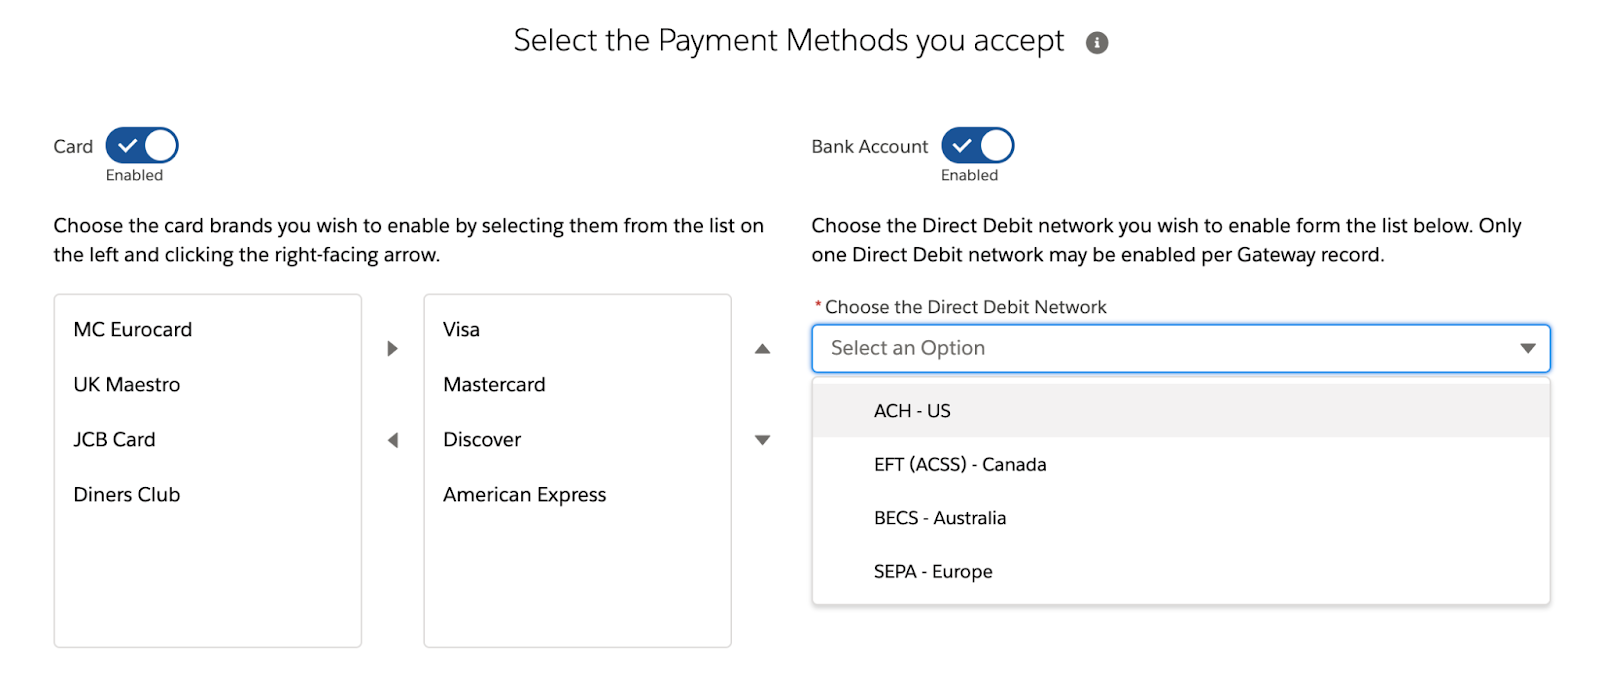
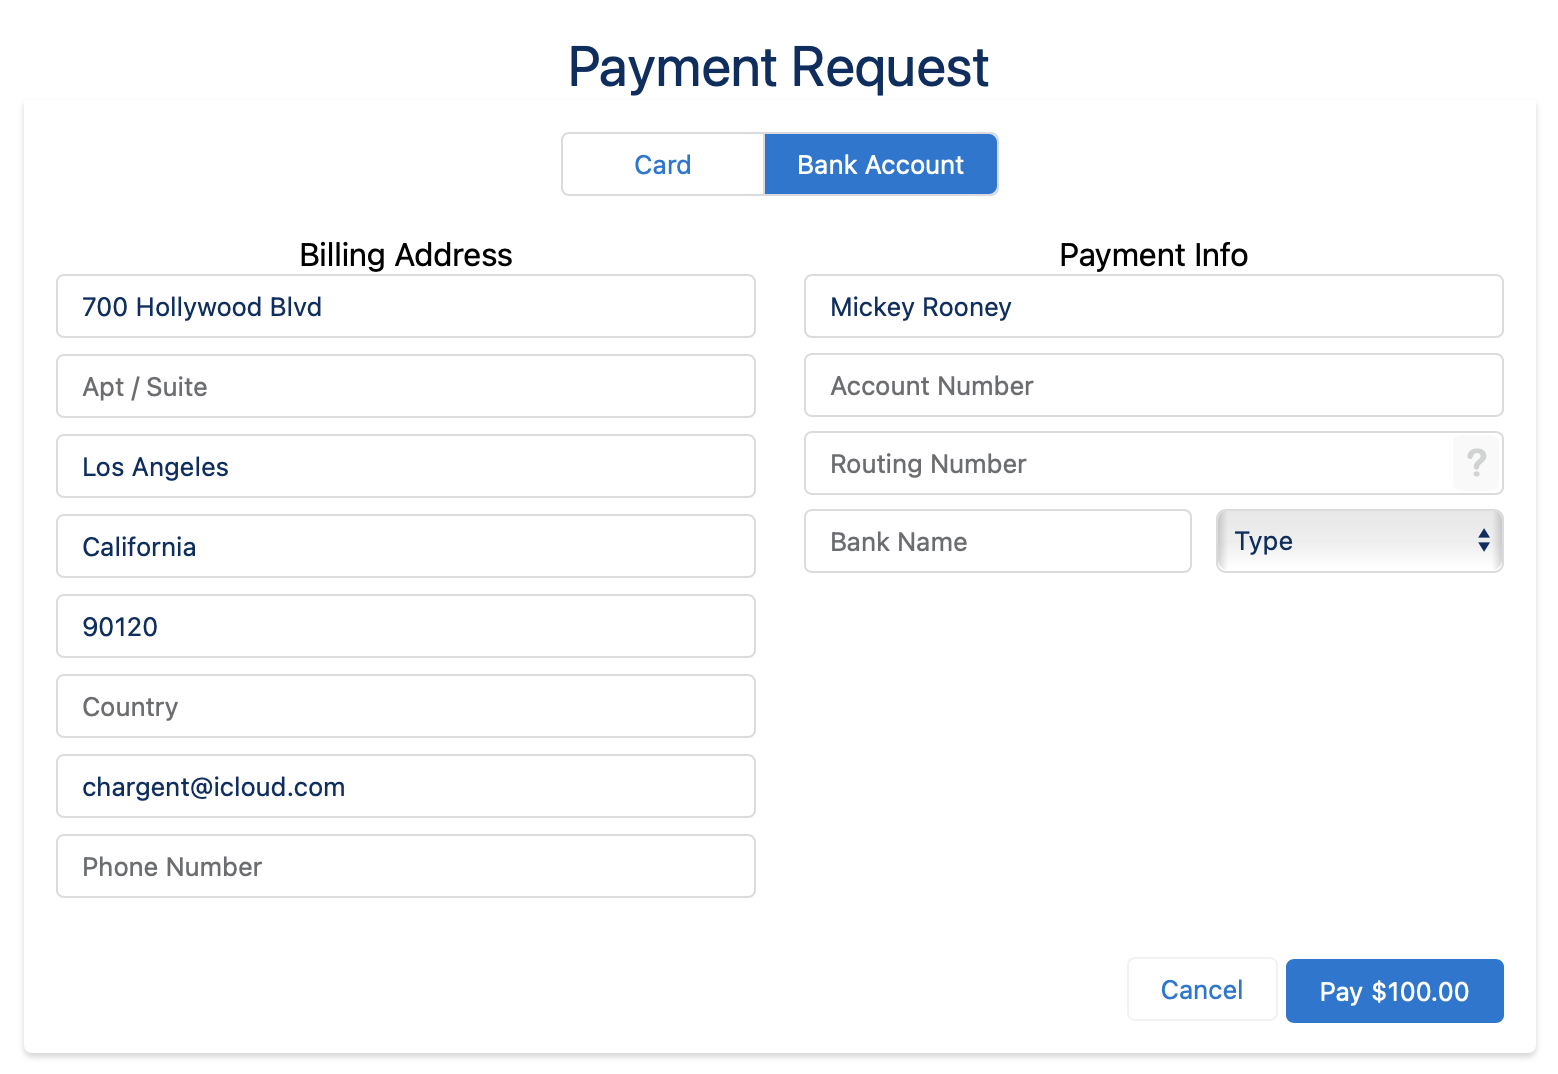
Once you have your Direct Debit Network set, you will see the appropriate field names on your Payment Request that are sent as well as your internal Payment Console.
Testing the Integration
Create a Chargent Order
- Click on the App Launcher in the top left side and select Chargent as the App.

- Click the Chargent Orders Tab.
- Click on New
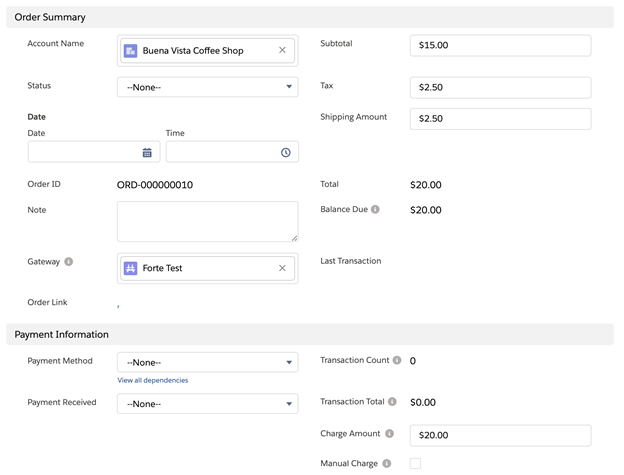
- Enter in the following information:
-
- Account: The Account the Chargent Order should be associated with.
- Gateway will default to Forte unless you are using multiple active gateways then you would want to select Forte as the Gateway.
- Payment Method = Credit Card (see our Testing Bank Accounts section for testing ACH, eCheck, Direct Debit)
- Card Type: Visa, MasterCard, American Express, etc…
- Billing Information
- First Name
- Last Name
- Address
- City
- State / Province
- Zip Code / Postal Code
- Email Address (if you want to test the email receipt that gets triggered upon a successful transaction)
-
- Charge Amount: If you are looking to test a specific amount, enter it in the Chargent Amount field otherwise this will default to the Amount field which is made up of Subtotal, Tax, and Shipping. If you test a specific amount in this field, you also want to check the [Manual Charge] box which overrides the default.
- Credit Card Number = See Forte test credit card numbers below
- Card type (Visa, MasterCard, etc.. based on the test card number you select from Forte)
- Card Expiration Month and Card Expiration Year should be in the future


-
- Click [Save ]
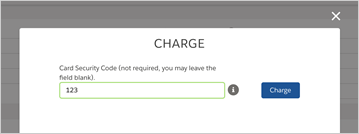
- You can now press the [Charge ] button to process the transaction. You will receive a pop-up asking for the CSC (Card Security Code). This can be any 3 digits for Visa, MasterCard and Discover or 4 digits for American Express.
- Click [Charge ] again to process the payment.

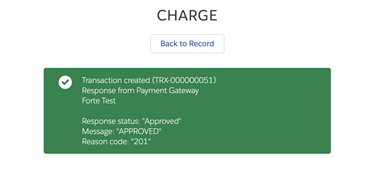
You should receive a popup that shows the test transaction was approved.

Test Credit Cards
The table below contains a listing of valid test credit card numbers for Forte. Any card may be used without impacting the cardholder account, since all responses are from a simulated authorization system
| Card Type | Card Number |
| Visa | 4111111111111111 |
| Visa | 4012888888881881 |
| Visa | 4222222222222 |
| MasterCard | 5555555555554444 |
| MasterCard | 5105105105105100 |
| Discover | 6011111111111117 |
| Discover | 6011000990139424 |
| American Express | 378282246310005 |
| American Express | 371449635398431 |
| American Express Corporate | 378734493671000 |
| Australian BankCard | 5610591081018250 |
| Diners Club | 30569309025904 |
| Diners Club | 38520000023237 |
| JCB | 3530111333300000 |
| JCB | 3566002020360505 |
Testing Bank Accounts (ACH, eCheck)
When testing bank accounts, you will need the following information.
- Valid 9 digit Routing Number which can be obtained from the Federal Reserve Website.
- Account Number – The Account Number can be a valid one or a random string between 5-17 digits (Note: If you are using a valid account number in Sandbox, the transaction will go to a test environment and does not deduct funds from your bank account).
To test ACH you want to create a new Chargent Order and populate the following fields.
- Account Name
- Gateway will default to the Forte unless you are using multiple active Gateways
- Payment Method = Check
- Charge Amount: Check the [Manual Charge] box if you are testing a specific amount. If you are entering Subtotal, Tax, and Shipping then the Charge Amount will default to the Balance Due and the Manual Charge box should not be checked.
- Billing Information
- First Name
- Last Name
- Address
- City
- State / Province
- Zip Code / Postal Code
- Email Address (if you want to test the email receipt that gets triggered upon a successful transaction)
- Bank Account Type indicate Checking or Savings
- Bank Routing Number from the Federal Reserve website.
- Bank Account Number = Any random string of numbers between 5 – 17 characters
- Bank Account Name = Name of the person who holds the bank account
- Bank Name = Name of the institution (Wells Fargo, Bank of America, Citibank, etc…)
- Click [Save]
- Click the [Charge button] and you will see a popup with an Approved message.
When you click the [Back to Record] button on the popup dialog box, the Salesforce page will refresh and a Transaction record is created in Salesforce.
Note: Although test transactions in the Sandbox will not deduct funds, it’s a good practice to Void the transaction immediately when testing.
Your connection between Salesforce and Forte is now set up and working. The next test would be sending a live transaction from your Salesforce Sandbox.
Order Source Fields (Standard Entry Codes – SEC)
Forte requires the SEC Code to be sent with every transaction. In order to send the SEC with each transaction, you will want to make sure you are on Chargent version 6.15 or newer. If you are on an older version of Chargent you will want to update your Chargent package using our PIM (Package Installation Manager).
The Order Source field on the Chargent Order can be set to indicate the SEC code. SEC codes represent the type of transaction whether the customer is in the store providing a check, the check is not physically present, or the check is going to be processed after they leave.
Below is the mapping of the Order Source field that will send the corresponding SEC code to Forte when you Charge an ACH transaction.
| Order Source (Chargent Order field) | SEC (Forte) |
| Corporate Cash Disbursement | CCD |
| E-Commerce (default) | WEB |
| Installment | PPD |
| ARC | |
| Prearranged Payment and Deposit | PPD |
| Recurring | PPD |
| Recurring Mail | ARC |
| Recurring Telephone | TEL |
| Retail | POP |
| Telephone | TEL |
Sending Live Transactions from a Salesforce Sandbox
When Chargent is installed in a Salesforce Sandbox, transactions are typically sent to the payment gateway’s test / sandbox / development environment, regardless of whether Chargent’s Test Endpoint checkbox is checked. This is done as a security precaution, to prevent real transactions from being accidentally sent from a Salesforce Sandbox.
When Chargent is installed in a production or developer Salesforce org, checking the Test Endpoint checkbox on the Gateway record will route transactions to the test environments provided by the gateway.
Note: Some gateways use the same endpoint for live and test environments. For these gateways, the Chargent application does not prevent live transaction processing. As such, it is best practice to deactivate your live gateway records in orgs used for testing.
If you wish to send live transactions from a Salesforce Sandbox, as a final step in testing, simply use Chargent’s Endpoint Override field on the Gateway record, and enter the production endpoint of your chosen gateway there.
Here is the production endpoint URL for Chargent’s integration with Forte:
https://api.Forte.net/v2
You can update the Gateway endpoint by editing the Gateway record.
- Click the App Launcher
- Search for and select Gateways
- Select the Gateway you want to modify
- Click [Edit]
- Click Advanced Settings
- In the Endpoint Override field enter the new URL
- Make sure the Test Endpoint box is unchecked
- Click [Save]

Testing Other Variables (requires live testing with live credit cards)
You can test other variables such as Address Verification (AVS) or Card Security Code (CSC) when testing live transactions in either the Sandbox as referenced above, or when testing in your live Production org.
Here are some helpful results to test for in your Live Production Org:
| AVS |
| Street Address and 5-digit Zip Code both match |
| Street Address and 5-digit Zip Code both match |
| Partial Match: Street Address matches, but both 5-digit and 9-digit Zip Code do not match |
| Partial Match: Street Address does not match, but 9-digit Zip Code matches |
| Partial Match: Street Address does not match, but 5-digit Zip Code matches |
| No Match: Street Address, 5-digit Zip Code, and 9-digit Zip Code all do not match |
| System Unavailable: Address information unavailable. Forte returns this response if the Street Address is a non-US address, if the AVS service is unavailable, or if the AVS service for a particular US bank is not properly functioning. |
| System Unavailable: Forte will retry the AVS check because the issuer’s system is unavailable or the request times out. |
| Invalid: AVS data is invalid |
| Not Supported: The US issuing bank does not support AVS checks. |
CSC Codes – Card Security Code (CSC) is also referred to as CCV (Credit Card Verification) and CVC (Card Verification Code) and refers to the 3 or 4 digit code on the back of the credit card. This security feature assists merchants in processing a Card-Not-Present transaction, and receiving a positive response. It improves the likelihood that the cardholder making the purchase is in physical possession of the card.
| CSC Results |
| Match |
| No Match |
| Error (Unrecognized or Unknown Response) |
| Invalid or Null |
| Not Processed |
| Service Not Supported |
| Issuer Unable to Process |
| No Response |
Understanding Transactions
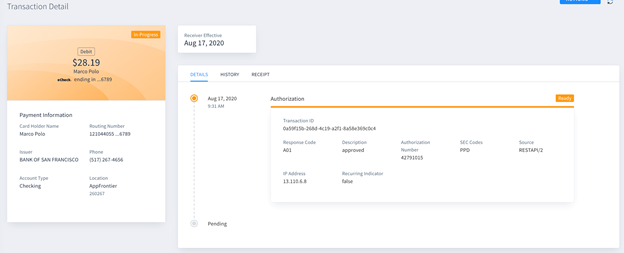
When a transaction occurs between Chargent and the Forte gateway, a new transaction record is created. The listing of transactions can be found under Related on the Chargent Order record.
Click a Transaction ID link to see the details, as shown in the figure below. This transaction record contains the entire set of data that Forte sends in its response, including transaction Type (Charge, Authorize, Refund or Void), the Response Status (Approved, Declined, Error).
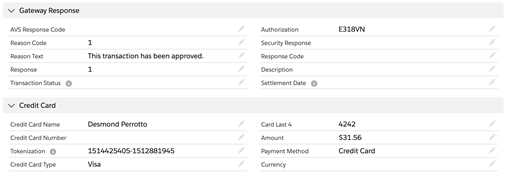
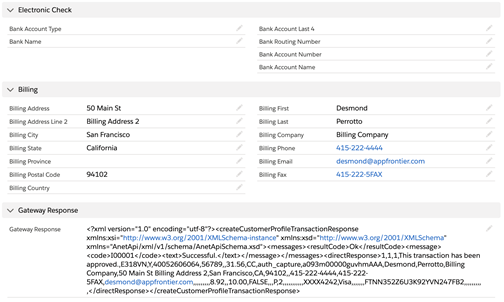
The Gateway Date is the timestamp for the submission to Forte, and the Gateway ID field corresponds to the Forte Transaction ID for use in reconciliation between two systems.
Access your Forte Virtual Terminal (Dex) and login.
To search for transactions:
- Click the Transactions option from the menu
- Enter a search term or specify the search criteria.
- Search options
-
- Date Range
- Individual Amount or Amount Range
- Status
- Last 4 digits of the card number
- Account Number

When you see the transaction you can click on it to pull up the transaction details.
Voiding Transactions
It’s always a best practice to Void a transaction after testing even if it’s going to a test endpoint. This is to prevent the accidental charges of live transactions.
- Locate the Transaction Record on the Chargent Order in Salesforce
- Click the Transaction ID Number
- Click the Void button.
Going Live
This section contains the procedure for configuring the integration in a Production Org.
NOTE: Do not proceed here until the testing procedure described in Testing the Integration is successful.
- Obtain the Production credentials for the Forte production gateway account (the production credentials from Obtaining Forte Credentials).
- As given previously, the credentials include the following:
- Account ID
- Location ID
- API Key (API Access ID)
- Secure Transaction Key (API Secure Key)
- Repeat the steps in the Forte Setup in Salesforce section above, but substitute the Production credentials.
- Repeat the steps in the Testing the Integration section above using a real credit card to test a live transaction.
NOTE: Remember to void the transaction after testing, if you are using a real credit card and want to prevent the charge from settling.
Be sure to successfully transmit at least one real credit card transaction and one real ACH transaction-using company or personal accounts. We recommend that you submit a transaction with a very small amount and then void that transaction afterwards.
Tokenization
This section contains the procedure for configuring the use of tokens that pass between Chargent and Forte. Forte uses a token system to maximize data security.
- Click the App Launcher
- Search and select [Gateways]
- Click on your Gateway Name and select [Edit]
- Click Advanced Settings.
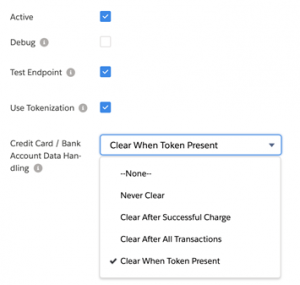
- Check the Use Tokenization option
- Select the options available for clearing the Credit Card / Bank Account Data
- Never Clear – Chargent will not automatically remove card data.
- Clear After Successful Charge – Chargent will clear the credit card number, expiration dates, and card security code only after a successful charge occurs for a card.
- Clear After All Transactions – Chargent will erase the credit card number, expiration date, and card security code after any transaction (Charge, Void, Refund) occurs for a card.
- Clear When Token Present – Chargent will erase the credit card number, expiration date, and card security code after any transaction (Charge, Void, Refund) for a card only if there is a value in the token field.
- Click Save to commit your changes.
NOTE: After your first successful transaction, the token is stored in the Chargent Token field in Salesforce and the credit card fields are handled according to the choice in the Credit Card Data Handling field.
Field Mapping
Along with sending data to Forte, Chargent also maps the response to various Transaction fields in Salesforce.
| Chargent Transaction Record Field | Forte | |
| Response Status | Status | |
| Response Message | Description / Response | |
| Authorization | Authorization Number | |
| Security Response | CVV Result | |
| Gateway ID | Transaction ID |
ACH Validation
Chargent supports ACH Validation through the Lyons Account Verification Service, allowing you to validate US bank accounts on the Automated Clearing House (ACH) network before attempting a transaction. This validation confirms that the bank account & routing numbers exist and the account is available for payment transactions, satisfying NACHA’s mandate – Supplementing Fraud Detection Standards for Web Debits. We strongly recommend that all ACH customers implement ACH Validation.
For more information about implementing validation for your ACH transactions, see our ACH Validation documentation.

