Integrating Paysafe and Salesforce Using Chargent

Overview
Your Paysafe Sandbox Account
Add a Paysafe Gateway record in Salesforce using Chargent’s Gateway Wizard.
Testing using Chargent Anywhere
Paysafe Test Credit Cards and Bank Numbers
Sending Live Transactions from a Salesforce Sandbox
Moving to Production
Overview
Paysafe, formerly known as Optimal Payments Netbanx, offers a full suite of credit and debit card functionality to meet all your card-processing needs. With a single integration you can process a complete range of card requests, including authorizations, purchases, settlements, refunds, card verification, and more.
Chargent has many features to offer, including automating and streamlining Salesforce payment processes, easy subscription management, click-to-charge buttons, payment request emails, and more.
All card payment requests are protected by Paysafe’s airtight risk and fraud management services.
Connect Paysafe and Salesforce with Chargent
See all Paysafe transactions, manage refunds, send payment links and more, all inside Salesforce with Chargent, the top rated payments app on the Salesforce AppExchange.
Not yet a Chargent customer?
Contact us for a no-obligation 30 day trial, and see for yourself!
Your Paysafe Sandbox Account
The first task is to get a sandbox / test account from Paysafe so that you can run test transactions from Salesforce. To being the process for obtaining a sandbox account, complete the form on the sign up page.
You will be walked through 5 steps when signing up.
- First and Last Name
- Business Email Address
- Phone Number
- Company Name, Website, and Country
- Processing Volume
In the welcome email you receive from Paysafe you will receive the following information.
- Merchant Account ID
- Temporary Password
- Store ID
Click the link in the email to go to the test login page:
Need help? Contact Paysafe through the options given on their Support page.
Permanent password
On your first successful login, you’ll get a prompt to enter a permanent password of your own choosing. Take note of any restrictions on the required strength of the password.
NOTE: You must get each of these gateway credentials from Paysafe before moving on to the steps in the next section, Configuring Salesforce for Paysafe Integration.
Prior to setting up Paysafe in Salesforce
Once you have your Merchant Account ID, Store ID and Store Password from Paysafe you can install and configure Chargent.
Prior to following the steps in this guide, Chargent should be installed in your Salesforce org and licenses assigned. If you have not yet installed, a 30 day free trial is available on our Installation Page.
Add a Paysafe Gateway record in Salesforce using Chargent’s Gateway Wizard.
- Click on the App Launcher on the top left side in Salesforce.
- Select Chargent as the App
- Select the Chargent Settings Tab
- Choose Setup Wizard

- Do you have a Payment Gateway account – Select Yes
- Select [Gateway Name] as your Payment gateway
- Select Test Transactions for testing or Live Transactions if you are looking to process real time payments.
- Follow the prompts to configure your gateway.
You will need the following information:
- Add your credentials based on your Sandbox (Test) or Production Live Paysafe account.
- Merchant Account Number
- Store ID
- Store Password
Feature Setup
- Will you be using tokenization? (recommended)
- What currency do you want to accept? (United States Dollar, Canadian Dollar, Euro, etc…)
- Do you want to enable Payment Console (premium feature) – This will send a request to request an activation key.
- What payment methods will you be accepting? Here you will select the types of credit cards you want to accept (Visa, Mastercard, Discover, etc…).
Note: Paysafe does not allow for Bank Account transactions (ACH, Direct Debit). You want to make sure both Bank Account Network and ACH Validation is disabled. - Setup Payment Console
- Will you be using recurring, scheduled, or installment payments?
- Set the batch time (Chargent recommends 3am)
Testing the Integration
Testing using Chargent Anywhere
Testing with Payment Console
To test using the Payment Console, you want to navigate to any record in your Sandbox that has the Chargent Anywhere Component enabled.
- Click the [Payment Console] button
- If you are using multiple gateways select your gateway from the dropdown otherwise continue to step 3
- Enter all the Billing Information and click [Next]
- Enter in a test credit card number, expiration date, and CVC code based on the Paysafe Test Credit Cards below.
- Click the [Charge] button.
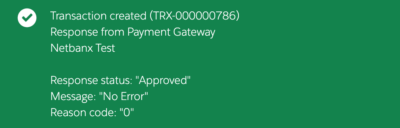
You should receive a green box showing Approved.
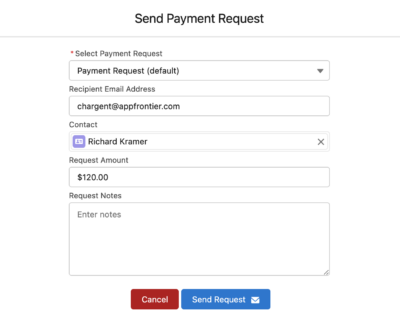
Testing using Payment Request
To test using a Payment Request you want to be sure you have the Chargent Payment Request feature set up as outlined in our documentation.
- Click the [Send Payment Request] button
- If you have multiple Payment Request templates set up you will first choose what template you want to use.
- Enter an email address where you want to send the test Payment Request along with any amount.
- Enter a Contact name (Optional)
- Click the [Send Request] button
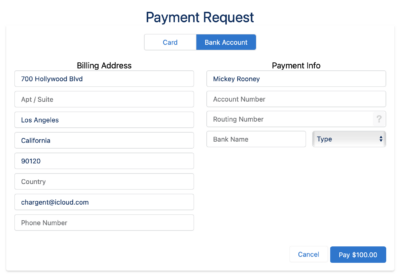
When you receive the email, click the secure link for the Payment Request. Use one of Paysafe credit cards to complete the payform and submit the payment.
You should receive a green box confirmation
Sending Live Transactions from a Salesforce Sandbox
When Chargent is installed in a Salesforce Sandbox, transactions are always sent to the payment gateway’s test / sandbox / development environment, regardless of whether Chargent’s Test Endpoint checkbox is checked. This is done as a security precaution, to prevent real transactions from being accidentally sent from a Salesforce Sandbox.
When Chargent is installed in a production or developer Salesforce org, the Test Endpoint checkbox on the Gateway record will select between sending to the payment gateway’s live and test environments. (There are a few exceptions, such as Stripe, which has a single endpoint to send transactions to, and different credentials for live versus test transactions).
If you wish to send live transactions from a Salesforce Sandbox, as a final step in testing, simply use Chargent’s Endpoint Override field on the Gateway record, and enter the production endpoint of your chosen gateway there.
Here is the production endpoint URL for Chargent’s integration with Paysafe:
https://webservices.optimalpayments.com/creditcardWS/CreditCardServlet/v1
Note that the full endpoint URL must be entered in the Endpoint Override field, and the domain must be present in the Remote Site Settings (for standard Chargent integrations it should be already present).
Paysafe Test Credit Cards
See the Paysafe Credit Card Response page to see which codes will generate various approved and declined transactions for each credit card type. You can trigger an error by varying the numbers in the cents value in the Charge Amount field. For example, a charge amount of $2.34 will cause an Error 3015 response code.
| Card Type | Card Number | 3D Secure Enabled | Issuing Country | |
| Visa | 4530910000012345 | X | CA | |
| Visa | 4510150000000321 | X | CA | |
| Visa | 4500030000000004 | YES | CA | |
| Visa | 4003440000000007 | YES | CA | |
| Visa | 4515031000000005 | YES | CA | |
| Visa | 4538261230000003 | YES | CA | |
| Visa | 4037112233000001 | X | US | |
| Visa | 4037111111000000 | YES | US | |
| Visa | 4107857757053670 | YES | UK | |
| Visa Debit | 4724090000000008 | X | CA | |
| Visa Debit | 4835641100110000 | YES | CA | |
| Visa Debit | 4900880000000008 | YES | US | |
| Visa Debit | 4900770000000001 | X | US | |
| Visa Debit | 4206720389883775 | YES | UK | |
| Visa Debit | 4206720389883775 | YES | UK | |
| Visa Electron | 4917480000000008 | X | UK | |
| Visa Electron | 4917484589897107 | X | UK | |
| Mastercard | 5191330000004415 | X | CA | |
| Mastercard | 5457490000008763 | X | CA | |
| Mastercard | 5411420000000002 | YES | CA | |
| Mastercard | 5258110000000005 | YES | CA | |
| Mastercard | 5192810000000009 | YES | CA | |
| Mastercard | 5100400000000000 | X | US | |
| Mastercard | 5200400000000009 | YES | US | |
| Mastercard | 5186750368967720 | YES | UK | |
| Mastercard Debit (Maestro) | 6277411477100000 | YES | CA | |
| Mastercard Debit (Maestro) | 6277411477200002 | X | CA | |
| Mastercard Debit (Maestro) | 5036150000001115 | X | US | |
| Mastercard Debit (Maestro) | 5036160000001114 | YES | US | |
| Mastercard Debit (Maestro) | 5573560100022200 | YES | UK | |
| Mastercard Debit (Maestro) | 6759950000000162 | X | UK | |
| American Express | 373511000000005 | X | CA | |
| American Express | 373522010100107 | YES | CA | |
| American Express | 370123456789017 | X | US | |
| American Express | 370123456789116 | YES | US | |
| American Express | 375529360131002 | X | Ireland | |
| Discover | 6011234567890123 | X | US | |
| JCB | 3569990000000009 | X | Japan |
A record is created for each error and each successful transaction, and this record contains the response messages and details that are sent back from Paysafe. Click on Related to see the transactions associated with the Chargent Order.

We recommend additional testing prior to going live, as well as running a few live transactions prior to launch test and live Paysafe environments are not always the same/
Congratulations! You are now up and running with Paysafe in Salesforce!
For additional details on testing and validating your Paysafe Salesforce integration, please see the additional sections below.
Sending Live Transactions from a Salesforce Sandbox
When Chargent is installed in a Salesforce Sandbox, transactions are typically sent to the payment gateway’s test / sandbox / development environment, regardless of whether Chargent’s Test Endpoint checkbox is checked. This is done as a security precaution, to prevent real transactions from being accidentally sent from a Salesforce Sandbox.
When Chargent is installed in a production or developer Salesforce org, checking the Test Endpoint checkbox on the Gateway record will route transactions to the test environments provided by the gateway.
Note: Some gateways use the same endpoint for live and test environments. For these gateways, the Chargent application does not prevent live transaction processing. As such, it is best practice to deactivate your live gateway records in orgs used for testing.
If you wish to send live transactions from a Salesforce Sandbox, as a final step in testing, simply use Chargent’s Endpoint Override field on the Gateway record, and enter the production endpoint of your chosen gateway there.
Here is the production endpoint URL for Chargent’s integration with Paysafe:
https://webservices.optimalpayments.com/creditcardWS/CreditCardServlet/v1
Note that the full endpoint URL must be entered in the Endpoint Override field, and the domain must be present in the Remote Site Settings (for standard Chargent integrations it should be already present).
Understanding Transactions
When a transaction occurs between Chargent and the Paysafe gateway, a new transaction record is created in Salesforce. The listing of transactions can be found under the Related tab on the Chargent Order page. See the figure above.
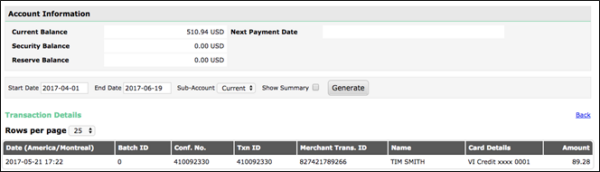
On the Related tab, click a Transaction ID link to see the details, as shown in the figure below. This transaction record contains the entire set of data that Paysafe sends in its response, including transaction Type (Charge, Authorize, Refund or Void), the Response Status (Approved, Declined, Error), and any related approval or error messages.
The Gateway ID in the Chargent Transaction record in Salesforce will correspond to the Txn ID and Conf. No. in Paysafe Netbanx, for purposes of reconciliation.
Verifying Transactions in the Paysafe Dashboard
You can compare the transaction records in Salesforce with the records in your Paysafe dashboard. Login to the Paysafe test portal and click the Account Statements link at the top. See the figure below.
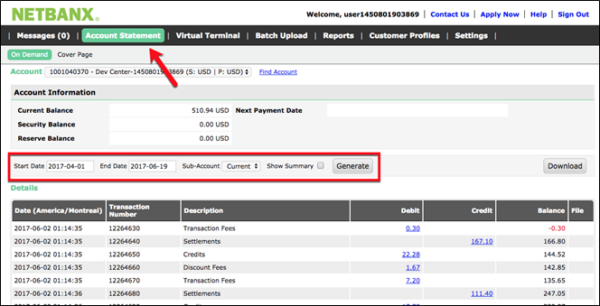
Set the Start Date and End Date and click the [Generate] button.
Locate the transaction of interest in the listing, and click anywhere on the transaction row to see all details for that transaction.
Moving to Production
This section contains the procedure for configuring the integration in a production system.
Get your Production Credentials
Production account: You’ll also need to register for a production account. When you’re ready, use the contact information in the enrollment email messages to work with Paysafe Support and obtain the same set of credentials (Account Number, Store ID, Store Password) for your production account.
NOTE: It’s important that you do not proceed here until the testing procedure described in Testing the Integration is successful.Follow these steps to configure the production integration in Salesforce:
- First, obtain the production credentials for the Paysafe production gateway account—similar to the method given for sandbox credentials in Obtain a Paysafe Sandbox Account.
- Repeat the steps in the Configuring Salesforce for Paysafe Integration section above, but substitute the production credentials.
- Add a Paysafe Gateway record in Salesforce using Chargent’s Gateway Wizard
- Add a Paysafe Gateway record versions prior to v5.40
- Repeat the steps in the Testing the Paysafe Integration section above with respect to the SalesForce production environment, using the production credentials.
- Be sure to successfully transmit at least one real credit card transaction using company or personal accounts. We recommend that you submit a transaction with a very small amount and then void that transaction afterwards. This ensures that the system works with your production credentials.

