Watch Part 2 of the Chargent Admin Certification training from the Payments Summit at Dreamforce 2019.
This training video includes advanced Chargent customization topics, Chargent Anywhere, payment receipts, and more.
View the 35 minute video:
Or read the content of the certification below.
From Certification Part 1:
Here is a quick recap of what was covered in Certification Part 1
- Installation of Chargent using the PIM (Product Installation Manager).
- How to obtain an Authorize.net gateway account
- Using the Chargent Setup Wizard to setup the new Authorize.net gateway in Salesforce.
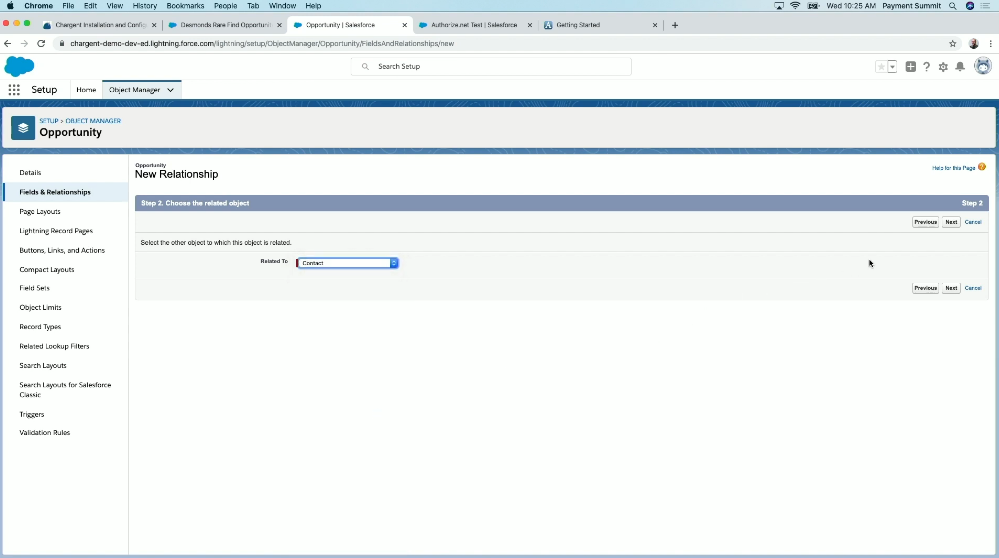
- Setup Chargent Anywhere on an Opportunity or Custom Object.
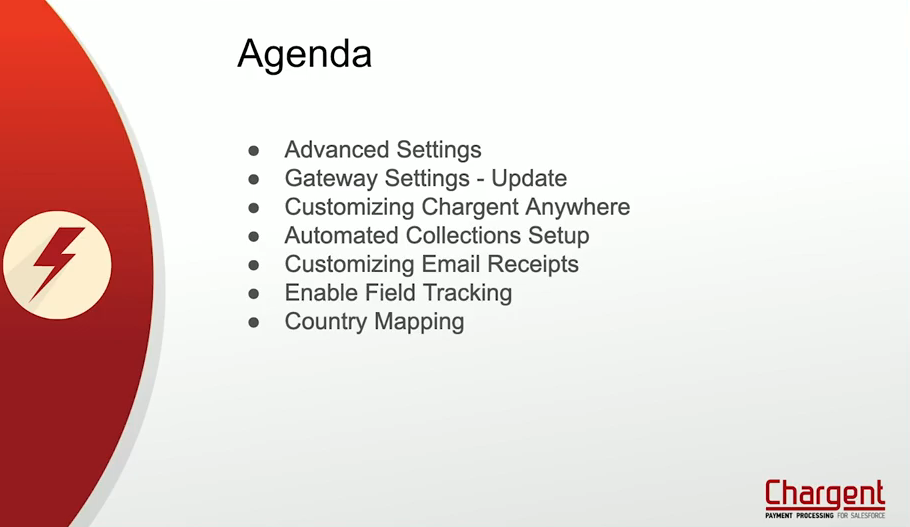
Certification Part 2 – Outline
In part 2 of Chargent’s Admin Certification, we are going to go into more advanced customization. These are some of the more popular customer requests for customizing Chargent in Salesforce.

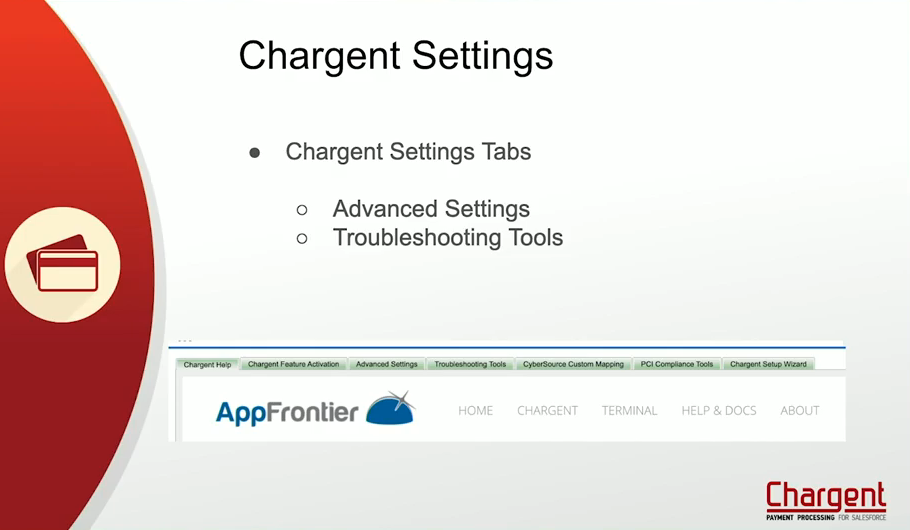
Chargent Settings:
Under Chargent Settings there are several tabs that are worth noticing. Advanced Features and Troubleshooting Tools. We will talk about these tabs more in depth in a bit.
Updating your Gateway Setting: We’re going to go to the Authorize.net gateway in Salesforce that you set up in the first session, and go through what customizations can be done and how to edit the existing settings.
Customizing Chargent Anywhere: With Chargent Anywhere, there are several things you can customize and set as default. For instance, If you have different groups in your organization that require the use of two different gateways, you can setup the Page Layout to dictate which group processes payments on which gateway. We will also cover setting the default company, changing the name of the Charge button, and several other customizations.
Automated Collections Setup: We have a brand-new feature coming out called Automated Collections. I’m going to talk a little bit about this feature and how it can help you recover some declined charges automatically.
Customizing Email Receipts: Many customers ask how they can customize the receipts that are sent to customers in Salesforce. I will explain how to do that in this session.
Field Tracking History: This will allow you to setup various fields on a page to track which fields are updated, who updated them, when they were updated, and what the modified value was prior to the update.
Country Mapping: When you’re sending the payment over to the gateway, the name of the country may be slightly different than what’s in Salesforce. Chargent has a tool that allows you to create a custom mapping so if you want “US of A” to work instead of USA, you can create a custom mapping of the country.
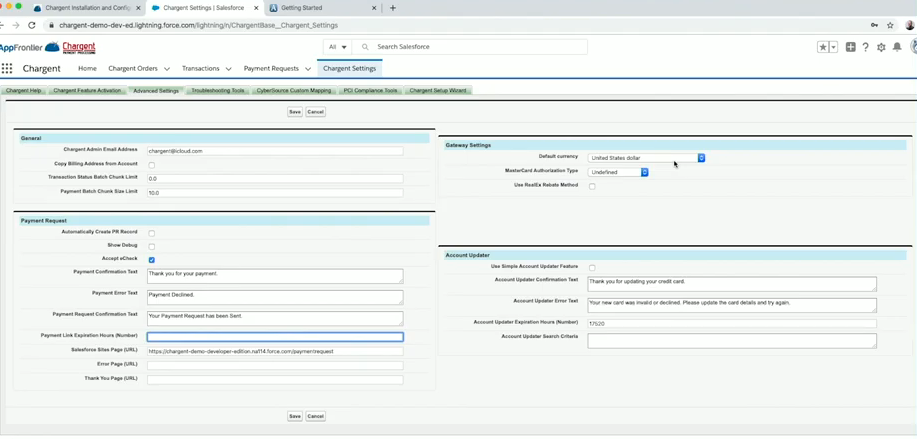
Chargent Settings
To navigate to the Chargent Settings tab:
- Click on the App Launcher and select the Chargent app.
- Click the Tab for Chagrent Settings
There are two different sub-tabs in Chargent Settings that I really want to talk about
- Advanced Settings
- Troubleshooting
Advanced Settings Tab
The Advanced Settings tab has a ton of different features that can be customized. Many are workflows and triggers that were created when you installed Chargent. I want to highlight some of these features on the Advanced Settings tab.
Copy the Billing Address from Account: The Billing Address field is required in order to submit a payment to your gateway. Sometimes you may want to customize your Salesforce Org to automatically copy the Billing Address from the Account record.This will allow you to copy the address from the Account to the Chargent Order.
Payment Batch Chunk Size Limit: If you have Recurring Billing set up and it’s scheduled to run nightly, this field will tell you how many records are going to be in the batch that gets sent to the gateway. If you have 100 records that need to be processed and this field set to 10, then it will send 10 batches, each with 10 records.
If you’re not processing a lot of recurring payments, this number can be 10 or even 1. If you are doing a high volume of payments, you will likely need to increase this number so the batch processes faster. If you have a lot of records that need to be processed, then you might want to lower this number. This field should never be 0 or blank. 100 is the maximum for batched records.
Transaction Status Batch Chunk Size Limit: This would be for transactions that are pending on a gateway and could potentially settle differently than what was originally returned. For example, you may have an ACH eCheck that is initially approved but then later declined for insufficient funds. This batch would allow your Transaction record to sync with your Gateway and Processor to update the record if the settled response is different.
This feature is available for certain gateways although we’re trying to get most of them updated.
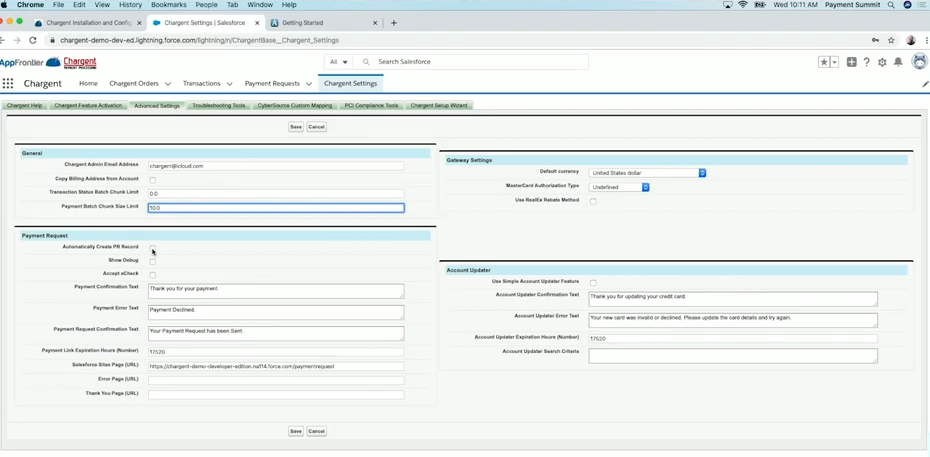
Automatically create the PR (Payment Request) Record: If you have automated emails that go out and you want to include a link to a Payment Request, checking this box will automatically create a Payment Request record every time a Chargent order is created, so your other customization can access the link to each record.
Accept eCheck: In the first certification I mentioned the setup of electronic check (ACH / Direct Debit) in the gateway setup. You still need to enable it here in the Chargent Settings in order for it to be visible on your Payment Request or Recurring Billing.
Payment Confirmation and Error Text: You can customize the text shown when processing a payment using the Payment Console or when sending a Payment Request. This is an internal message to your Salesforce user to either confirm the charge or alert that there is an error. For Payment Requests it alerts that the request was successfully sent.
Default Currency: There are several places in Chargent and Salesforce that determine which currency to use.
- Default for Salesforce (this defaults if nothing is indicated on either of the below items)
- Default set in the Chargent Settings (this defaults if not indicated on the Chargent Order)
- Default for the Gateway record
- Record Settings (specifically tells you what currency to use for that record)
Troubleshooting Tools
The Troubleshooting Tools tab can be helpful in determining why a Transaction record isn’t being updated, saved, or created. If you have customizations like Workflow Rules, or a processes in Process Builder, sometimes they can prevent records from being saved. The Troubleshooting Tools provides two buttons. One that allows you to test the insertion of a Transaction record and another to test the insertion of a Master record into Salesforce (typically a Chargent Order record). This can often tell you why the transaction record can’t be created and exactly what Workflow Rule or process is actually causing the problem.
Gateway Customization
I’m going to run through the customizations of the gateway, what you can enable, and what you can disable. If you went through the setup, and now you want to make changes to it you can follow the following steps to make changes.
Some possible reasons why you may want to make changes:
- You want to show that Authorize button, and you didn’t click it when you were going through the setup
- You want to enable other buttons on your Payment Request and Payment Console
- You’ve changed the types of currency, or you want to add currencies.
- You want to take away the option to allow for electronic check.
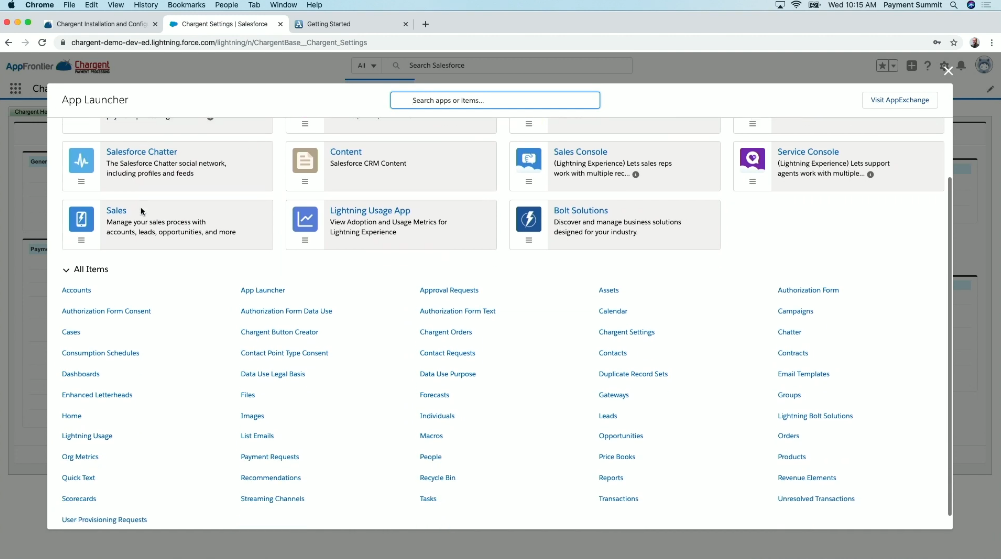
If you click on the App Launcher on the top left, and we do a search for Gateways, you can click on “Gateway” object.Click on the Authorize.net gateway which we added from the first session. If you click Edit, it will take you to a page that looks similar to the one you set to begin with. The difference is, on the very bottom, there is an option for Advanced Settings. In order to edit that gateway, we click on Advanced Settings. You will now be able to update the gateway record.
Some of the things you can see here
- Active means that the gateway is active. If you switch gateways and you want to deactivate it, you would just come here and uncheck it.
- Test Endpoint, In Sandbox, it automatically defaults to a test URL endpoint for testing however in Production or your Dev org you will need to check this box if you want to process test transactions.
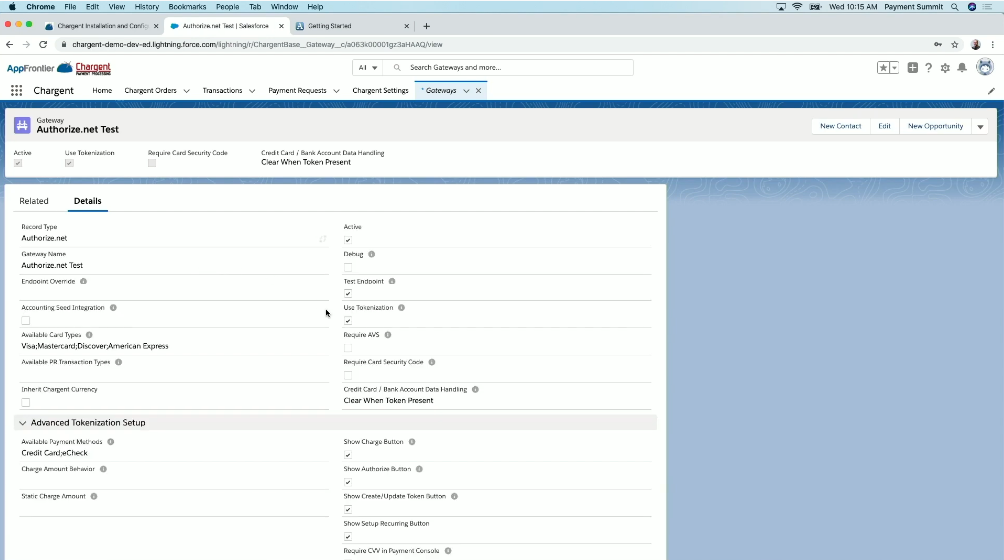
- Use Tokenization is always recommended. Tokenization is a random string of characters returned by the Gateway which can be used for this customer solely, by only you, and only this gateway. With tokenization, you can greatly reduce your PCI compliance scope by not storing credit card numbers in Salesforce.
- Credit Card and Bank Account Data Handling you can set what happens when a transaction is sent, and how the sensitive credit card or check information is handled. Do you want it to only clear it when there’s a successful charge? Do you want to clear it after all transactions?We always recommend clearing it when a token is present. The token comes back, and it clears out or does not save the credit card details, so you’re not storing it in Salesforce.
- Available Payment Requests types If you send a Payment Request, the customer will get the link to either Charge or Authorize payment. Those options are:
- Charge the Full Amount.
- Authorize the Full Amount: When they fill in the Payment Request, it authorizes their credit card and makes sure it’s valid and the funds are available. It will hold the funds until the authorization falls. It doesn’t actually take the money from their credit card unless you Charge the Authorization.
- Authorize just the Minimum Amount that your gateway allows. Most of the time, it’s about $1.00. So, what it does is, it sends it to the gateway saying, “Just making sure that this is an active credit card, and we’re going to authorize this for $1.00.”

Other items you can update in the Gateway settings
- Add or remove the option for eCheck, ACH
- Check the “Show Authorize Button,”
- Add or remove the different buttons that are on the Payment Console/Payment Request
Be sure to click the save button to ensure your updates.
Customizing Chargent Anywhere
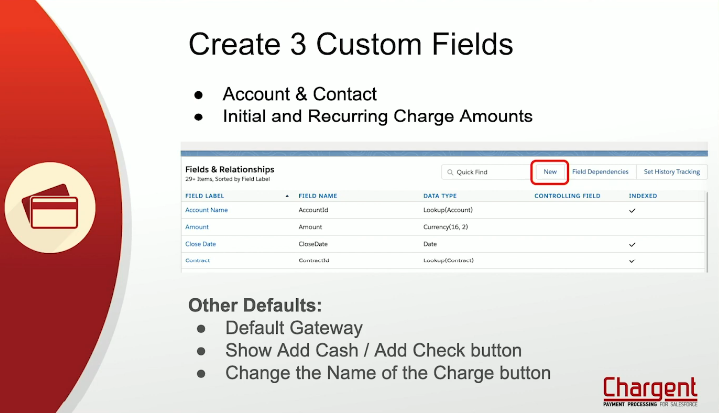
In order to customize the default settings for Chargent Anywhere, we need to create 4 custom fields. These fields are added to the same object where you will be adding Chargent Anywhere. You will need to copy the Field Name to use as the defaults.
- Account (if you don’t already have an Account Lookup on the object)
- Contact
- Initial Charge Amount
- Recurring Charge Amount
The following items can be customized using Chargent Anywhere:
- Default Gateway
- Show Add Cash / Add Check button
- Change the Name of the Charge button
- Default Account Contact
- Default Initial and Recurring Charge Amounts
For Opportunities, we already have the lookup to the Account (AccountId), so we don’t have to create that. If you want to populate a specific contact from there, you can do that as well by creating that lookup field for the Contact. You can also set the default gateway if you use multiple gateways for different Salesforce users.
From the main page, click the gear icon and choose Setup. Navigate to Objects and Fields and select Object Manager. Select the object you want to add Chargent Anywhere to, and go to Fields Relationships. What we’re going to do here is create the other 3 custom fields.
Lets create a lookup field to the Contact first.
- Click “New
- Select Lookup Relationship and click Next
- Choose Contact from the dropdown and click “Next.”
It’s going to ask us which profile you want to assign that to. Go ahead and click “Next” as well as which Page Layout do you want to assign it to.
After you create the Contact, you want to create a custom currency field for the Initial Amount and another for Recurring Amounts, or reference existing fields you have on the object. When you are done creating all custom fields you want to copy the Field Name for use in customizing Chargent Anywhere.
The next thing we want to do is copy the Gateway Record ID. To get this, you can navigate to the Gateway record and copy the record ID from the URL. Once you’ve copied the Gateway ID we are ready to customize.
Navigate to any record that has Chargent Anywhere installed. For our demonstration we have it on the Opportunity Record. From the gear icon click Edit Page.
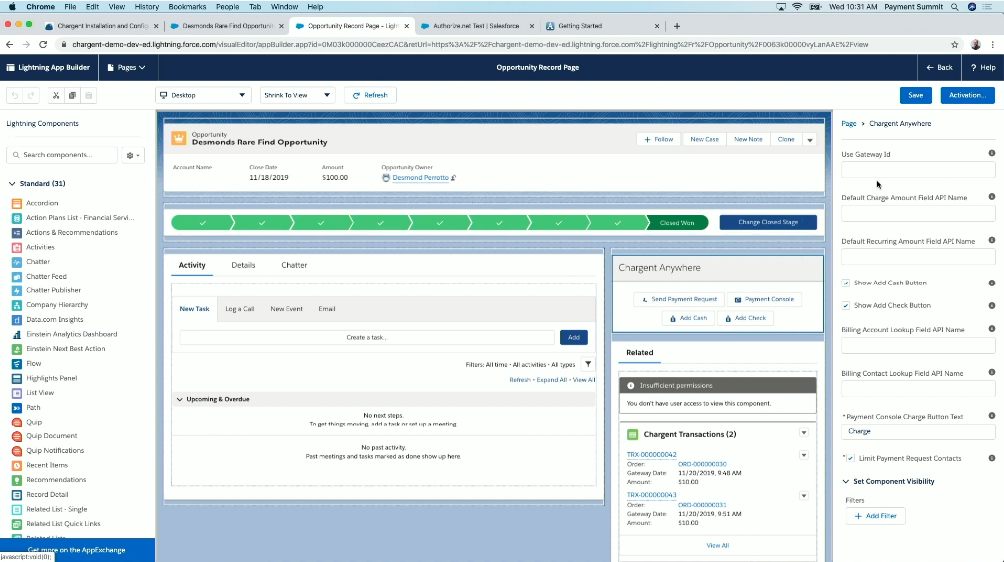
We’re going to go ahead and tap on the Chargent Anywhere component. Here we can copy in all the fields we added along with the Gateway Record ID. We can add the Field Name for Account, Contact, Initial Charge, and Recurring Amount.
You can also show the Add Cash or Add Check button. Finally, we have the ability to change the name of the Charge button as. If you don’t want it to say “Charge,” but instead want it to say Press Me, or Give Me the Money you could do that. Be sure to click Save and return to the Opportunity record.
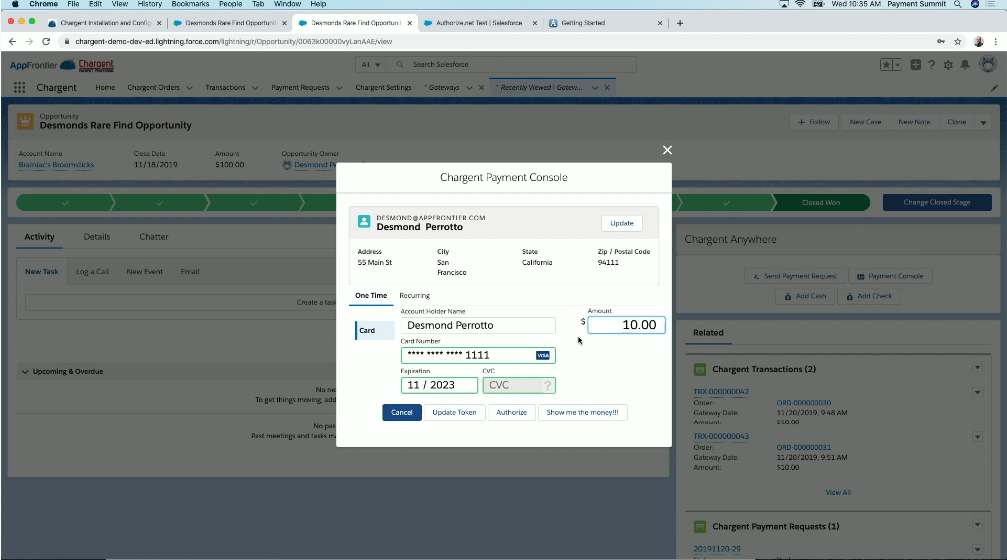
Before we click on the Payment Console we want to make sure the Initial Amount and Recurring Amounts are populated. Go ahead and update the record with any amount and click Save.
Now, when we click on the Payment Console, you’re going to notice that the amount is now being populated from the record. If you go under Recurring, it’s also going to have the populated amount as well. You can select the contact record from the drop down if it’s not already populated on the Opportunity. The Payment Console will automatically pull in the mailing address from the Contact record.
Automated Collections
Automated Collections is coming out soon in version 6.0. We’ve had several customers who have created their own versions of this. What this is going to do is help you collect money from failed transactions by retrying and sending automated emails based on a schedule you set.
As you know, sometimes the Recurring Billing can fail. One of those transactions may be declined for insufficient funds or various other reasons. You probably spend a lot of time trying to collect that money.
With the Automated Collections, you can schedule automated emails to be sent on a frequency based on the Automated Collections setup. We are going to go through how to enable it, and how to set it up. If you want a more in-depth check out our video presented by our Product Manager Don Snider.
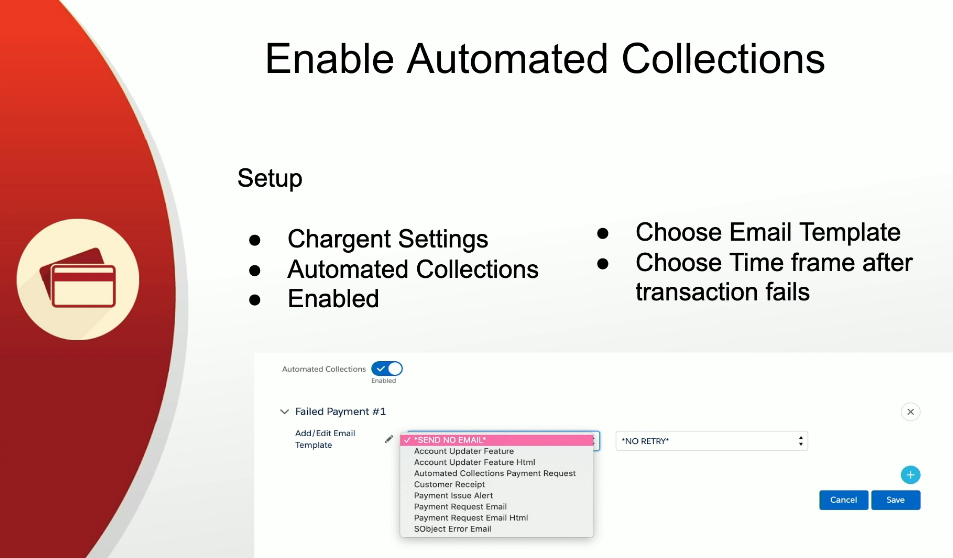
Enable Automated Collections
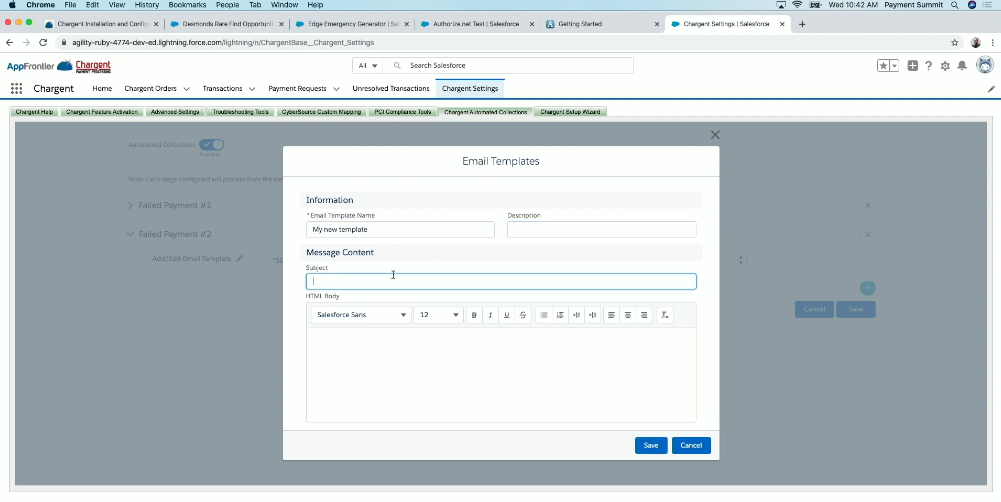
To enable Automated Collections, if you have purchased this add-on module, go to the Chargent Settings tab and go under Automated Collections. You can toggle the Enable button to activate this feature.
You can either use existing Email templates in Salesforce or create new ones. To create a new email click New Email, select the name, description, and modify the content.
You could set your emails to send on a specific day of the month that you want it to go out on. For example if you know your customers generally get paid on the 15th of the month, you can set the email to send all failed automated emails to be sent on the 15th or the 30th of the month.
When payment is rendered, it will cancel any future failed payment emails, and it sets the Payment Status back to recurring. You don’t have to have any manual intervention.
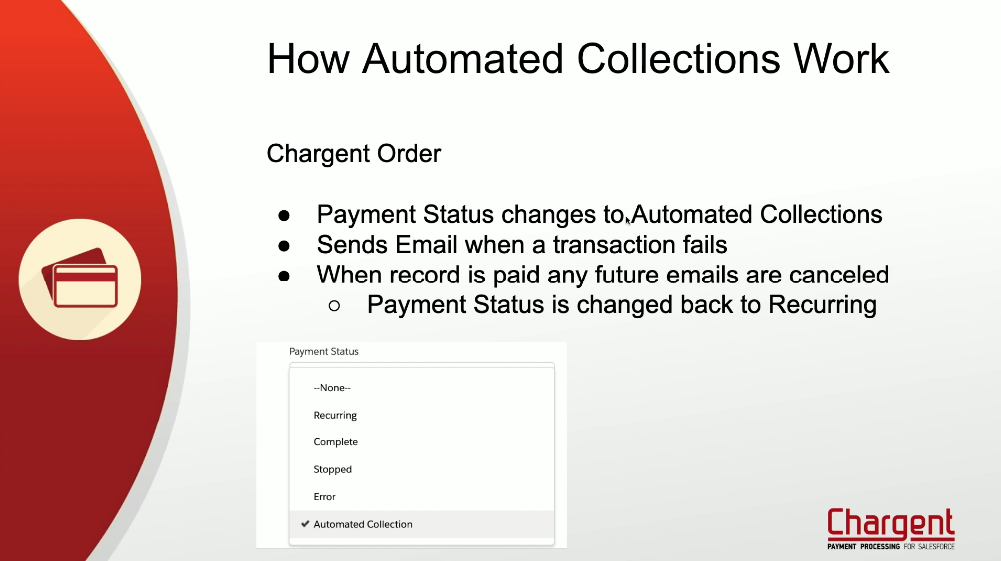
How Automated Collections Work
Prior to the Automated Collections feature, whenever a transaction failed, it would change the Payment Status to Error, and you would have to manually change it back to recurring and spend time trying to collect from the customer. With Automated Collections that’s no longer the case. Here is how the feature works.
- On the Chargent Order, the Payment Status changes to Automated Collections
- An Email is sent when a transaction fails based on the schedule you set up.
- When record is paid any future emails are canceled and the Payment Status is changed back to Recurring and continues to process as normal
- If a transaction goes unpaid you can set it to expire and the Payment Status will be changed to Error. To set the expiration you can do that in hours by going under Chargent Settings, Advanced Settings.
Customizing Email Receipts
One of the most common questions we receive in support is how to customize the email receipts sent by Chargent from Salesforce when a payment transaction is successful. You can easily update these emails and customize them.
To do this, click on the gear icon and choose “Setup.” Type “Classic Email Templates” in the Quick Find and select. If we go to Customer Receipt and click “Edit,” it allows us to customize the email that goes to the customer for a receipt. So, you can either remove some of this information, whether it’s the merchant or the description, or if you have specific custom fields, you can go ahead and add those merge fields to the template.
When you select an object that is related to the transaction object, it will give you the merge field to copy and and paste into the template. Now that field will be added to the email template. Once you’re done adding whichever field you want, you can just easily click save, and it’s updated.
Field Mapping Country Mapping
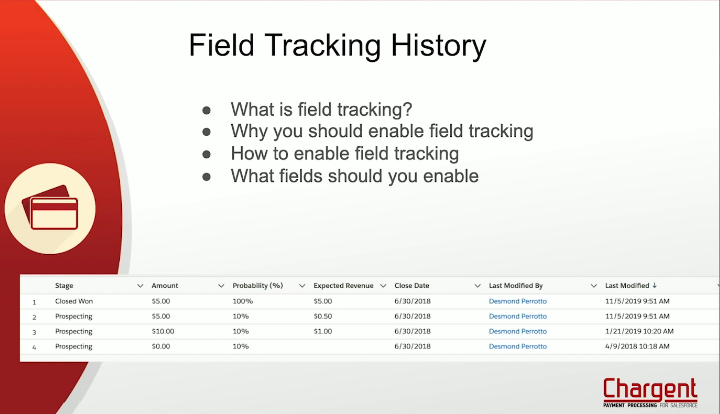
Field Tracking History
Field tracking history is allows you to see a history of what fields were modified on a record. It will also show you who it was modified by, when it was modified, and what the values were prior to the modification,
This Salesforce feature is useful in tracking down issues due to changes in the fields such as when a recurring payment suddenly stops. Something may have happened where somebody accidentally changed the payment start date. You’ll be able to see who changed field values, and when it was changed.
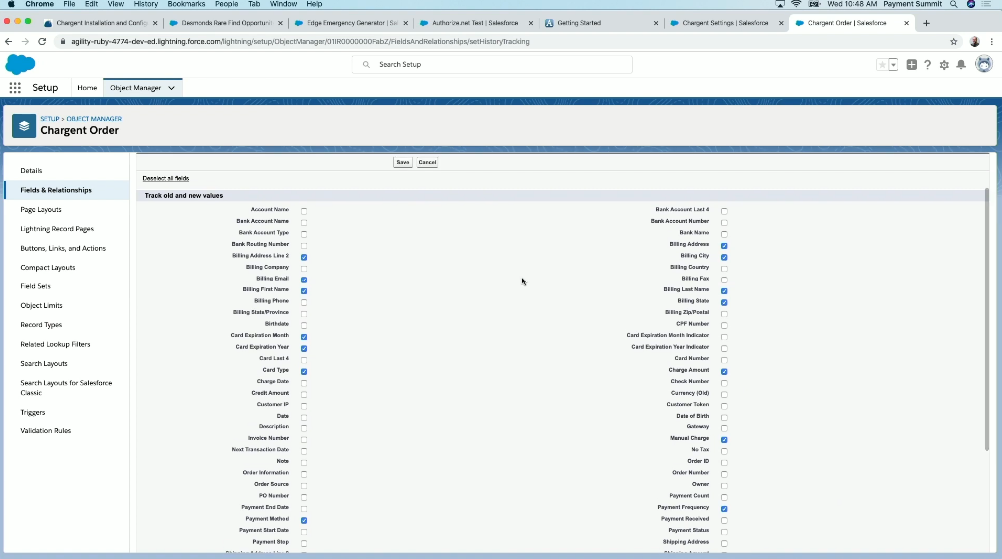
In order to activate History Tracking, you can navigate through Setup and go directly to the Object. Under the Fields Relationships option, you can click on Field Tracking. That will allow you to choose the different fields that you want to track.
Here are some useful fields to track on the Chargent Order object.
- Billing Address, if somebody updated the billing address on a record, that’s useful to know who and when, because if they’ve updated the wrong information and suddenly a payment is declined, then you want to know who changed it, why they changed it, when they changed it.
- The credit card information, The credit card number and expiration date is useful to track to see if it was updated previously. This is also very useful if credit cards start to decline. Maybe the wrong expiration date was entered and the transaction is now failing.
- The Card Type, if they’ve changed it from a Visa to a Mastercard. Payment Method, whether it was changed from credit card to ACH.
- Payment Status is the Recurring status which is always really good to know. If it’s changed from Recurring status it would stop the recurring batch from picking it up for processing.
- Charge Amount field so you can automatically enter in, or you can see who’s updated the Charge Amount. Say a different amount was processed, sent to the gateway, and it appears for $30.00 in Authorize.net, yet your record in Salesforce says $10.00. It’s good to know if somebody updated this field.
- Payment Frequency. If somebody changes Recurring Billing from monthly to annually, or from annually to quarterly, it’s always good to know those things.
Country Mapping
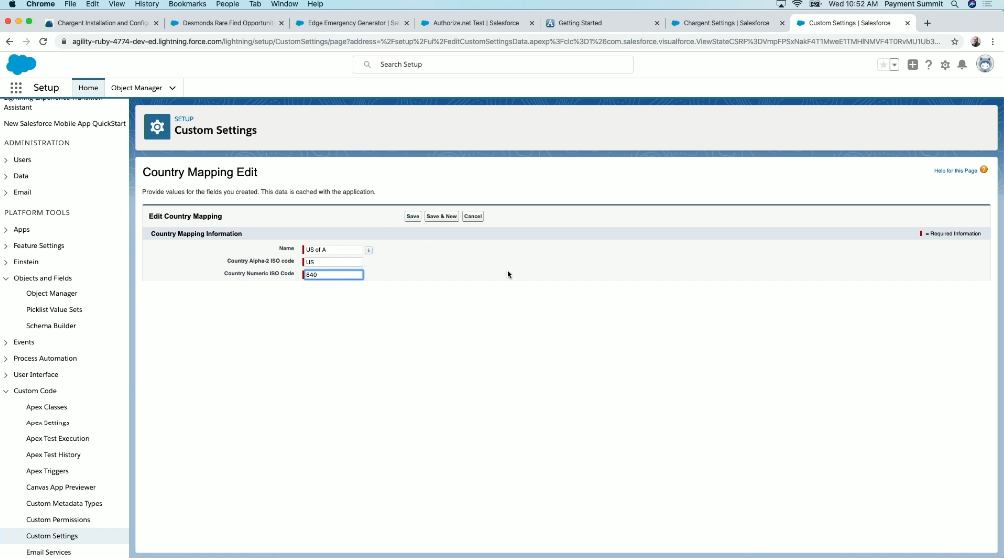
Country mapping is if you have a different name or abbreviation for a country that isn’t in the mapped country codes already. For example, instead of “United States of America”, you want to use “US of A”. You could set the country mapping to send US of A using the correct ISO code.
If you view the existing country code, you could see that the ISO code for the United States is 840. The Alpha-2 ISO code is US. This is what tells you what to send to the gateway. If this number is wrong, then the transaction will fail. If you get an error for the country and determine its the incorrect country mapping, this will allow you to correct it.
To navigate to the Country Mapping tool, go to Setup and search for Custom Settings. You will see the Country Mapping feature with a link to Manage. Here, we have United States of America. If we want to add US of A in there, you can click “New,” Type US of A as the Name. We know that the Alpha-2 code is US, and the Numeric ISO Code is 840. Click Save.
Now, if we submit a transaction record with US of A as the country, it’s going to process correctly using the right ISO codes.