
The Chargent Power User Certification Training video gives you an overview of Chargent and the tools to use the app. It will prepare you to be a Chargent training resource for your team, and go into troubleshooting and best practices.
My name is Don Snider and I’m the Chargent Product Manager at AppFrontier. I’ve been with the company for just over a year, and have worked in the Salesforce space since about 2012, much of that with the founders of this company.
My first goal for this training is to equip you with all-around Chargent User know-how. If your company has installed and configured Chargent, or if you’ve just joined a company who uses Chargent, this training will leave you comfortable with and capable of using our app.
My second goal is to prepare you to be a Chargent User training resource for your team.
If you attended our Chargent Admin Certification trainings from this morning, some of this will be already fresh in your mind and you’ll leave this summit with 2 certifications. Good on you for being overachievers!
This slide deck is going to be text-heavy because it provides step-by-step instructions for each section, and I will provide it to you as a reference document after the course. (It will be emailed).

Our agenda for today is as follows:
- Chargent: The Big Picture (things to know about Chargent before we delve in)
- ERD
- Security
- Gateways
- Chargent Anywhere
- The Basics
- One-time Payments
- Recurring Payments
- Refunds vs. Voids
- Working without Chargent Anywhere
- The Not-So-basics
- Authorizations
- Partial Refunds
- Payment Request
- Troubleshooting
- Declined. What now?
- Where’s my Payment Request link?
This is not at all the TOTAL ERD for our application. For instance, we have objects for Payment Request and Gateways. But for the sake of becoming a power user, these are the two major objects that you’ll be interacting with.
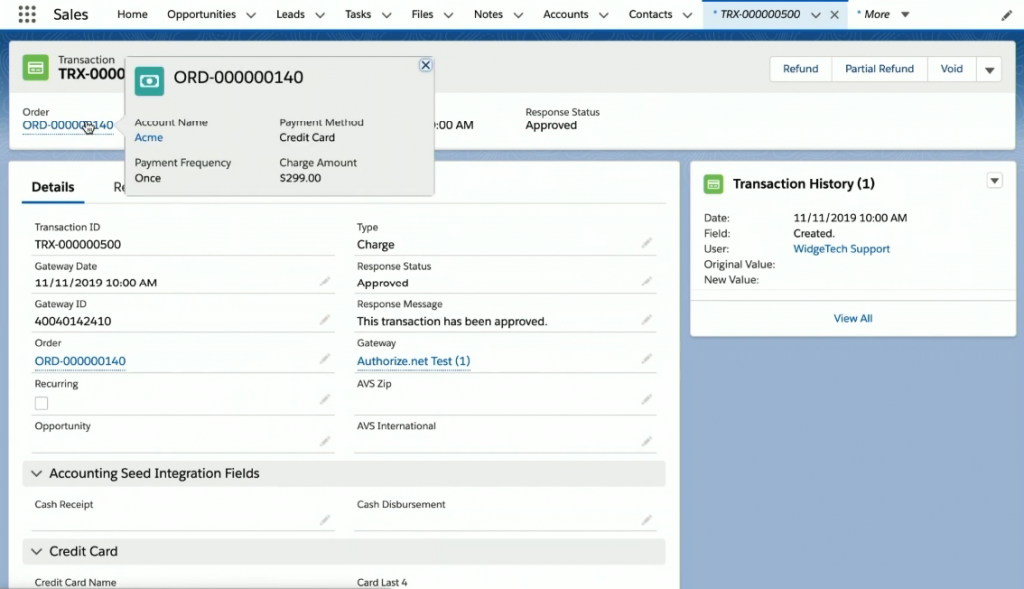
The Chargent Order object is the meat and potatoes, so to speak. This object is less of an “Order” and more of a “Payment Profile.” This is the object where the payment details live, as well as billing / shipping addresses, recurring payment details, and level 2 3 data.
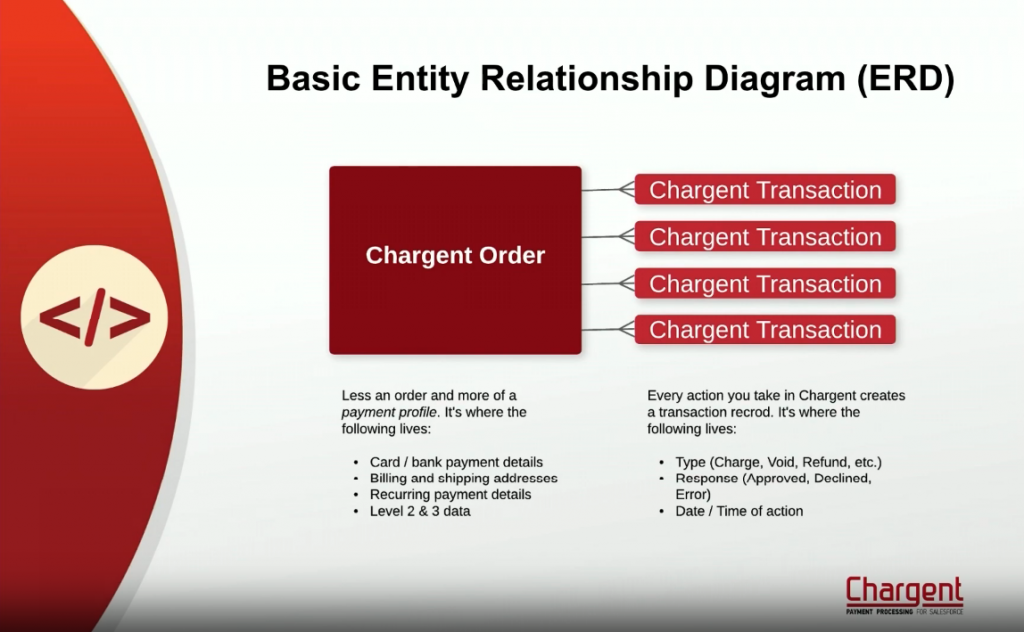
Chargent Transactions is the child object of Chargent Orders. Every action you take in Chargent creates a Transaction record. This object is where you’ll find:
- The transaction Type: Charge, Void, Refund,
- Response: Approved, Declined, Error. This is from the gateway and essentially indicates whether your transaction was a success.
- Date / Time of the action: When was this payment completed?
Again, there are more objects in the Chargent app, but these are the two that you, as a user, will interact with the most.
As a Chargent user, you and your team might be asked by a customer to assure them that the transaction is secure. Here are some key points to keep in mind regarding Chargent and the security of your company and customers:
- Chargent is as secure as your Salesforce.com org. This is because Chargent code is 100% Salesforce native. Transactions are processed from your org directly to your payment gateway.
- Chargent tokenizes payment data, which means that you don’t have to store card or bank numbers in your org at all. While this is an option that your admin controls, it is also an industry standard that we highly encourage using.
- Our Payment Console allows you to process a payment entirely in memory so that no payment details are stored in your org, even temporarily.
- For an added level of security, your customers can enter their payment details themselves by using our Payment Request feature. This means that your customers’ payment data is revealed to nobody at your company during or after the payment is made.
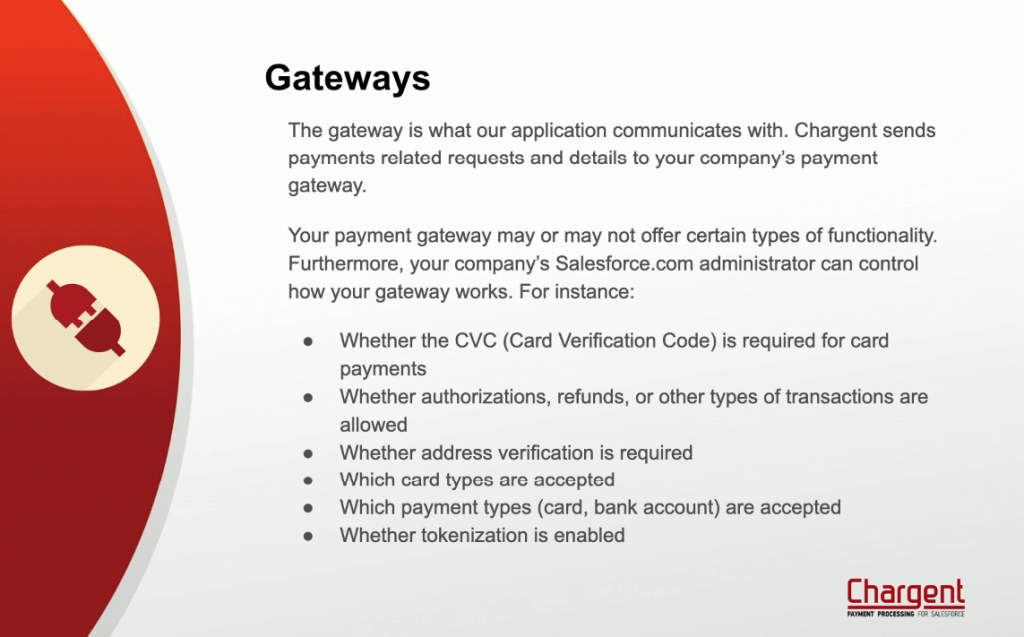
The gateway is what our application communicates with. Chargent sends payments related requests and details to your company’s payment gateway. As a Chargent user, you won’t be interacting much with the gateway settings, but it’s important to know how your gateway has been configured as it dictates certain functions and features. For instance:
- Whether the CVC ( Card Verification Code) is required for card payments
- Whether authorizations, refunds, or other types of transactions are allowed
- Whether address verification is required
- Which card types are accepted
- Which payment types (card, bank account) are accepted
- Whether tokenization is enabled
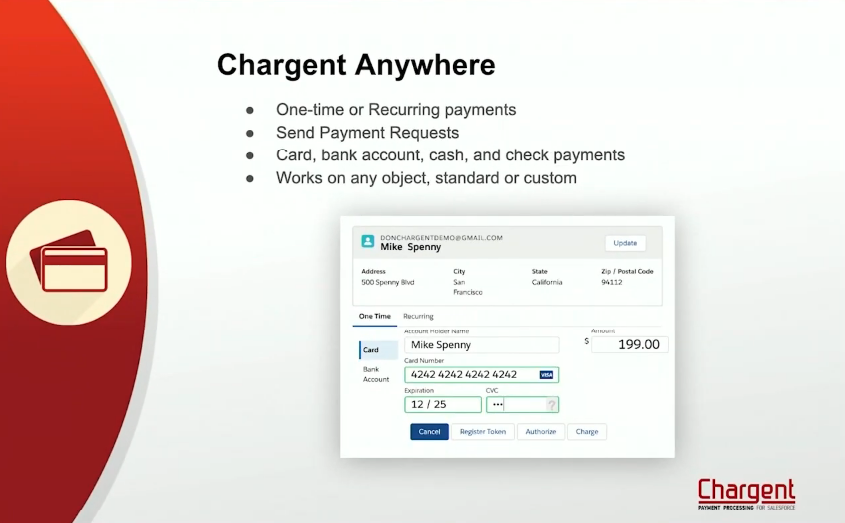
Chargent Anywhere is our Lightning Component that facilitates our most popular Chargent functionality on any object in your org. Instead of having to navigate back and forth between objects, Chargent Anywhere allows you to process payments from the objects you and your team are already working in. I’m talking about it in the Big Picture section of this training because it’s the quickest and most efficient way to use Chargent.
For the Big Picture view, here are the key points of Chargent Anywhere:
- Supports one-time or recurring payments
- Can be used to send a Payment Request to your customers
- Can be used to process card, bank account, cash, and check payments
- Can be configured on and used from any Salesforce object, including custom objects
- Can be configured on more than one object at a time, and have unique settings per object
We’ll be getting into the usage details of Chargent Anywhere later in this training, but if you find that you’re using Chargent at your company and you notice that you and your team are bouncing back and forth between objects anytime you need to collect a payment, it’s probably worth asking your admin to configure Chargent Anywhere on those objects you’re working in.
One-time payments are just that; a payment that you collect just once. This can be done a number of ways in Chargent, but we’ll start with (and focus on) taking the payment using Chargent Anywhere. These slides will lay out the basic steps, and I’ll demonstrate each transaction for you.
- From the object on which Chargent Anywhere is configured, click, the [Payment Console] button
- Choose the “One Time” tab above the payment form
- Choose the payment method on the left. For this demonstration, I’ll be using “Card”
- Enter the Payment Details in the payment form
- Note that Chargent does field validation work in the background and lets you know when you’ve entered an invalid card number, EXP, CVC
- Enter / edit the “Amount” field if needed
- Click the [Charge] button
We’ve submitted a one-time payment and received a “Success” message, letting us know that the payment went through. What’s the result? Which records were created?
As described in the ERD shown before, our payment has resulted in the creation of a Chargent Order record and a Chargent Transaction record.
Let’s take a look at these records.
Instead of the credit card number sitting around in the org, visible to anyone who has access to that record, we see a token. If we take further payments from this Order record, they’ll use that token instead of requiring the re-entering of a credit card number.
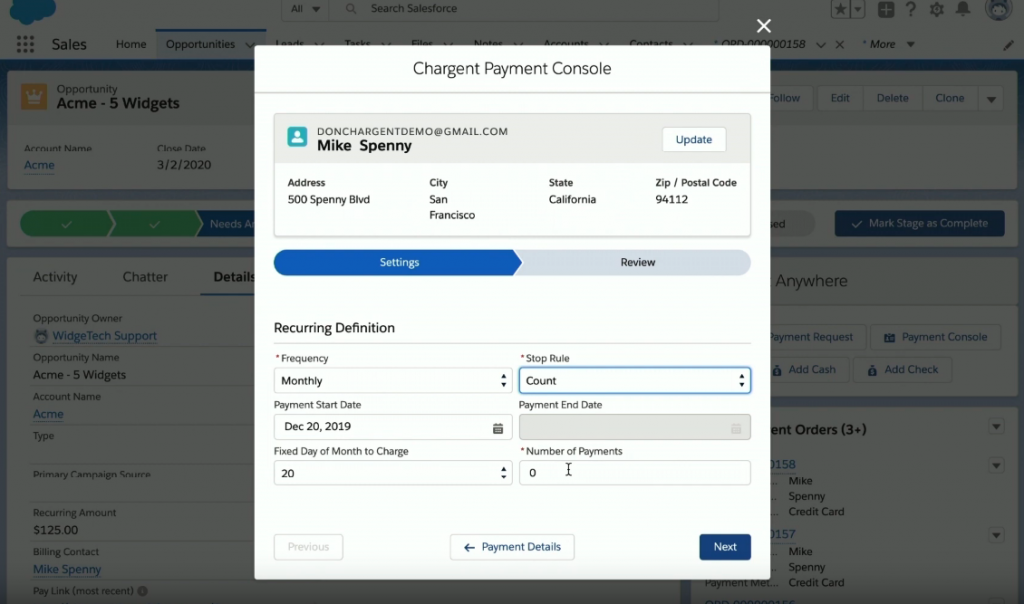
Recurring payments are payments that are set to occur on a scheduled basis. Subscriptions and installment payment plans fall into this category.
- From the object on which Chargent Anywhere is configured, click, the [Payment Console] button
- Choose the “Recurring” tab above the payment form
- Choose the payment method on the left. For this demonstration, I’ll be using “Card”
- Enter the Payment Details in the payment form
- Note that Chargent does field validation work in the background and lets you know when you’ve entered an invalid card number, EXP, CVC
- Enter / edit the “Amount” and “Recurring Amount” fields if needed
- Click the [Next] button
- Select the Frequency from the picklist
- Select the Payment Start Date from the calendar
- This is the date of the payment that will occur AFTER today’s payment. If the Frequency is monthly, this date would typically be a month away from today
- Select the Stop Rule from the picklist
- Selecting “Date” will enable the “Payment End Date” field
- Selecting “Count” will enable the “Number of Payments” field
- Click the [Next] button
The next page shows a summary of the Recurring Payment options you’ve chosen, as well as what the next 6 months of payments will look like. Once you’ve confirmed that the schedule and options are correct, click the [Charge One Time Amount ($x.xx) and Start Recurring Billing] button.

Voids and refunds have a similar effect, but are not the same thing.
A Void cancels a transaction prior to settling at the payment gateway. In Salesforce, it simply changes the Transaction Type from Charge or Authorize to Void. Voids are typically allowed for up to 24 hours after a transaction has been submitted.
A Refund returns the funds from a transaction that has previously settled at the payment gateway within the allowable window for credits (typically 60-120 days). In Salesforce, it creates a new Transaction record with Type=Refund and a negative amount.
Use a Void when you’ve submitted a payment, but quickly realize an error. A refund is appropriate when the allowed period for Voids has passed. A voided transaction will typically disappear from a customer’s credit/debit account statement within 24 hours, while a refund may take 3 to 5 business days.
What is an authorization?
An authorization is an approval from a bank or card issuer that the customer has sufficient funds to cover the cost of the transaction. A typical use-case for an authorization is:
- Customer buys an item or service
- Company authorizes for the amount of that item or service, but hasn’t yet delivered or provided it
In this scenario, the company would authorize for the amount, but not charge against that authorization until the item is delivered or the service is provided.
Authorizations can be done through Chargent Anywhere, and those authorizations can be later Charged or Voided from Chargent Anywhere. Let’s take a look at how that works.
A Partial Refund means just what the name suggests; it’s a refund, but not for the full amount originally charged.
A common scenario where Partial Refunds come into play is:
- Customer requests on-site service
- Company charges the customer based on what the service will most likely cost
- On-site service technician makes the visit and discovers that the issue is minor and won’t cost as much as originally thought
- Company issues a partial refund for the difference
Partial Refunds must be done from the Transaction record itself. Let’s see what that looks like. You won’t be able to perform a partial refund as all your transactions are less than 24 hours.
You learned earlier during the Security section of this training that our Payment Request feature provides an additional layer of protection for your customers. This feature also adds convenience as itt reduces the chances of input error, and it allows your customers to make a payment without having to take time out of their day to make a phone call, initiate a chat, or send an email.
To send a Payment Request from Chargent Anywhere:
- Click the [Send Payment Request] button
- Select the Contact from the “Contact” field
- You may search if the list doesn’t populate
- You may also enter an email address manually in the “Recipient Email Address” field
- Enter or edit the Request Amount
- Enter notes (if needed)
- Click the [Send Request] button
The result is an email that is sent to that contact that includes your note and a link that, when clicked, takes them to a secure Salesforce Sites page where they can enter their billing details and submit the payment themselves. Let’s see how that works.
Troubleshooting a failed payment in Chargent begins with learning why it failed. Some of the most common reasons are:
- Invalid Card Number
- Invalid or Incomplete AVS (Address Verification System)
- Invalid CVC (Card Verification Code)
The Chargent app is designed to reliably convey the reason for a declined payment. Upon the initial submission of a payment, a pop-up message will indicate whether the payment succeeded. In cases where the payment is declined, that pop-up message will convey just that, but you’ll also find the decline details in the “Response Status” and “Response Message” fields on the Transaction record.
Let’s take a look at those fields.
A common troubleshooting issue involves a customer who hasn’t received their Payment Request email. This can happen for a number of reasons, including:
- The customer has changed their email address
- The Payment Request email landed in their spam folder
If a customer is unable to track down the original Payment Request email, you have a couple of options:
- Manually copy the Payment Request link and email it to the customer directly
- Send a new Payment Request email
- Be sure to correct the email address on their Contact record first, or use the “Recipient Email Address” field for manual entry of their Email Address
The Payments industry is closely regulated as it impacts the security of your company and your customers. As such, it is important that you always operate in a way that is considerate of that security. Here are some best practices to remember:
When a customer cannot find their Payment Request email and you need to create a new one, do so from the original Chargent Order record to prevent unused records from littering your org
Never enter credit card or bank account numbers into fields other than those explicitly used for that data. Tokenization works on those specific fields in our payment forms and objects
If your customer has a recurring Chargent Order that charges, and you need to collect a one-time payment that doesn’t have anything to do with that recurring order, it’s best to create a new order for that one-time payment.